Introduction to Digital
Stroboscopic Motion photography
School of Photographic Arts and Sciences
Rochester Institute of Technology
Stroboscopic
photography for depicting the changing features
of subjects in motion is a technique that was enabled and popularized
by one of
the "fathers" of high speed photography, Harold "Doc"
Edgerton. He applied this technique to numerous situations where a
still
camera, in a single shot, did not capture enough information about a
subject in
motion and where a motion picture camera record was unsuitable for
being
reproduced on the printed page.
Photographers use two types of stroboscopes. The first, and most popular, is nothing more than a flashing light source. This is the kind that Doc Edgerton popularized.
There is also a
cheaper, simpler, mechanical alternative.
This consists of nothing more complicated than a rotating disk with a
slot cut
into it. With every rotation of the disc we are able to glimpse the
position of
the subject at the time the slot passes in front of our eyes. In either
case, a
stroboscope allows us to view a subject on a periodic basis.
Photographers have generally used a flashing light, a stroboscopic light source, to illuminate a moving subject in order to track the subject position over time. This is accomplished by setting up an action situation if front of the camera generally firmly attached to a tripod, opening the shutter of the camera while the subject is moving and the stroboscope flashing and after a while closing the shutter and terminating the exposure.
When engaged in stroboscopic photography generally one is interested in photographing relatively long duration events (even though one may only be talking about a second or two!) because it is really pointless to make a stroboscopic record while only recording the subject in only one, two or three positions over time!
For example, to make a record of a golf swing or something similar, we would be looking to make a record over a time period of a second or so. During that time we might want to record our subject in maybe 20 to 100 different positions. This, of course would require a strobe flashing at a frequency of 20 to 100 flashes per second if we kept the shutter open for a second.
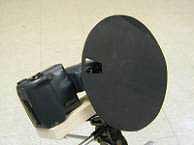
I also attached
my
home-made mechanical, rotating disk type,
stroboscope to a Nikon 990 Coolpix camera and used an exposure time of
one
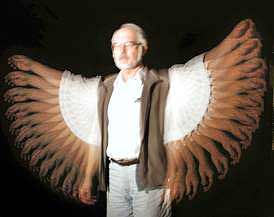
second to obtain the photograph shown below. I stood against a large,
black,
velvet background. The lighting level was adjusted so that the results
obtained
were of an acceptable quality by making a few preliminary tests and
judging the
quality of the images on the LCD display screen of the camera. Very
convenient
and effective!
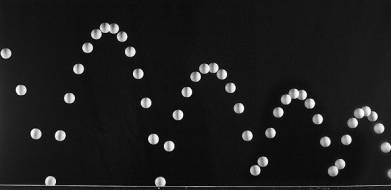
By the way, from this example made over a period of 1 second, the camera recorded about 15 separate images of my action. From this it can be determined that the mechanical stroboscope's disc was turning at about 15 revolutions per second.
 If one leaves the shutter for too long the
sequential images will start to overlap until a point is reached that
they all
blend into a uniform "blur" and the specific position of the subject
at any given time can no longer be
perceived. If one is interested in motion detail then, one can move the
image
across the CCD by panning the camera while the mechanical stroboscopic
disk
rapidly rotates in front of the camera's lens and the subject performs
in front
of the camera.
If one leaves the shutter for too long the
sequential images will start to overlap until a point is reached that
they all
blend into a uniform "blur" and the specific position of the subject
at any given time can no longer be
perceived. If one is interested in motion detail then, one can move the
image
across the CCD by panning the camera while the mechanical stroboscopic
disk
rapidly rotates in front of the camera's lens and the subject performs
in front
of the camera.
A major drawback of this technique is that the field of view of the camera (over time) is now very wide and the surrounding studio equipment may be seen within the angle of coverage of the camera as it is panned from side to side and this will make these items appear to "bleed through" the subject's image.
To deal with this difficulty I would suggest that the camera be simply surrounded by a curtain of black velvet set up in such a manner that there is a small open slot located between the camera, rotating on a tripod, and the subject. This way the camera will be prevented from seeing and recording anything but that which is available to it through the gap or slot in the curtain. This provides a "ghost" free final record although superimposition of certain parts of the moving subject is still a possibility. This often just adds to the fluidity of the final motion record.
Since one is limited in the size of the camera's sensor the total number of images that one can clearly record depends on how small one is prepared to allow the subject to be within the frame of the camera. The smaller the image size one can tolerate the larger the time over which one can "track" the subject or the number separate images of the subject that can be placed from one side of the frame to the other.
The stroboscope that was used for the photographs shown in this article was a self-built piece of equipment. It had the capability of “flashing” (actually turning) up to 20 times a second. For image capture the camera that was used was a Nikon CoolPix 990, with the set camera on manual, the lens set to the widest aperture, the exposure time set to 4 seconds and it was rotated by hand. The illustrations in this article were downloaded from the camera and adjusted in Photoshop 6.0 for final presentation.

Mechanical
Stroboscope Construction Instructions
To make a
mechanical stroboscope as described and applied in this article you
will need:
One plastic
gear or other item that attaches to motor shaft
Sheet of
black construction paper
Battery
connectors
About 6x9
inches of 1/2 or 3/4 inch plywood
or pine
One 1/4 by 20
threaded “T” nut (3/8 or 7/8 depending on wood)
One 1/4 x 20 threaded
bolt to reach through
wood
One piece of
stiff board
2.
Cut a slot near its edge about the length
of diameter of the lens you will be using on your camera and about 10
degrees
in width.
3.
Line up camera next to one edge of wooden
board and noting where the tripod thread on camera body is mark and
then drill
a 1/4 inch diameter hole in the wood so camera mounts with through-bolt
from
bottom of board. The camera lens front should approximately line up
with the
other side of the board.
4.
Mark and then drill another hole in wood
(5/8 in diameter) so T-nut can be pounded in and fastened to the board
from the
camera side. This allows fastening the wooden camera platform to a
tripod
securely.
5.
Prepare a small piece of stiff
cardboard by cutting a hole in it
so it fits the body of the electric motor and glue the motor with epoxy
glue to
the board as shown in illustration.
6.
Attach the paper disk to whatever device
or item you purchased that fit
snugly onto the motor’s shaft and which had a large flange on one end.
Such as a plastic gear.
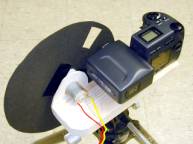
7. With camera attached to the supporting wooden platform align the motor carrying cardboard along the front edge of the board so that the slot in the disk passes in front of the camera’s lens as it makes a revolution and fasten it to the wood using flat headed thumbtacks.
8. Attach the battery connector to the motor.
There
is a more recent article that describes the making of this disc
stroboscope from another angle.