|
Building
and Calibrating a Mechanical Stroboscope
Andrew Davidhazy Imaging and Photo Technology School of Photo Arts and Sciences / RIT back to the main articles page Some years back I was asked by a middle school student if I could suggest a topic she might present at a local science fair. This took me a bit off guard but ultimately I suggested she might do some experimentation with stroboscopes. She then asked me about the price of such an instrument. I had not thought about that but I quickly realized that she was in no position to invest the kind of funds that a scientific stroboscope would require. In fact, even some of the small party-type stroboscopes were probably out of her reach. After considering her request more carefully I suggested she look into what I called a "mechanical" stroboscope as opposed to the flashing light kind of device I thought of at the beginning. I gave her some general pointers on how to accomplish the task and she took it from there and had a successful science fair presentation. Later on I decided to explore the making and applying of the device myself and that is where this article had its origin. Mechanical stroboscopes are nothing really new. But they are, in my opinion, quite underrated in their potential for application in the science or photography classroom. Mechanical stroboscopes mimic the flashing light kind of stroboscope by periodically interrupting the light reaching our eyes or passing through into a camera's lens. Concentrating our attention in the use of one of these devices they accomplish the interruption of light into the camera's lens by whirling a lightweight disc with a radial slot cut into its edge so that as the disc turns the slot passes by the camera lens once with each revolution of the disc. That is the principle. So how does one go about making such a whirling disc and what can one do with it once built? Well, this is probably best explained by the following illustration and the text below. 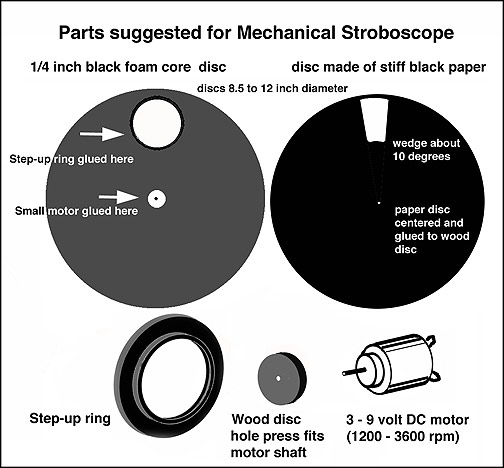 The idea is that once attached to the stiff foam core disc you should be able to attach the disc to the front of your camera's lens. At the center of this disc you should make another small hole to accommodate the small 3 to 9 volt DC motor that will drive the stiff paper disc into which you should cut a wedge of about 5 to 10 degrees in size as shown in the illustration. This paper disc is first glued to a small wooden disc into which there is drilled a hole that press fits over the shat of the motor. The motor itself is driven by a connection to a pair of 1.5 volt batteries, a 9 volt battery or a battery eliminator device that provides various voltages. This latter approach will allow you to turn the stroboscope at various speeds. You can also experiment with some kind of rheostat to control the battery eliminator for even finer speed control. The connector itself can be found at electronic supply stores and is sometimes referred to as a 9 volt battery "clip". There you would also find battery holders that hold 2, 4, 6 or 8 1.5 volt batteries with the same connector already installed so then it is a simple matter to "clip" the two together and power the motor at various voltages. 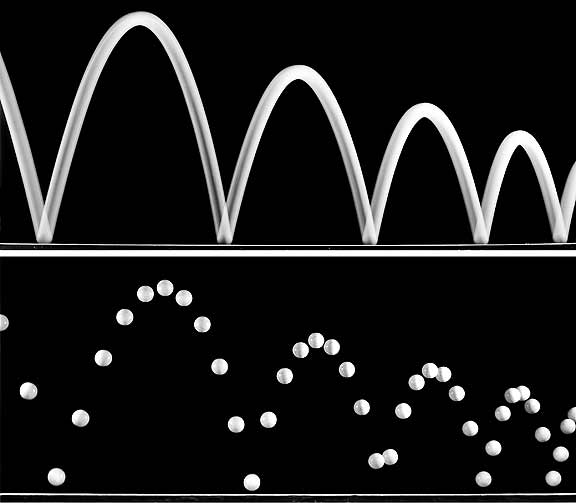 Now we put
the stroboscope to use. At first we'll photograph a fairly
mundane object such as a bouncing Ping-Pong ball. The first photograph
will be made with the ball traveling through space while the shutter of
the camera is kept open for the time it takes the ball to complete its
travel across a table top. This would be done against a very dark
backdrop and with a camera capable of keeping its shutter open for some
desired time or at least for a few seconds. Now we put
the stroboscope to use. At first we'll photograph a fairly
mundane object such as a bouncing Ping-Pong ball. The first photograph
will be made with the ball traveling through space while the shutter of
the camera is kept open for the time it takes the ball to complete its
travel across a table top. This would be done against a very dark
backdrop and with a camera capable of keeping its shutter open for some
desired time or at least for a few seconds. The most desirable background would be one of high quality black velvet. In addition to this the lights used to illuminate the subject should generally come from the side and be masked so that as little light as possible from the lights falls on the background. The reason for this is that the photographs you make will be made over a relatively long period of time and the background will be building up brightness during all that time while the moving subject will be exposed in various locations. Getting back to the ball. At first the camera is not used with the stroboscope located in front of its lens. The ball is bounced across the field of view of the camera. The result of this first exposure should show a blurred flight at of the ball as it travels through space and leaves a trace of its position over time. As seen in the top illustration. For the next photograph, the stroboscope, powered by maybe a 9v battery, is installed in front of the camera's lens. The disk with the slot in it will start to spin and with each rotation the moving slot will allow a "flash" of light to pass through to the lens. The light level on the ball probably will need to be increased some or the sensor speed of the camera adjusted for more sensitivity in order to capture enough light passing through the moving slot to be able to satisfactorily record the instantaneous position of the Ping-Pong ball as we again make it bounce across the field of view of the camera. This time the result should show the continuous blur recorded in the first instance but as a series of still images of the ball. The distance between consecutive positions of the ball is an indication of the fact the ball is not always moving at the same speed but rather, as it falls it picks up speed and as it rises its speed diminishes. If we wished to actually find out what the speed of the ball was we'd need to know what the time interval was between consecutive positions of the ball plus the distance between these positions. The distance can be determined fairly easily by measuring the distance in terms of diameters of the ball. If we measure the ball to be 30mm in diameter and we find that between two consecutive locations of the ball there are three diameters worth of space then we determine that the ball traveled 3x30mm or 90 mm between those positions and so on. 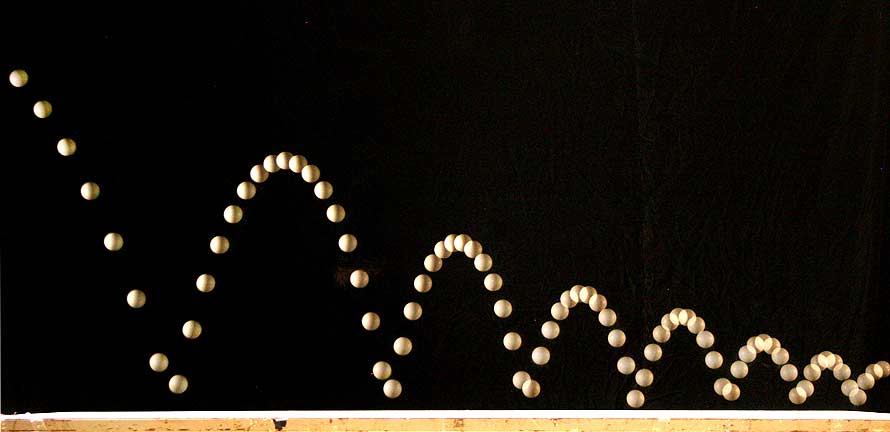
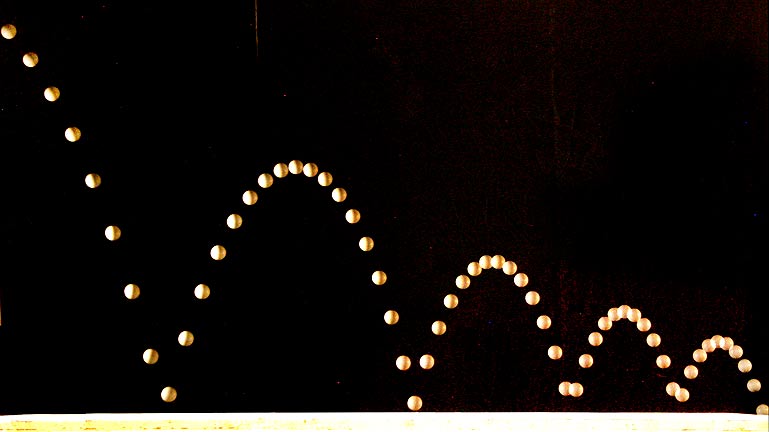
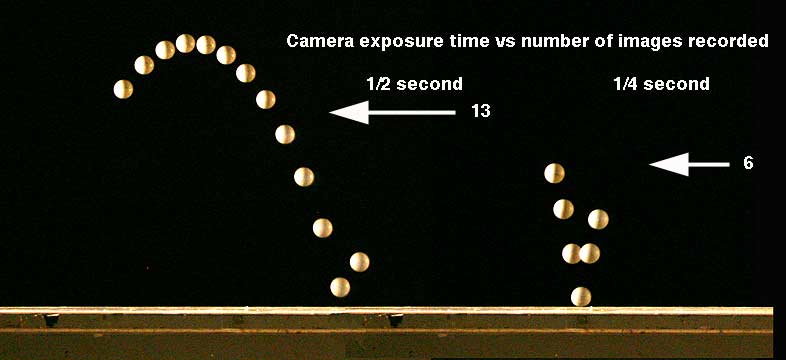
But now, in order to determine the actual average rate that the ball was moving at beween positions we need to know how much time elapsed between stroboscopic exposures. To determine this we need to calibrate the rotating disc. There are complicated methods to calibrate the stroboscope and then there are simpler methods to do it as well. I would suggest that the camera that will be used with the stroboscope can shed light into the rotational frequency of the disc. This is the case because camera manufacturers take precautions to make sure the shutter of the camera delivers fairly accurate exposure times. So, if we set 1 second on the camera shutter we should reliably expect the shutter to stay open for one second. Now all we need to do is to make a photograph of something in motion, a ping pong ball bouncing along against a black background comes to mind, could be photographed during a one second (or other) exposure time. Then all we need to do is to make sure that the images of the ball do not extend beyond the edges of the image frame and then count the number of images of the ball that appear in the picture. That is the number of times that the disc turned in front of the camera lens while the shutter was open for one second. Thus that number of images per second is also the rotational frequency of the disc and the image acquisition rate of the stroboscope. 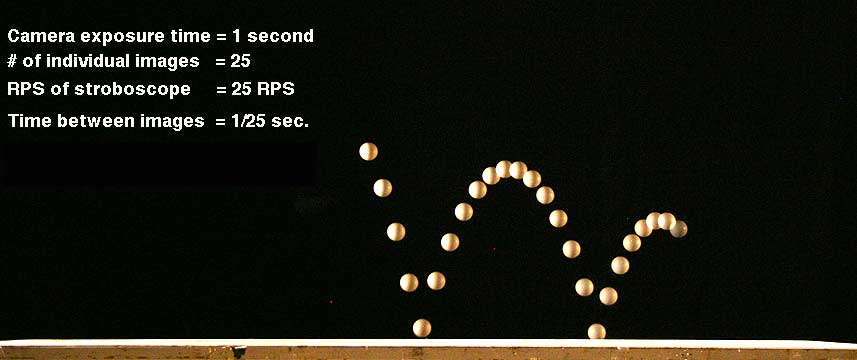 This calibration step can be done at just
about any exposure time but the longer times tend to yield more
accurate
results. Below you can see two additional sets of images made at
different exposure times but both providing reasonably similar results
in terms of the rotational frequency of the disc. In the instance at
left there are 13 images seen in 1/2 second and thus that would be 26
per second. On the right the number of images is 6 but in 1/4 second
and so the frequency ifs 6 in 1/4 second or 24 rotations per second.
  What remains to
be done with this kind of stroboscope? Well,
it could be put to more interesting uses than photographing Ping-Pong
balls. It could be used to photograph people in motion for example.
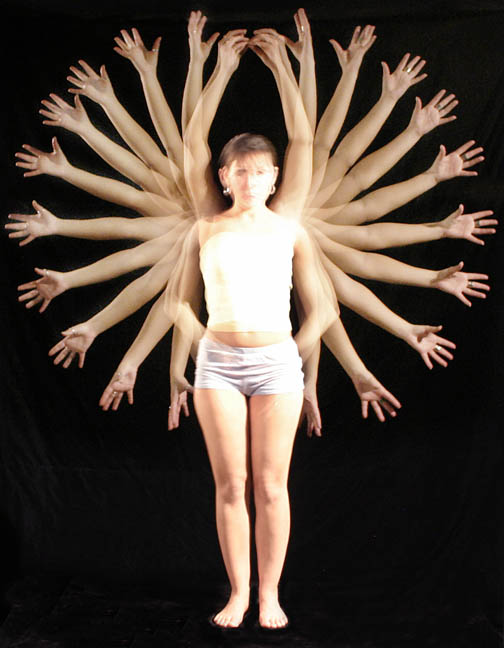
This is illustrated in the photograph below. This is the result of the
model holding her hands above her head an dropping them to her side the
instant she heard the shutter of the camera open. What remains to
be done with this kind of stroboscope? Well,
it could be put to more interesting uses than photographing Ping-Pong
balls. It could be used to photograph people in motion for example.
This is illustrated in the photograph below. This is the result of the
model holding her hands above her head an dropping them to her side the
instant she heard the shutter of the camera open. There are many subjects that lend themselves for stroboscopic studies. This mechanical version can be a powerful tool not only as a device that enables you to make interesting creative and artistic images but one that also allows you to make measurements and determinations of subject performance. Further, a mechanical stroboscope as described in this article has certain advantages over the flashing light kind. For one it lends itself to be used under daylight conditions. The flashing light kind of stroboscope generally is only suited for illuminating relatively small subjects. The mechanical stroboscope is relatively cheap to construct and to calibrate. It takes a little more ingenuity to use it possibly but the amount of learning is probably greater than with any instrument where all you have to do is to push a button. A mechanical stroboscope encourages thinking and problem solving. 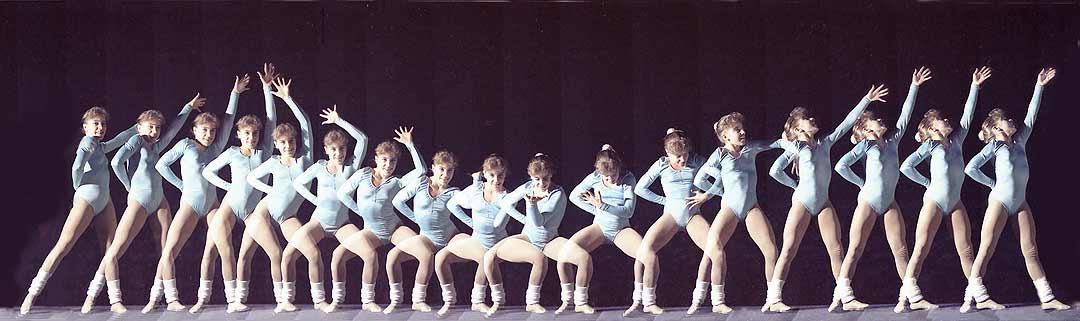 
 So now go out there and have some stroboscopic fun. Find applications that have not been mentioned in this brief introductory article. There are a couple of other articles devoted to stroboscopic photography based on using film or digital cameras. Find them at these links: Simplified Stroboscopic System for Motion Pattern photography http://www.davidhazy.org/andpph/text-stroboscope.htmland a second one at
Introduction to Digital Stroboscopic Motion photography http://www.davidhazy.org/andpph/text-digital-stroboscopy.htmlIf you have any questions
about the material mentioned here feel free to write to me at
|