Teaching High Speed Photography and Photo-instrumentation
Andrew Davidhazy
Imaging and Photographic Technology Department
School of Photographic Arts and Sciences
Rochester Institute of Technology
70 Lomb Memorial Drive, Rochester, NY 14623
ABSTRACT
As the tools available to the high speed photographer have become more powerful the underlying technology has increased in complexity and often is beyond the reach of most practitioners in terms of in-the-field troubleshooting or adaptation and this specialization has also driven many systems beyond the reach of high school, community college and undergraduate, non-research funded, universities. In spite of this and with the belief that fundamental techniques, reasoning and approaches have not changed much over the years, several courses in photo-instrumentation at the Imaging and Photographic Technology program at the Rochester Institute of Technology present to a couple dozen undergraduate students a year the principles associated with a various imaging systems and techniques for visualization and data analysis of high speed or “invisible” phenomena.
This paper reviews the objectives and philosophy of these courses in the context of a total imaging technology education. It describes and illustrates current topics included in the program. In brief, calibration and time measurement concepts, instantaneous and repetitive time sampling equipment, various visualization technologies, strip and streak cameras and applications using film and improvised digital recorders, basic velocimetry techniques including sensitometric velocimetry and synchro-ballistic photography plus other related techniques are introduced to undergraduate students.
Keywords: High speed, photography, education, photo-instrumentation, imaging technology, streak, digital, ballistic photography, photofinish.
IMAGING AND PHOTOGRAPHIC TECHNOLOGY
The Imaging and Photographic Technology program at RIT program was designed in the early 1980s to cater to a small (select!) group students whose passion would be photography but who wanted an imaging education geared to technical applications instead of art and one that would not be quite as mathematically rigorous as a pure science program might be.
When the program was developed several courses related to the broad field of applied photography and photo-instrumentation were designed and were included in the program requirements. Currently junior and senior students in the are required to complete a course in basic high speed and time lapse photography. This course was described at the ICHSPP meeting in Santa Fe. In addition to this basic course some students elect to enroll in courses such as Non-conventional Imaging and Photo-instrumentation Applications. Both of these courses are designed to provide them with additional overview background of specialized and sophisticated imaging systems and technologies.
Before going further it is worth mentioning that the “classic” projects are some of the major topics of interest to students. The department has a variety of “old fashioned” pieces of high speed photography gear and students are enthralled still by the whine of a high speed motion picture camera reaching its peak framing rate and the sound of high speed electronic flashes (not to speak of the report of a .22 caliber rifle and the explosion of various and sundry fruits and vegetables.

Fig 1. Students learn about the operating principles of rotating-prism motion picture cameras and traditional high speed techniques. A few, as shown by photo taken of Peter Tate at a NASA Gelnn Research Center wind tunnel, secure positions in the photo-instrumentation field where they work with state-of-the-art equipment.

Fig 2. In the photographs above students experience ballistic photography using EG&G 549 Microflash and also Palflash high speed electronic flash units.
One of the major difficulties in teaching state-of-the-art technology is the fact that equipment and systems have become too specialized and expensive for a small, undergraduate, teaching oriented, program to procure. While some instruction could be delivered simply as “book-work” we have a strong belief in the “hands-on” approach and whenever possible teach by example and experiment rather than only by reading about such technologies. Our solution has been to simplify and improvise.
In the photo-instrumentation elective courses students have an opportunity to engage with additional high speed and other applied imaging topics that are considered somewhat more specialized and sophisticated than those included in the required course in High Speed/Time Lapse photography. These topics are described below.
COURSE FORMAT
Photo-instrumentation courses meet for 10 weeks, for 6 hours per week with approximately two to three hours dedicated to an initial discussion or general lecture period where the theory and application of the topic at hand is introduced. This is followed by a 3-4 hour laboratory where specialized or improvised instruments demonstrating the lecture material are put to practical use. The primary objective of these lectures and hand-on experiments is for the students to gain an appreciation for the hardware, the applications and for the data reduction procedures associated with basic high speed and photo-instrumentation techniques and to report their findings in professional quality technical reports.
SELECTED TOPICS PRESENTED
1. Shadowgraph and Schlieren photography. Students learn the principles of shadowgraph and ballistic imaging and put the system to work by participating in an experiment where the velocity of a high speed .22 caliber bullet is determined from the shock wave captured by the shadowgraph system. Single and double pass schlieren systems are described and the students make color photographs of density gradients in stressed glass, sprays, flames, etc. They are also introduced to focusing schlieren systems and get to appreciate the advantages and limitations of this alternative system for visualizing refractive index variations in a subject. As a group they build a system during a lab session.

Fig. 3. Left, bullet velocity determined from shadowgraph of shock wave and, right, transmission schlieren images of hot and cold gases.

Fig 4. Students set-up, on an improvised basis, a focusing schlieren system

Fig. 5. Students learn about and set-up a seldom-seen application of schlieren imaging: reflection schlieren. In center is a combination transmission and reflection schlieren photograph and on right quiescent superheated and freezing liquid surfaces.
1. Electronics as an important side-interest to students contemplating careers in photographic technology. Students are encouraged to consider the value of additional coursework in electronics and circuits by participating in a series of workshops where they build a multiple input synchronizer, time delay and intervalometer “from scratch”. They start by making their own printed circuit board, buying the parts required for the project and finally assembling and testing the final product.

Fig. 6. Students build relatively simple synchronization devices that trigger a flash on the basis of sound or light and also a sophisticated Light, Sound and Dark activated device with delay (and intervalometer) capability. With the latter they photograph the impact of liquids on a surface “ala Edgerton”.
1. While state-of-the-art digital imaging technology is beyond our means we use a scanner converted to a CCD linear array streak camera system to study concepts related to timing, event duration and simultaneity. In addition, several projects related to oscillatory motion are also studied with this low cost digital simulation technique. The idea being that if they can see the potential at low speeds the jump to high speeds should be relatively easy to make.

Fig. 7. The linear CCD array camera improvised from a hand-scanner introduces students to capturing and measuring the (above top) oscillatory motion of springs, (above left) capillary behavior of liquids, (above right) acceleration of falling bodies, and vibrations of many kinds with this improvised but working timing and recording instrument. The camera can function as a stationary array system and is applied to panoramic and peripheral recording situations or as a focal plane scanning camera where it mimics high-end digital imaging systems.
1. Panoramic, peripheral, photofinish and aerial strip cameras and their operating principles along with hands-on projects also form a part of the coursework available to these students.

Fig 8. Hands-on improvised racetrack photofinish photography is demonstrated and practiced in a lab setting.

Fig. 9. Using a Cordin Velocity Recorder camera Model 1, Serial Number 1, acquired inexpensively from government surplus, students use it with makeshift control devices to determine 1/4 peak duration and the delay between the firing of a main flash and a slaved one. Since the camera was obtained without control systems these are devised and improvised during the lab session
1. Velocimetry is a general topic of interest in several projects and beyond those covered in the High Speed/Time Lapse course (including blur based techniques, stroboscopic imaging and streak and synchroballistic photography) projects in tracer based multiple exposure velocimetry and sensitometric velocimetry are also included in the elective course in photo-instrumentation
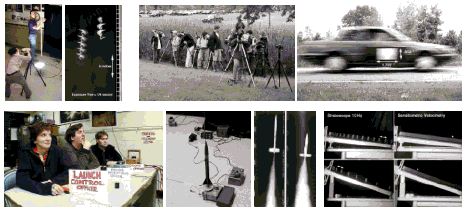
Fig 10. At top left a shutter makes an effective timing device in a project where students determine the rate of fall and rotation of an oak tree samara. In a similar project students double-check the accuracy of a car’s speedometer basing their measurements on blur. In a simulated, but very real, ballistic range setting students determine the velocity of model rockets in free flight using a rotating drum type synchroballistic camera. At bottom right students learn about possibilities afforded by sensitometric methods for velocity determinations based on the density of a moving image contrasted to its density while standing still at a shutter-controlled exposure time or against (in this calibration case) velocity determined with a stroboscope. Where velocities are the same so is density.
1. Photo-instrumentation also covers a few topics not exactly related to high speed photography such as infrared and ultraviolet photography, light scanning photomicrography, underwater photography, principles of aerial photography and mapping, etc.
1. The potential of using a mechanical stroboscope or repeating flash as an industrial visualization or measurement tool is introduced in a general lecture on such techniques. The pioneering work of "Doc" Edgerton is an integral part of this lecture including a demonstration of a "piddler" slowed down with electronic as well as mechanical stroboscopes. Advantages and disadvantages of the stroboscope as a motion analysis tool are covered and applications of multiple images on stationary as well as moving film are described and illustrated. The "problem" of the _dark_ interval between flashes is given particular emphasis.

Fig 11. Often students are unaware that much useful information about subjects in motion can be obtained by making photographs that showing the subject as a blur instead of sharply. They also assume that stroboscopic photography can only be undertaken with flashing lights but in this case they experiment with a rotating disc in front of a digital camera’s lens interrupting the view of the bouncing ping-pong ball at periodic intervals producing a high-tech effect with a low-tech imaging device.

Fig. 12 Students work with a motorized plastic camera whose function it is to simply move the film across the image plane of the camera. In the top example they learn to appreciate the subject tracking possibilities afforded by moving film technology applied to the study of bouncing ping-pong balls and in the bottom illustration they compare the appearance of a series of drops produced by a pump (the Edgerton “piddler”) in continuous illumination vs. intermittent, stroboscopic, illumination.
GRADES AND EXAMINATIONS
Unlike is the normal practice in required courses where course content is more narrowly defined, in these elective courses the emphasis is on self-motivation, inquiry, curiosity, initiative and participation in a dynamic group environment. The technical level of the presentations and the scope of the discussions is significantly above that of required courses. This is justified on the basis that these are, after all, elective courses and as such more is expected of the students. Ultimately the course grade is determined on the basis of the completion in a satisfactory manner of class experiments substantiated by the submission of associated written project reports. The final written exam, covering all the topics of the course, and indeed, some topics that may not have been specifically covered but which the student is expected to be able to deal with based on acquired background, is offered to all students but is not required to pass the course if the reports are of substantial quality. However, the highest course grade can _only_ be earned by opting to take the final exam and turning in an above average performance on this exam.
To give you a taste for what a couple of questions in an exam associated with these courses are like consider these:
The drawing below represents the output from a rotating-drum type streak camera. It depicts two bullets fired from one gun. The film in the camera was moving at a rate of 100 inches per second and the camera magnification was 1/120x. The bullets were fired at a target consisting of two wooden planks.

1. Compared to bullet #2 how fast was bullet #1 traveling before hitting the wood?
1. Bullet #2 was fired 1/100 second after bullet #2. TRUE or FALSE – explain either answer
1. Bullet #2 did not decelerate like bullet #1 did. What is a possible explanation?
In the question below based on a drawing from a photofinish photograph the film in the camera was moving at a rate of 4 inches per second and the operating reduction factor was 1/120X and the lens had a focal length of 5”.
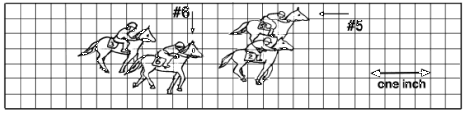
1. By how much time did horse #5 beat horse #6?
1. How fast were the horses moving?
1. In which direction were the horses running?
A photograph of a moving vehicle is made with a focal plane shutter moving from top to bottom in the camera. The original vehicle was moving from left to right. Draw an exaggerated picture (distortion—wise) of the appearance of
the vehicle in the final print.

Answers at end of paper.
CONCLUSION
Students in the Imaging and Photographic Technology program of study at the Rochester Institute of Technology have the opportunity to complete several elective courses that deal with fundamental principles associated with high speed photography and photo-instrumentation. It is recognized that not many will become practicing professionals but the experiences gained in solving problems associated with high speed events, handling simple to sophisticated imaging devices, writing complete technical reports, presenting their findings and experiences to an audience, etc. add a dimension to their studies that serves them well in most any technical imaging field they eventually enter.
BIBLIOGRAPHY
Davidhazy, Andrew; 20th International Congress High Speed Photography and Photonics, SPIE Proceedings, "Some stroboscopic spinoffs in Photographic Technology", 1992, Vol. 1801, pp. 672-676.
Davidhazy, Andrew; Tech Directions Magazine, "There is more to a blur than meets the eye!", Vol. 52, No. 6, January 1993, pp. 13-15.
Davidhazy, Andrew; 24th International Congress High Speed Photography and Photonics, SPIE Proceedings, "High Speed Photography 101", held in Santa Fe, NM from Oct. 26-Nov. 1, 1996.
Davidhazy, Andrew; Tech Directions Magazine, "A Simplified Stroboscopic System for Motion Pattern Photography", Vol. 59, No. 7, February 2000, pp. 12-16.
Answers to first question:
1. Bullet #1 was traveling 2X as fast as #2 before it hit the wood. It covered 5 feet in half the time that #2 did.
2. Most appropriate answer is FALSE as with a DRUM camera the drum could easily have made more than one revolution between firings. Otherwise gun would be firing 100 rounds per second (but only two rounds).
3. Bullet #2 went through the holes that #1 opened up.
Second question:
1. Since 4 inches is 1 second, 1.75 inches (distance from nose of 5 to that of 6) divided by 4 inches per second is equal to .43 seconds.
2. One way to determine this is that since there is no major distortion the images of the horses are moving at about same rate as film or 4 inches per second. Since 1 inch is about 10 feet in real distance, the horses were moving about 40 feet per second.
3. On the track they were moving from right to left.
Third question:
The answer here hinges on realizing that inside the camera the image is upside down so bottom of car interacts with moving shutter slit first so car can move forward in time it takes slot to arrive to its roof.

If you want to send me email my address is andpph@rit.edu.