Andrew Davidhazy
Imaging and Photographic Technology
School of Photo Arts and Sciences / RIT
 Rollout photographs or peripheral photographs assume that one is interested in capturing an image of some
subject so that all of its sides and surface features are included on one flat
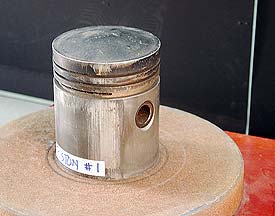
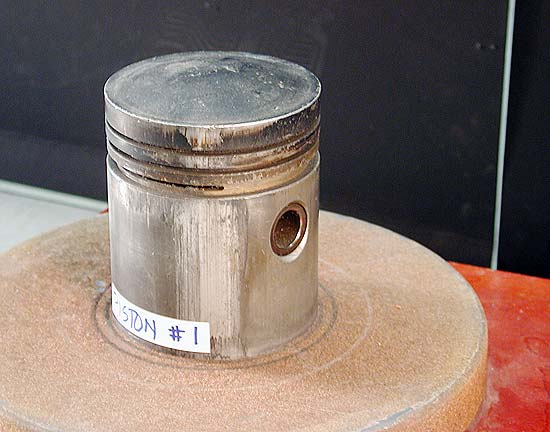
continuous representation or photograph. A typical subject is something like a piston that exhibits
wear on its surface and where it would be desirable to show the wear
pattern. These wear patterns or features can be seen by turning the subject
in front of our eyes and noticing these patterns appearing sequentially as the object is rotated.
Rollout photographs or peripheral photographs assume that one is interested in capturing an image of some
subject so that all of its sides and surface features are included on one flat
continuous representation or photograph. A typical subject is something like a piston that exhibits
wear on its surface and where it would be desirable to show the wear
pattern. These wear patterns or features can be seen by turning the subject
in front of our eyes and noticing these patterns appearing sequentially as the object is rotated.
Normally one would make three, four or more photographs from different points of view around the piston and then have the recipient leaf through the images identifying the problem areas.
A peripheral, or rollout, record allows all defects to be visible at a glance. To make such images a strip camera is normally used. An alternative is to make several 2D records, cut out the central portion of a series of images and then "stitch" them together into a continuous record. Film type strip cameras accomplish all this by recording the moving features of a rotating subject through a slit onto film matched to move at the same rate as the image of the object moves.
Linear array type strip cameras do essentially the same thing but they are quite expensive and for occasional use maybe not the best investment especially if one is willing to tolerate a less than perfection in the final result.
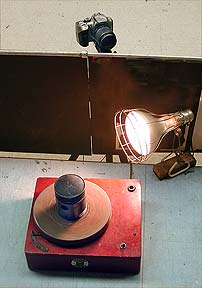
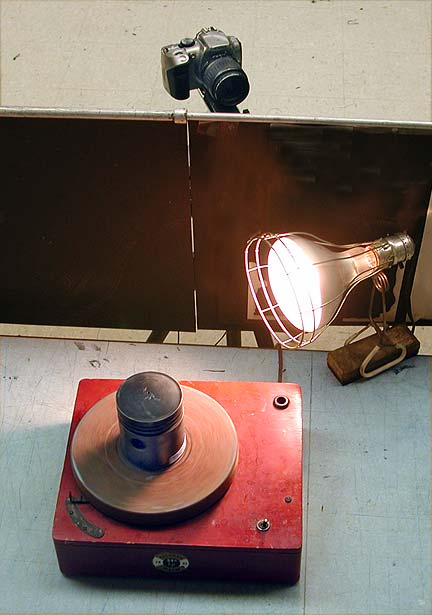
Setting up the "improvised" DSLR based strip photographic system as shown in the illustration allows a photographer to make peripheral records that are probably suitable for most purposes. All one needs is a mask with a slot cut into it and a turntable to rotate the object. A motorized method for turning the camera is useful but not absolutely necessary. It all depends on the degree of perfection desired!
The camera is set up on one side of the black curtain or mask and aligned so that the center of rotation of the turntable falls within the slot in the curtain and the camera/lens combination is rotated about a point that does not cause that center of rotation to move out of the slot as the camera turns.
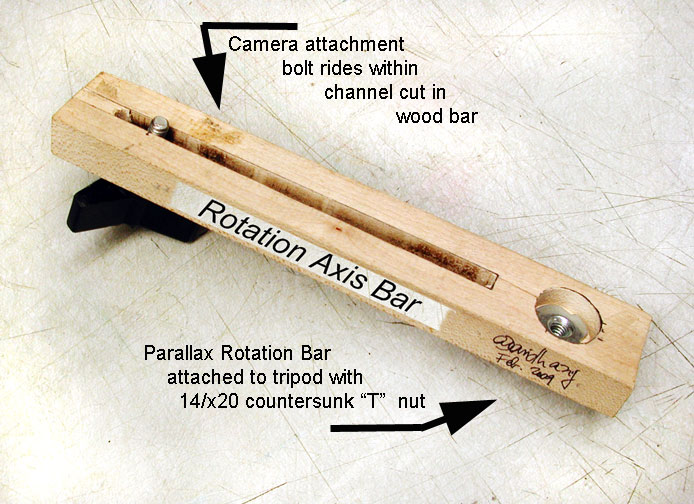
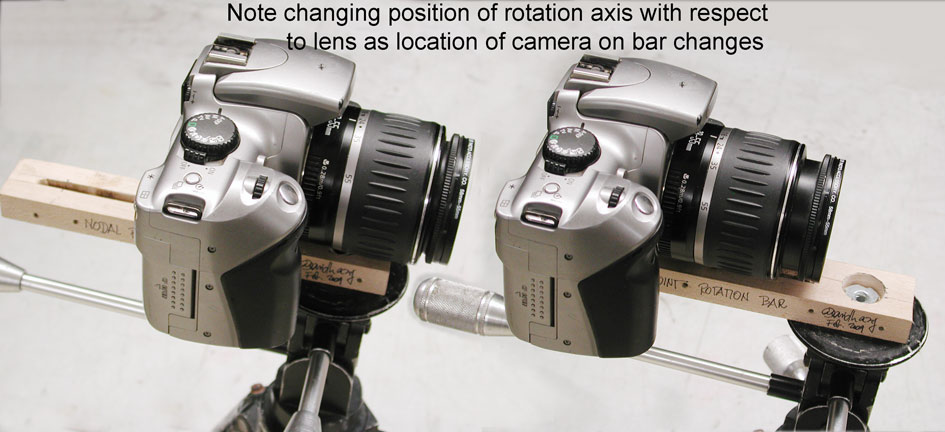
This is best accomplished by attaching the camera to a rudimentary, basic, "panorama parallax bar" as shown in the illustration. It is nothing more than a short wooden bar with a slot in it and a 1/4 x 20 "T' nut at one end that attaches the bar to a tripod. The camera is affixed to the parallax bar by means of a 1/4 inch bolt from below and its position adjusted so that as the camera is rotated the image of the slot in the mask and a subject located beyond it do not move with respect to each other as the camera is panned, movonmg the image of the slot from one side of the camera's field of view to the other.
For an initial set-up before the mask is placed in front of the camera the object under study is placed and centered on the turntable and the lens of the camera focused on its surface. The reason for this is that after the camera "looks" at the subject once the slot is in place it is quite difficult to judge the accuracy of focus.
The, once the mask with the slot is placed between the camera and the turntable a thin vertical object is placed over the turntable center. Something like a marker that can stand on one end will do. This is then sighted through the camera's viewfinder and its position tracked as the image of the slot moves from one side of the viewfinder to the other by virtue of the camera turning.
Once this is adjusted then the object of study, in this case Piston #1, is placed and centered on the turntable. Noting that a standard turntable rotates the piston in a clockwise direction the camera is adjusted so that it rotates in a counterclockwise direction. The exposure time is adjusted so that it is the a bit longer than it takes the image of the slot to traverse the camera's viewfinder.
This ensures the least "fogging" effect from the black sides of the mask which the camera is aimed at all the time that the image of the slot travels across the viewfinder.
The rate at which the camera turns determines a number of things. For one, the exposure time that any local spot of the recorded image gets. This affects the choice of sensor speed or aperture that one needs to use to secure a useful record.
It also determines whether the aspect ration of the reproduction matches that of the original. For a high quality reproduction not only has the subject to be accurately centered but the reproduction must have the same ratio of height to length as the original subject has in terms of height to circumference.
In the digital world there is the possibility of adjusting the aspect ration of the reproduction within limits and this is something that film systems were not able to do well.
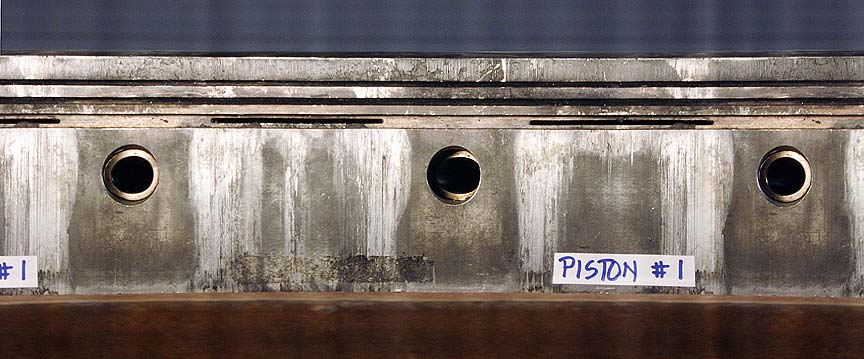
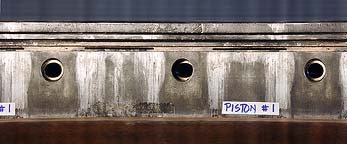 The first
periphotograph
was made
with the camera lens set to 45 mm focal length and it shows slightly
over 360 degrees of the surface of the piston in question.
The first
periphotograph
was made
with the camera lens set to 45 mm focal length and it shows slightly
over 360 degrees of the surface of the piston in question.
If the reproduction is slightly off in terms of appropriate reproduction ratio the horizontal dimension of a record can be adjusted by digital image management removing constraints on vertical / horizontal proportions or the focal length of the camera lens can be adjusted and the rotation speed of the camera changed. Selecting a shorter focal length will reduce the vertical dimension of the subject and also allow more revolutions of the turntable to be recorded.
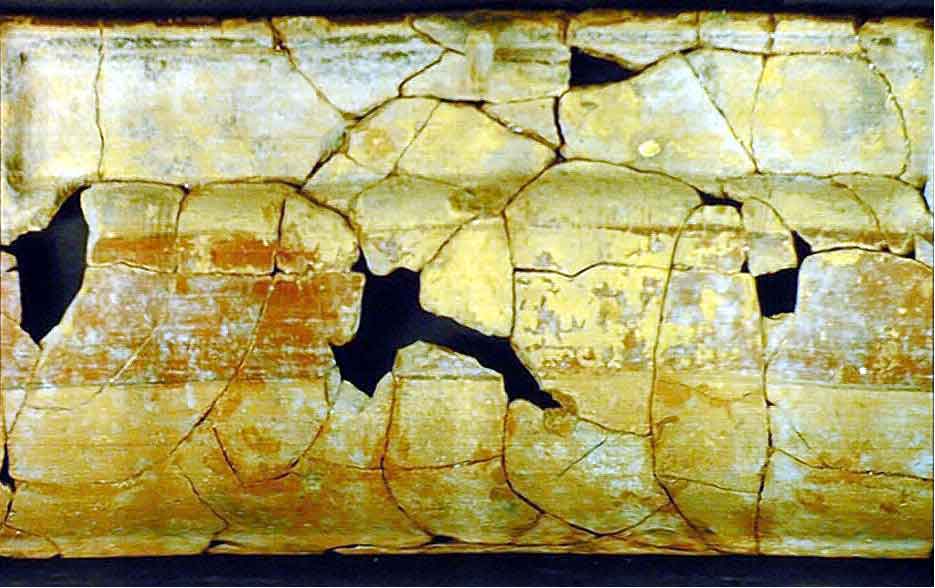
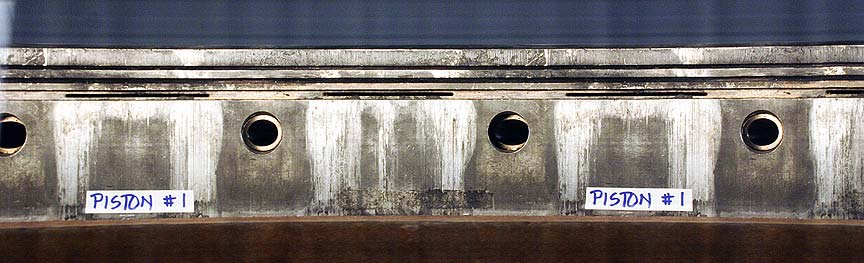
 This is shown in the second periphotograph
made
at 35 mm focal length. It was possible to record more revolutions of
the piston and adjust the rotation rate of the camera to produce a
proportionally slightly longer image of each 360 degree rotation of the
piston than with the longer focal length setting which would not be
able to fit a 360 degree turn within the available space for a single
exposure
of the camera.
This is shown in the second periphotograph
made
at 35 mm focal length. It was possible to record more revolutions of
the piston and adjust the rotation rate of the camera to produce a
proportionally slightly longer image of each 360 degree rotation of the
piston than with the longer focal length setting which would not be
able to fit a 360 degree turn within the available space for a single
exposure
of the camera.
There are many applications for peripheral or rollout photography and this simplified approach may be useful in many situations from photography of archeological specimens to hoky photographic caricatures of human subjects such as shown below.


I hope that the above examples give you ideas for many more applications. Photographs made by this means actually incoporate TIME as one of their dimensions. The resulting images are a result of the interaction between the moving subject and the moving slot within the camera. In some sense they illustrate basic principles of relativity and motion. They have an Einstein connection!
As a final note I must mention that the images you see illustrating this article were all improved compared to the raw files provided by the camera. Most were underexposed so had to be lightened using commonplace image processing software.
If you have found this material of interest or if you have questions or constructive and helpful comments to share feel free to drop me a line. Thank you, Andrew Davidhazy, andpph@rit.edu.
Imaging and Photographic Technology
School of Photo Arts and Sciences / RIT
 Rollout photographs or peripheral photographs assume that one is interested in capturing an image of some
subject so that all of its sides and surface features are included on one flat
continuous representation or photograph. A typical subject is something like a piston that exhibits
wear on its surface and where it would be desirable to show the wear
pattern. These wear patterns or features can be seen by turning the subject
in front of our eyes and noticing these patterns appearing sequentially as the object is rotated.
Rollout photographs or peripheral photographs assume that one is interested in capturing an image of some
subject so that all of its sides and surface features are included on one flat
continuous representation or photograph. A typical subject is something like a piston that exhibits
wear on its surface and where it would be desirable to show the wear
pattern. These wear patterns or features can be seen by turning the subject
in front of our eyes and noticing these patterns appearing sequentially as the object is rotated.
Normally one would make three, four or more photographs from different points of view around the piston and then have the recipient leaf through the images identifying the problem areas.
A peripheral, or rollout, record allows all defects to be visible at a glance. To make such images a strip camera is normally used. An alternative is to make several 2D records, cut out the central portion of a series of images and then "stitch" them together into a continuous record. Film type strip cameras accomplish all this by recording the moving features of a rotating subject through a slit onto film matched to move at the same rate as the image of the object moves.
Linear array type strip cameras do essentially the same thing but they are quite expensive and for occasional use maybe not the best investment especially if one is willing to tolerate a less than perfection in the final result.
Setting up the "improvised" DSLR based strip photographic system as shown in the illustration allows a photographer to make peripheral records that are probably suitable for most purposes. All one needs is a mask with a slot cut into it and a turntable to rotate the object. A motorized method for turning the camera is useful but not absolutely necessary. It all depends on the degree of perfection desired!
The camera is set up on one side of the black curtain or mask and aligned so that the center of rotation of the turntable falls within the slot in the curtain and the camera/lens combination is rotated about a point that does not cause that center of rotation to move out of the slot as the camera turns.
This is best accomplished by attaching the camera to a rudimentary, basic, "panorama parallax bar" as shown in the illustration. It is nothing more than a short wooden bar with a slot in it and a 1/4 x 20 "T' nut at one end that attaches the bar to a tripod. The camera is affixed to the parallax bar by means of a 1/4 inch bolt from below and its position adjusted so that as the camera is rotated the image of the slot in the mask and a subject located beyond it do not move with respect to each other as the camera is panned, movonmg the image of the slot from one side of the camera's field of view to the other.
For an initial set-up before the mask is placed in front of the camera the object under study is placed and centered on the turntable and the lens of the camera focused on its surface. The reason for this is that after the camera "looks" at the subject once the slot is in place it is quite difficult to judge the accuracy of focus.
The, once the mask with the slot is placed between the camera and the turntable a thin vertical object is placed over the turntable center. Something like a marker that can stand on one end will do. This is then sighted through the camera's viewfinder and its position tracked as the image of the slot moves from one side of the viewfinder to the other by virtue of the camera turning.
Once this is adjusted then the object of study, in this case Piston #1, is placed and centered on the turntable. Noting that a standard turntable rotates the piston in a clockwise direction the camera is adjusted so that it rotates in a counterclockwise direction. The exposure time is adjusted so that it is the a bit longer than it takes the image of the slot to traverse the camera's viewfinder.
This ensures the least "fogging" effect from the black sides of the mask which the camera is aimed at all the time that the image of the slot travels across the viewfinder.
The rate at which the camera turns determines a number of things. For one, the exposure time that any local spot of the recorded image gets. This affects the choice of sensor speed or aperture that one needs to use to secure a useful record.
It also determines whether the aspect ration of the reproduction matches that of the original. For a high quality reproduction not only has the subject to be accurately centered but the reproduction must have the same ratio of height to length as the original subject has in terms of height to circumference.
In the digital world there is the possibility of adjusting the aspect ration of the reproduction within limits and this is something that film systems were not able to do well.
 The first
periphotograph
was made
with the camera lens set to 45 mm focal length and it shows slightly
over 360 degrees of the surface of the piston in question.
The first
periphotograph
was made
with the camera lens set to 45 mm focal length and it shows slightly
over 360 degrees of the surface of the piston in question. If the reproduction is slightly off in terms of appropriate reproduction ratio the horizontal dimension of a record can be adjusted by digital image management removing constraints on vertical / horizontal proportions or the focal length of the camera lens can be adjusted and the rotation speed of the camera changed. Selecting a shorter focal length will reduce the vertical dimension of the subject and also allow more revolutions of the turntable to be recorded.
 This is shown in the second periphotograph
made
at 35 mm focal length. It was possible to record more revolutions of
the piston and adjust the rotation rate of the camera to produce a
proportionally slightly longer image of each 360 degree rotation of the
piston than with the longer focal length setting which would not be
able to fit a 360 degree turn within the available space for a single
exposure
of the camera.
This is shown in the second periphotograph
made
at 35 mm focal length. It was possible to record more revolutions of
the piston and adjust the rotation rate of the camera to produce a
proportionally slightly longer image of each 360 degree rotation of the
piston than with the longer focal length setting which would not be
able to fit a 360 degree turn within the available space for a single
exposure
of the camera.There are many applications for peripheral or rollout photography and this simplified approach may be useful in many situations from photography of archeological specimens to hoky photographic caricatures of human subjects such as shown below.
I hope that the above examples give you ideas for many more applications. Photographs made by this means actually incoporate TIME as one of their dimensions. The resulting images are a result of the interaction between the moving subject and the moving slot within the camera. In some sense they illustrate basic principles of relativity and motion. They have an Einstein connection!
As a final note I must mention that the images you see illustrating this article were all improved compared to the raw files provided by the camera. Most were underexposed so had to be lightened using commonplace image processing software.
If you have found this material of interest or if you have questions or constructive and helpful comments to share feel free to drop me a line. Thank you, Andrew Davidhazy, andpph@rit.edu.