![[schlieren image]](schlieren-2.jpg) Among the photo-optical techniques available to the photoinstrumentation
specialist, schlieren photography is perhaps one of the simplest and most
"magical" of the methods in common use today.
Among the photo-optical techniques available to the photoinstrumentation
specialist, schlieren photography is perhaps one of the simplest and most
"magical" of the methods in common use today.
Among the photo-optical techniques available to the photoinstrumentation
specialist, schlieren photography is perhaps one of the simplest and most
"magical" of the methods in common use today.
Schlieren, shadowgraph and interferometric techniques have been used for many years to study the distribution of density gradients within a transparent medium. Of these methods, the schlieren technique combines relatively low cost with high sensitivity. Its principal limitations are field sizes limited by the diameter of the optical field elements and that it is usually only a qualitative visualization process.
Because of the often spectacular visual results which the schlieren system is able to produce it is attributed with a level of set-up difficulty and explanation of the effect which is not really deserved. As the other systems, schlieren imaging is only possible if there are present in the subject gradients or boundaries across which the density changes. These in turn deviate the path of light rays passing in the vicinity or through these gradients.While in a shadowgraph system the changes in illumination at the image are caused by a simple redistribution of light rays from one place to another, in a schlieren system the deflected light rays interact with some kind of an opaque (knife edge) or transparent (filter array) obstacle. This interaction gives rise to variations in the distribution of light at the image plane or a coloring of certain portions of the image depending on the degree to which the path of the rays was deflected. The knife edge or filter array in conjunction with the image of the light source acts as a discriminator which makes visible deflected light beams.
 To get into schlieren photography examine this demonstration. All you need is
an astronomical quality mirror of fairly long focal length preferably of
spherical figure rather than a parabolic one. A suitable mirror is a 6"
diameter 48" or 60" focal length mirror available from Edmund Scientific Co.. In
addition, a small light source and a long focus lens for your camera is also
required. The lens could be a 200 mm. focal length telephoto lens with a 2X
telextender and the light can be a automobile taillight selected to contain as
straight a filament as possible. You'll obviously also need a power supply for
the lamp.
To get into schlieren photography examine this demonstration. All you need is
an astronomical quality mirror of fairly long focal length preferably of
spherical figure rather than a parabolic one. A suitable mirror is a 6"
diameter 48" or 60" focal length mirror available from Edmund Scientific Co.. In
addition, a small light source and a long focus lens for your camera is also
required. The lens could be a 200 mm. focal length telephoto lens with a 2X
telextender and the light can be a automobile taillight selected to contain as
straight a filament as possible. You'll obviously also need a power supply for
the lamp.
To set the system up you'll basically be setting up a Foucault test for proper grinding of the mirror. The distance between the lamp and it's reflected image is made to be roughly equal. Thus, the distance between the lamp and the mirror will be two focal lengths of the mirror. Try to keep the separation between the lamp and its image as small as possible while still allowing you the possibility of catching all the light passing through the image of the lamp within the diaphragm aperture of your camera's lens. This lens must be aimed directly at the mirror. Attaching the lamp to the lens shade of the lens is one way to keep the separation between the lamp and it's image small. To minimize the possibility of unexpected results you should operate with your camera lens set to maximum aperture or with the diaphragm set to work in the "stop-down" mode. This way any small alignment errors not visible in the camera's viewfinder will not spoil your photographs.
Once you have set the system up this way, note that introducing an opaque obstruction, such as a razor blade edge or the edge of a piece of black photographic tape, into the image of the light source formed by the mirror will simply cause the surface of the mirror as seen in the camera's viewfinder to dim overall simultaneously. When this obstruction is located outside of the sharply focused image you'll see that the mirror darkens more noticeably from one side or the other.
 Once again locating the knife edge at the plane of the sharply focused image of
the lamp's filament, intercept about 3/4 of the size of the image with the
edge. This will cause the mirror surface to appear darkish overall. At this
time, you may already notice moving waves or patterns over the mirror's image.
These are caused by the effect of density gradients located between the source
and it's image on the path of the light rays traveling between them. Preferably
you should set up the system in as calm an environment as possible and then
introduce a distrurbance in the vicinity of the mirror's surface. This is the
location of the "schlieren field". Placing a lighted match or lighter or simply
a lighter discharging butane without it being lit will produce a marked visual
effect in the camera's viewfinder.
Once again locating the knife edge at the plane of the sharply focused image of
the lamp's filament, intercept about 3/4 of the size of the image with the
edge. This will cause the mirror surface to appear darkish overall. At this
time, you may already notice moving waves or patterns over the mirror's image.
These are caused by the effect of density gradients located between the source
and it's image on the path of the light rays traveling between them. Preferably
you should set up the system in as calm an environment as possible and then
introduce a distrurbance in the vicinity of the mirror's surface. This is the
location of the "schlieren field". Placing a lighted match or lighter or simply
a lighter discharging butane without it being lit will produce a marked visual
effect in the camera's viewfinder.
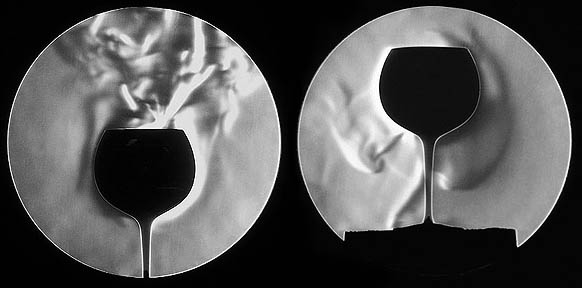
In the illustration seen to the right you can see air rising after it has been warmed by contact with the top and sides of a goblet that has been filled with hot water and on the right cool air that falls after contact with the cold top and sides of the same goblet but this time filled with ice water.
Replacing the opaque knife edge for a transparent array of filters transforms the above Black and White system into a Color schlieren system. This array in its simplest form consists of a thin central filter strip flanked by more substantial filters on either side.
![[schlieren image]](schlieren-1.jpg)
NOTE for visitors to this Demonstration: If you'd like to alter the location of the light source or find out what happens as you alter the position of the knife edge or even the mirror by all means do so. The only piece of equipment you should take some care with is the Xibion video camera. If you'd like to examine it in more detail and/or make a video tape with it, this is certainly possible if you provide the tape. It is even possible to make photographs onto 400 speed color film if you'd like to do this. We have the camera and lens you provide the film!
(the text above went along with a demonstration)
For further information feel free to write the author, Andrew Davidhazy, Imaging and Photographic Technology, 70 Lomb Memorial Drive, Rochester, NY 14623. Call him at (716) 475-2592 or fax at (716) 475-5804 or send e-mail to his POSTOFFICE now.
You might be interested in a more thorough explanation of schlieren imaging techniques. Here is a link to a book by Gary Settles of Penn State University titled Schlieren and Shadowgraph Techniques