|
Basic Rangefinders
Andrew Davidhazy Imaging and Photographic Technology School of Photo Arts and Sciences Rochester Institute of Technology Successful photography usually requires that camera lenses be sharply focused on the subject of interest. Cameras have built-in various means for achieving this. Viewing the image on a groundglass or frosted screen is one method. The image may be analyzed visually and the lens adjusted until a sharp image is seen on the screen. This ensures also that the image will be sharp on the sensor of the camera. The image on the screen may be analyzed electronically and the camera may have means for adjusting the lens position to automatically achieve an in-focus image. Ultimately whatever means is used the lens of the camera is adjusted to focus at a particular distance from the lens. If one knows that distance to the subject that one desires to be reproduced sharply then one can set the focus of the lens for a particular distance according to that scale. To use that scale one needs to determine the distance from the camera to a given subject. The distance can be estimated or it can be determined with an auxiliary device called a rangefinder. Making an improvised rangefinder is something that not only may provide a few minutes of entertainment but also result in a potentially useful photographic "gadget". There are two approaches that will be presented here. One based on simple trigonometry and the other on established rules of perspective. In the first instance you will need a protractor, a small wooden platform on which the rangefinder will be built and a wooden rod or stick plus a few nails to complete the assembly. The wooden platform might measure something like 8 inches square by 1/2 inch thick. A line is drawn along one edge of the platform and another line is drawn at right angles to that line along another edge of the platform. You only really need 1/2 of the protractor as shown in the illustration. It is glued or somehow attached to the wooden platform so that it's baseline lines up along the line drawn on the board. The wooden stick is attached to the board with a nail close to one end so that so that it pierces the center point of the protractor and in such a manner that the rod is free to rotate about the nail. Two nails are attached to this rod but without going all the way through the wood and so that they and the nail at the "pivot" point are aligned along a straight line. One nail is located close to each end as shown in the illustration. It is useful to attach the movable rod so that its end does not cover the degree markings on the protractor. This makes reading out the angle that the stick forms with the baseline easy if one simply places a pointer or mark at the bottom of the stick so it indicates 0 degrees when the rod is aligned parallel to the baseline of the protractor. Two nails are now inserted along the line that is perpendicular to the one along which the protractor is aligned. These will serve as alignment reference or sighting indicators when the rangefinder is used. The assembled rangefinder might look something like the illustration. It is useful to make the distance between the pivot point for the movable rod and the nail located along the protractor baseline some easy to remember distance. Maybe 6 inches. This is not absolutely necessary but one does need to know what the distance is. To use it one places the rangefinder on a stable platform of some kind and lines up the two sighting nails with the object whose distance it is desired to determine. 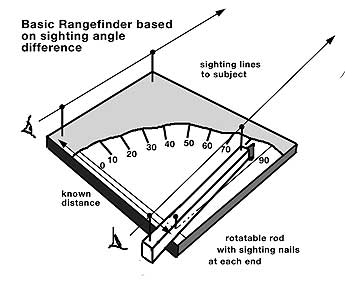 Without disturbing the rangefinder the
sighting nails on the movable rod are then aligned with the same object
by rotating the rod around it pivot nail. Once these sighting nails are
lined up with the subject of interest the angle the rod describes with
respect to the protractor's baseline is read off the protractor. Without disturbing the rangefinder the
sighting nails on the movable rod are then aligned with the same object
by rotating the rod around it pivot nail. Once these sighting nails are
lined up with the subject of interest the angle the rod describes with
respect to the protractor's baseline is read off the protractor.The trigonometric principle here is that the baseline multiplied by the tangent of the angle between the two sighting lines produces the distance from the base of the protractor to the subject. Assuming that the pointing rod indicates that the difference in angle between the two sightings is 80 degrees and the distance between the point of rotation of the rotatable rod and the sighting nail is 6 inches, then the distance to the object is tangent of 80 degrees times 6 or 5.67 x 6 inches or 34 inches or 2.8 feet. To make the rangefinder easy to use in the field its degree markings could be labeled already with distances so one would not have to determine distances based on angular readings but they would already be available directly on the device. This rangefinder is obviously most accurate when the distances to an object are relatively small. Measuring angles greater than 85 degrees becomes problematic and so accuracy at long distances is prone to large errors. To increase accuracy the baseline of the rangefinder can, of course, be made larger. Another method for finding the distance to a subject depends on the fact that as subjects of a given size are moved further and further from a person they diminish in apparent size according to the inverse of the distance moved. That is, if a subject's distance is increased by a factor of two its relative size will appear to be only half as large as when it was closer. This type of rangefinder is often used at golf courses to determine the distance from a golfer to the hole. This is made possible because all the flags at golf courses have the same height and thus provide a subject whose size is constant from hole to hole and golf course to golf course. A rangefinder based on a subject of consistent and known size can be easily improvised by making marks on a cardboard card or wooden rod or maybe a ruler. The distance marks on the rangefinder are determined by sighting the known subject from a known distance and marking up the rangefinder with the distance associated with that subject. Subject distances other than the first, or reference, distance are added later. 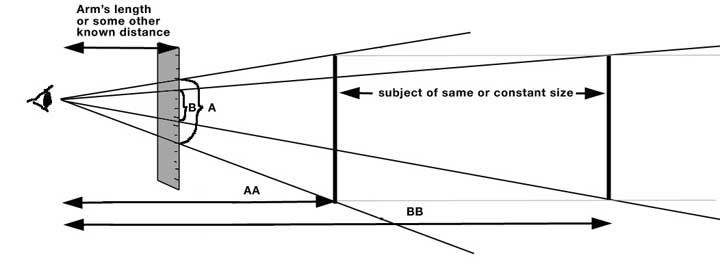 To construct this rangefinder start off with a subject of known height an located at a known distance. If you use a ruler then holding the ruler at arm's length notice what the height of the subject is along the scale of the ruler. Let's say you assume that the average height of a person is 6 feet. With the ruler at arm's length you notice that when such a person is 10 feet away (AA in the illustration) they measure 5 inches according to the scale on the ruler. This is A in the illustration. This indicates that any subject that is 6 feet tall and that appears to be 5 inches tall according to the ruler is located 15 feet from the rangefinder. If the distance is doubled to 30 feet (such as BB) the subject will appear to be only half as tall, or 2.5 inches. Or B as shown in the illustration. At 60 feet such a subject will measure only 1.25 inches. Given the same conditions as above and if constructing a rangefinder without a ruler then one holds the wooden stick or cardboard at arm's length and makes two marks on it that equal the height of the subject from the position of the rangefinder. This will be the distance associated with a subject 6 feet tall and located 15 feet from the rangefinder. To find out how far apart the marks should be when the subject is at twice the original distance you only need to remember that making the distance between marks 1/2 that of the base distance doubles the distance to the subject. Halving the distance between marks will indicate a doubling of the distance to a subject. It is possible to calibrate the rangefinder for other distances by multiplying the apparent size of the subject when it is located at 15 feet by the “calibration distance” (in this case 15 feet) divided by the desired distance from the rangefinder location. For example, if you'd like to determine how far apart the marks should be for a subject 45 feet away you start with the distance between marks for a subject at 15 feet. Then multiply that by the calibration distance divided by the distance to the subject for which you’d like to determine the distance between marks on the rangefinder. So, if the measured size for an object that is 6 feet tall and 15 feet from the rangefinder is 5 inches, to find what the distance on the rangefinder would be for a subject at 45 feet one takes the 5 inches and mutiplies that by 15 divided by 45, or 1/3, to determine that the apparent size would appear to be 1/3 of 5 or 1.65 inches. Marks 1.65 inches apart indicate that a 6 feet tall subject would be located 45 feet away. Below is an illustration of what a rangefinder stick like this might look like. 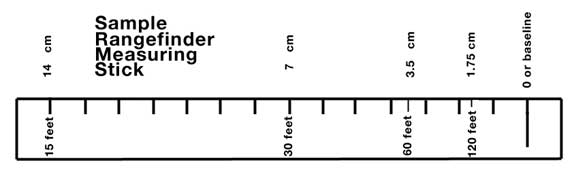 Again, as the first rangefinder, this rangefinder also works best for relatively close subjects since as subjects are further and further away it becomes more and more difficult to determine their apparent height. The assumption is made when using this rangefinder that it is held vertically and that the subjects are 6 feet tall and are also aligned vertically and perpendicular to the line of sight. Following the procedure described above it should be possible to make a rangefinder stick for subjects that are other than 6 feet tall. Each stick or rangefinder should be fitted to a particular "arm's length" however. Actually, now that I think of it, photographers have another method to estimate the distance to a subject of given size by using their viewfinder as the frame of reference. Take the illustration as an example of what you might see in a camera’s viewfinder. 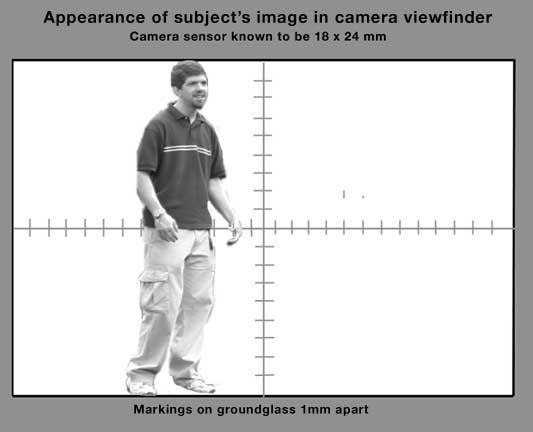 Then, if later some subject of equal height appears to be 1/2 as tall as the viewfinder frame they would be located at twice the distance that the reference person was at. If they are 1/4 the height of the viewfinder frame they are 4 times as far as the reference person was. It does help if the camera viewfinder has etched in it a scale that provides actual dimensions on the groundglass but lacking that one simply makes an estimate to estimate the subject distance. To determine the distance for any fraction of the viewfinder that a "standard" subject covers you take the calibration distance and divide it by the fraction of the viewfinder that the subject appears to cover. Further, one can determine the distance to any subject whose size is known by noting how tall it appears in the viewfinder. The ratio of image size to lens focal length is the same as that of the subject size to the subject distance. Therefore the subject size times the lens focal length divided by the image size (off the groundglass) is equal to the distance of the subject from the camera. To be sure all of these methods provide only approximate values but the point of this article is not to dwell on limitations but rather point out possibilities. So now you have several methods by which the distance to a subject from a camera can be determined. I am sure there are others. Can you think of some? . |