Loading film into Polaroid Pack
type cassettes
Andrew Davidhazy
Images for Science, Education and Industry
andpph.com
Andrew Davidhazy
Images for Science, Education and Industry
andpph.com
I suspect there are many out there that have old Polaroid pack type cameras that produce 3 1/4 x 4 1/4 prints on type 600 pack film. Such as 664, 665, 667, and others. All are no longer available from Polaroid and although some of these emulsions were made by Fuji they too are discontinuing production of these pack materials. This may mean the end of instant picture making with these cameras but there may be some life left in these relics of photographic history if you are more interested in using them than in the instantaneous availability of the images they record.
Just because you can't use them for instant photography, if you are willing to put up with certain limitation you may just find that you can use them for recording images on traditional silver halide materials that are still available.
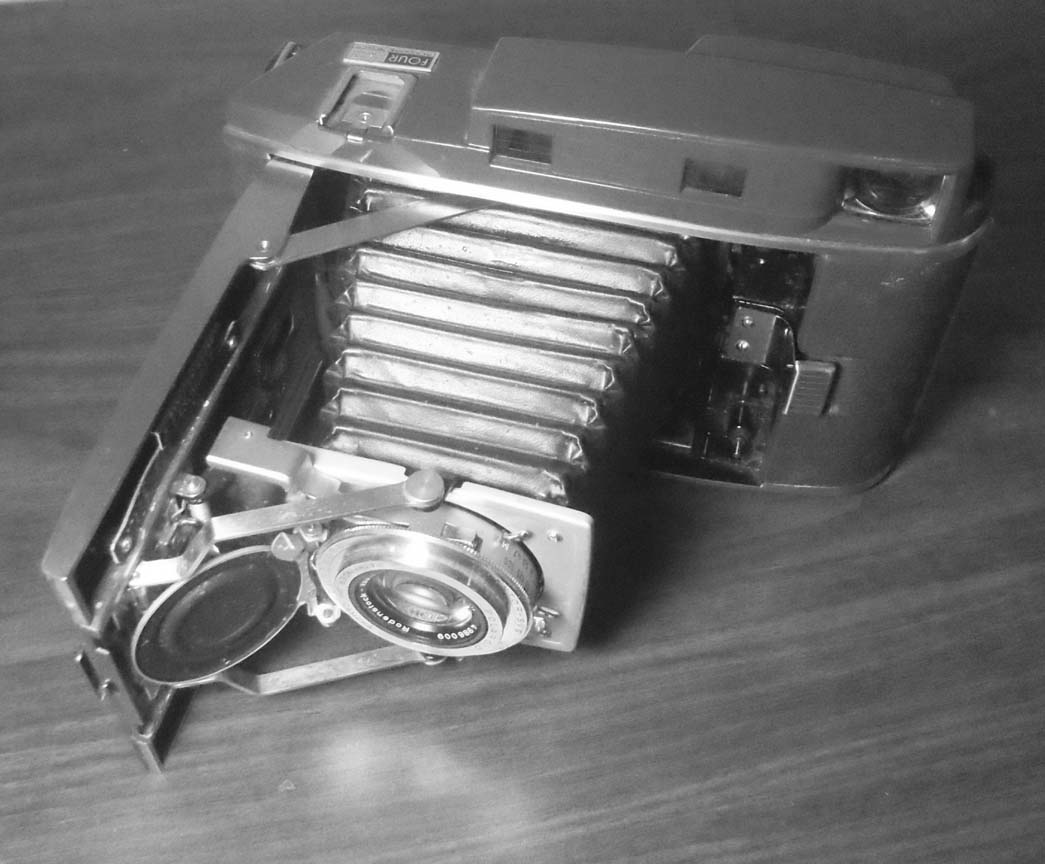
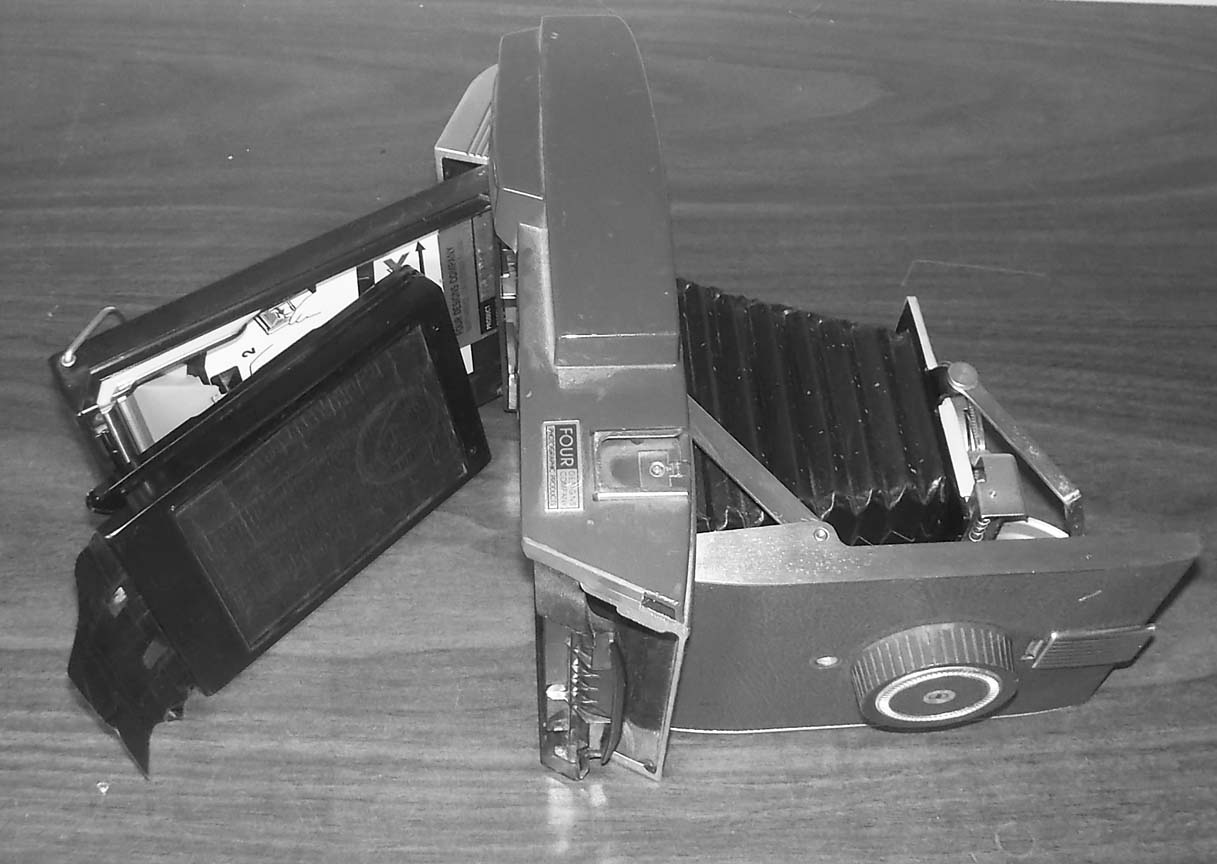
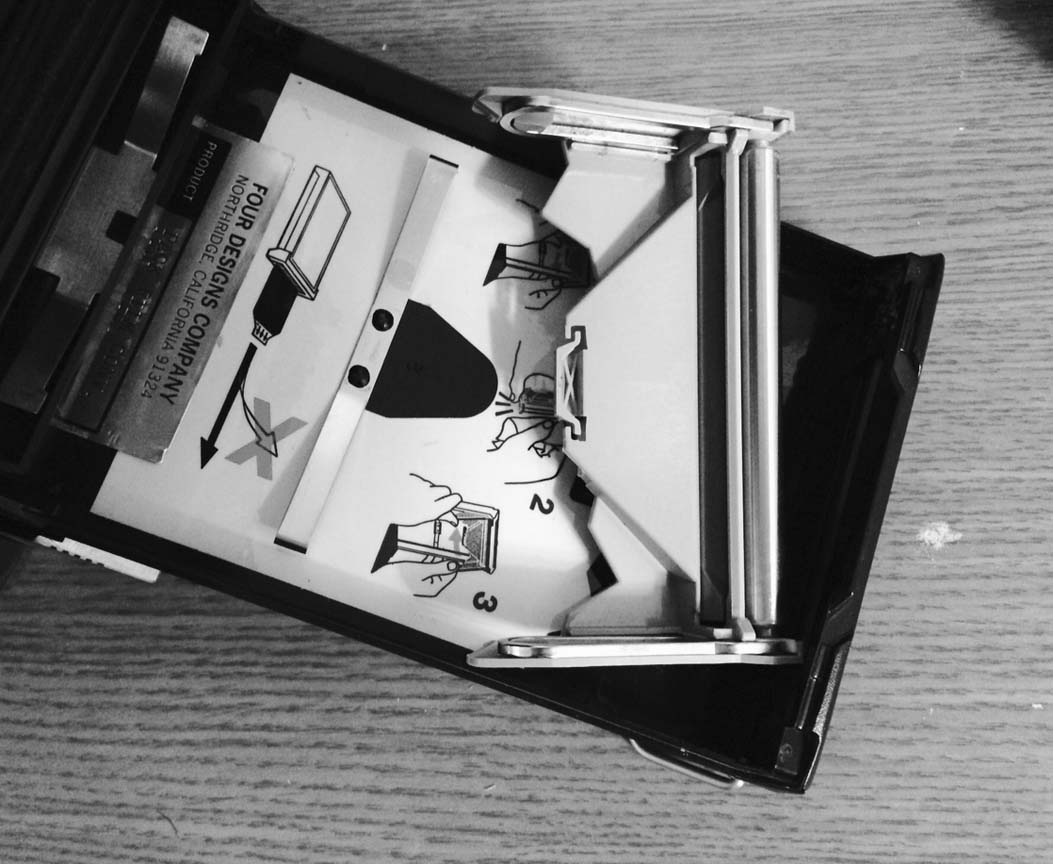
I have several of these cameras
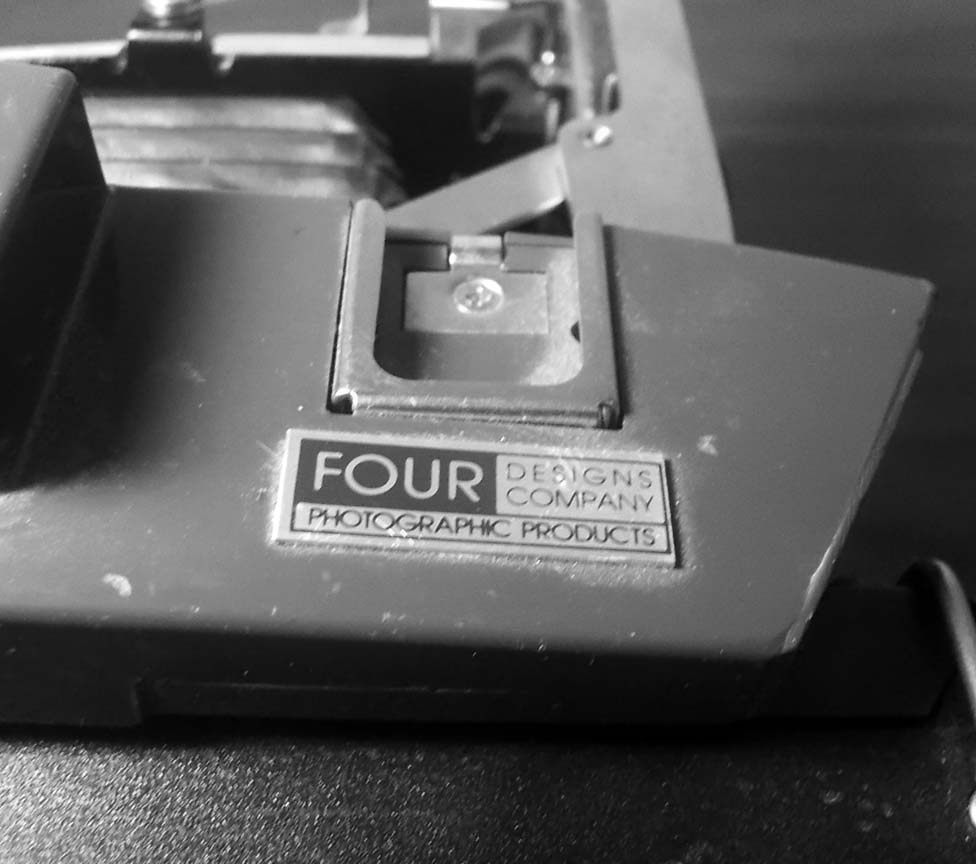
including this Pathfinder 120 that was modified by Four Designs by
installing a pack back on it as shown above. It is a quite
sophisticated camera with manually
adjustable apertures and shutter speeds and an excellent Yashinon lens
and Seikosha shutter up
front. I also did a similar conversion to a couple of other Pathfinders
and I still have some Colorpack cameras around as well. I was
disappointed, of course, by the lack of Polaroid, and later Fuji, pack
type films to load into these cameras but recently, while
exploring the making of pinhole photographs with one of my home
modified Polaroid pack cameras I thought I would look into the
possibility of
loading Kodak T-Max 100 sheet film (or other brands as well) into the
film pack designed for the Polaroid camera and then use it for
photography.
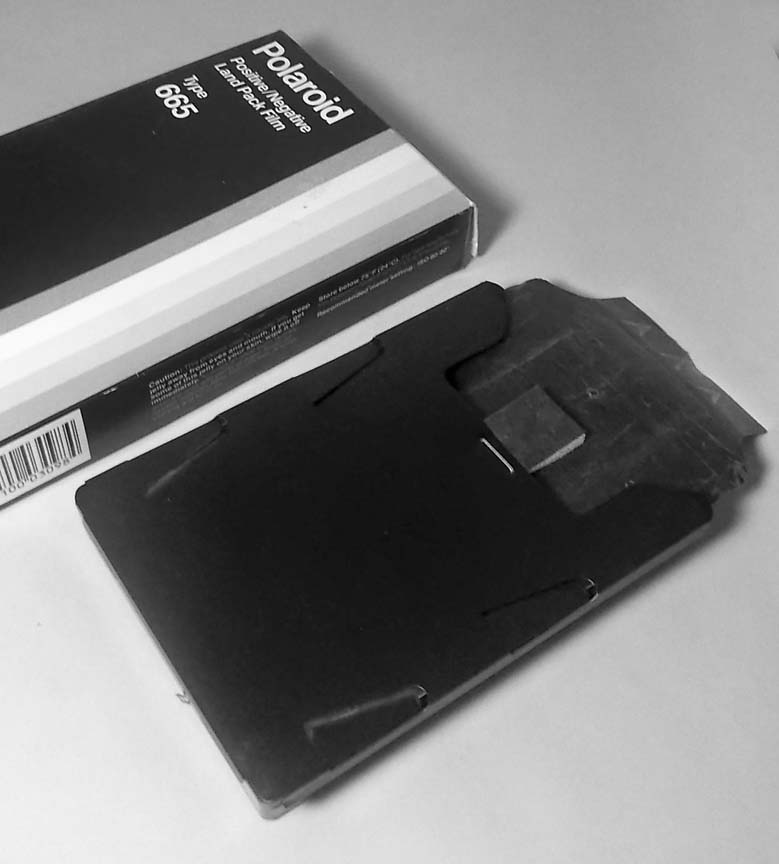
After finishing my last pack of
Polaroid 665 film I looked at the empty pack more closely. It is made
up of
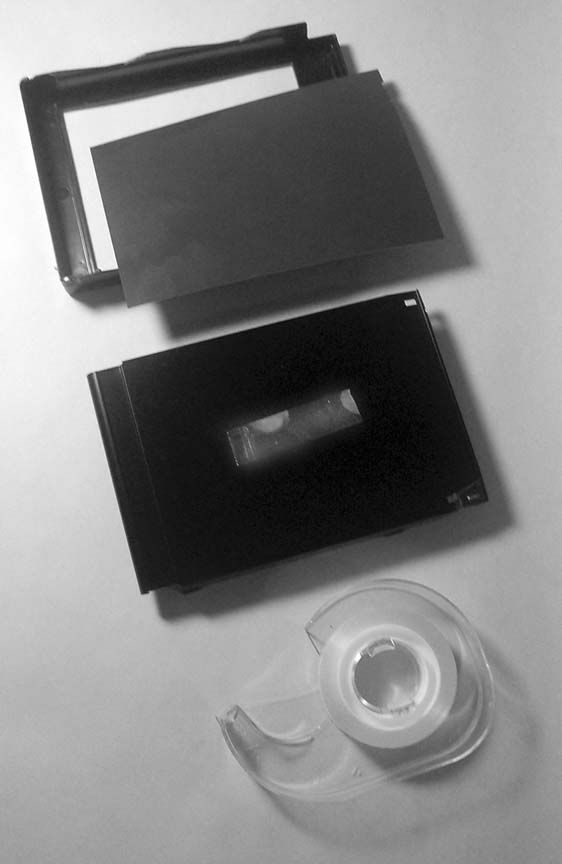
5 parts essentially. 1. A "cradle" into which a 2. film redirect septum
and pressure
plate device sits and 3. an opaque paper leader that
protects the 4. photosensitive material within (and also envelops the
receptor/print sheets) and 5. a top metal or plastic cover.
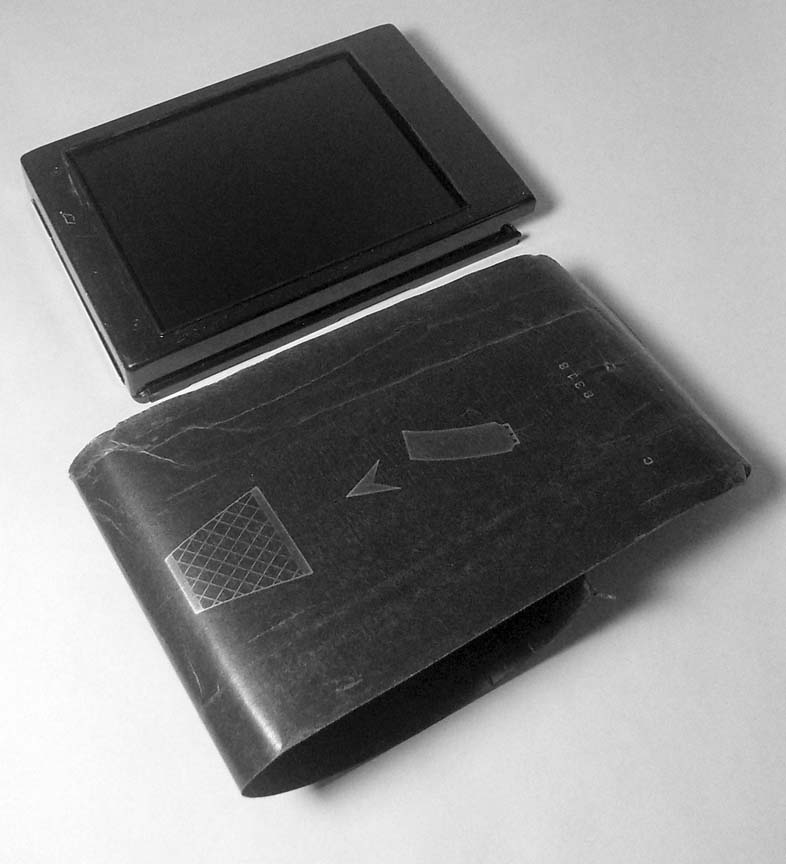
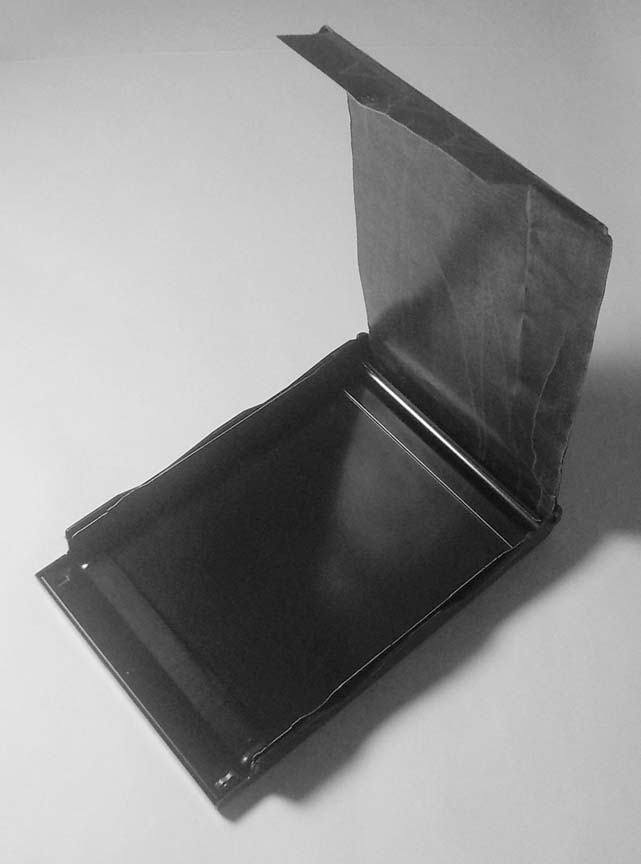
One can easily take a pack apart whether the ones made by Polaroid or Fuji. They are held together with snap connectors along the top edge of the pack. Just pry the top away from the bottom and out will pop the parts I mentioned although if it is an empty pack then it will not contain the opaque leader sheet or any film stock anymore. Look at the three remaining parts closely to get an idea of what happens within that pack container.
In brief, the pack system works as follows: The opaque leader is withdrawn and this brings a white tab (connected to the first negative/positive combo) to the exit slot and exposes the emulsion of the first exposure to light from the lens when the exposure is made. Once ready for processing the white tab is pulled out and this brings the second white tab out and places the first exposed sheet into the correct position for breaking the developer pod and then processing and transferring image information onto the receiver or print sheet. This is accomplished by pulling out the tab that appeared when the first white tab was pulled out. This breaks the developer pod and spreads the liquid between the paper negative and the receiver sheet. Once processing is competed one separates the donor negative from the receiver, print, sheet and one has a finished product. One generally discards the paper negative and keeps the print. With type 665 materials a very good negative is produced but this material has not been manufactured in years. And this is repeated for every exposure until you are out of film. The pack is now empty.
One word of caution: Resist the temptation to discard the opaque cover sheet. You will need it.
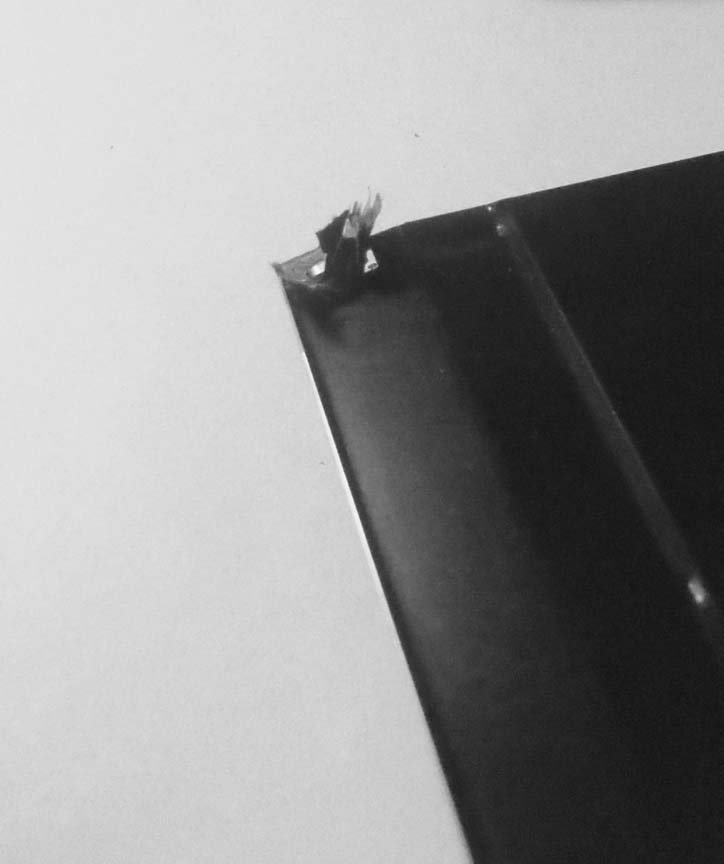
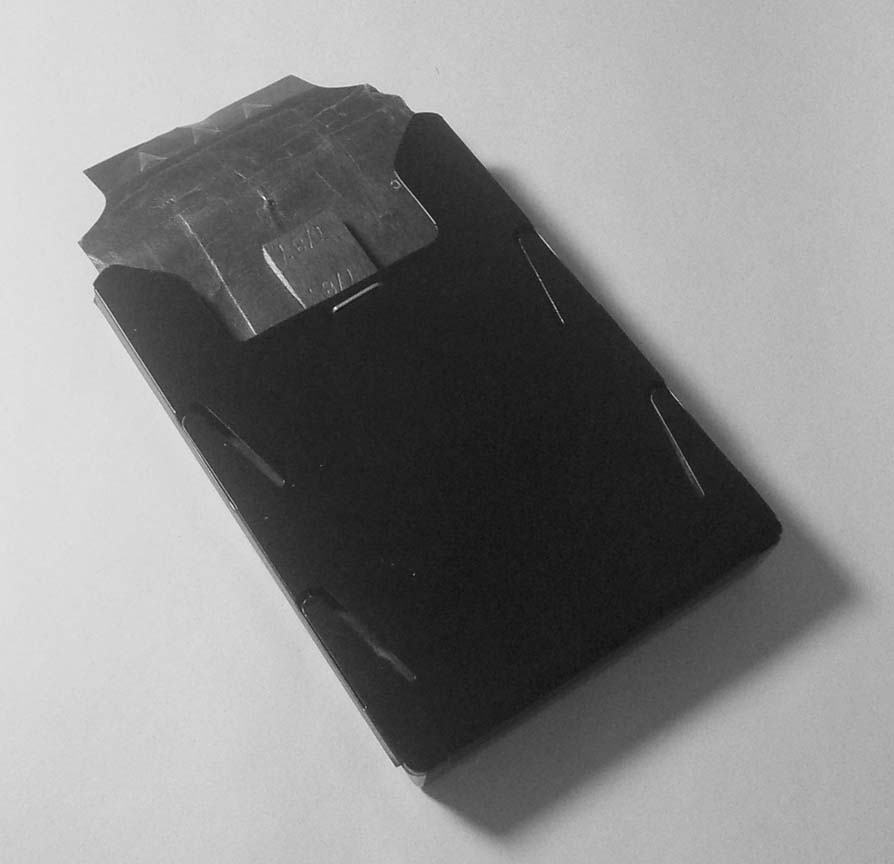
Notice that along one or maybe two edges of the middle septum sheet that has a curved end at one end there are the remnants of paper attached to a small staple at one side of the other end of that sheet of metal or plastic. Clean up that area so it is clean and smooth. By the way, you will need a roll of double sided sticky tape along with the remnants of the empty Polaroid or Fuji film pack.
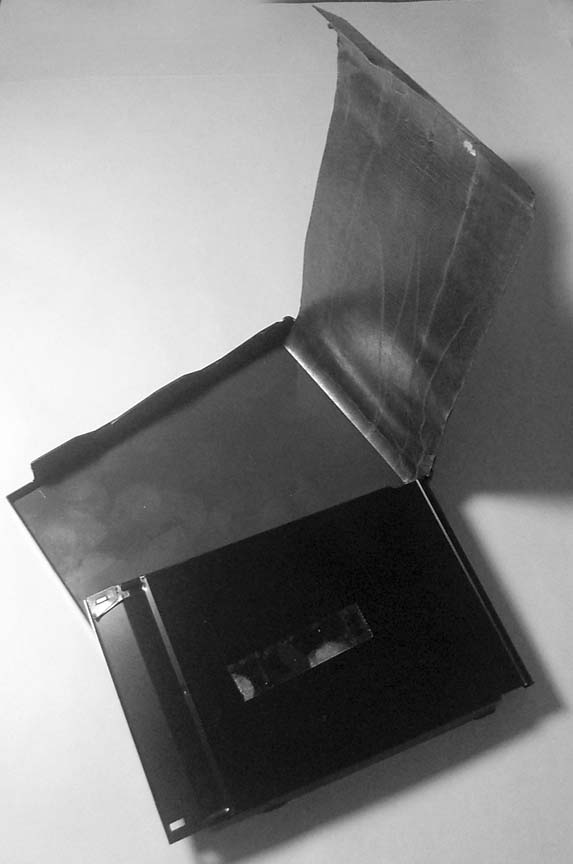
Now notice that you can place the opaque sheet back in its place, cover it with the redirect septum placing the curved end away from the film exit end of the pack and the smooth side down. You can now bend the opaque sheet back on itself and it will extend beyond the exit lip of the empty pack. Replace the back cover snapping it smartly into place. The completed assembly should look pretty much like an original Polaroid pack.
You can now place that pack in your Polaroid camera and you should be able to pull the opaque paper out without any trouble. If all this happens you good to go!!
 Disassemble
everything and go back to the
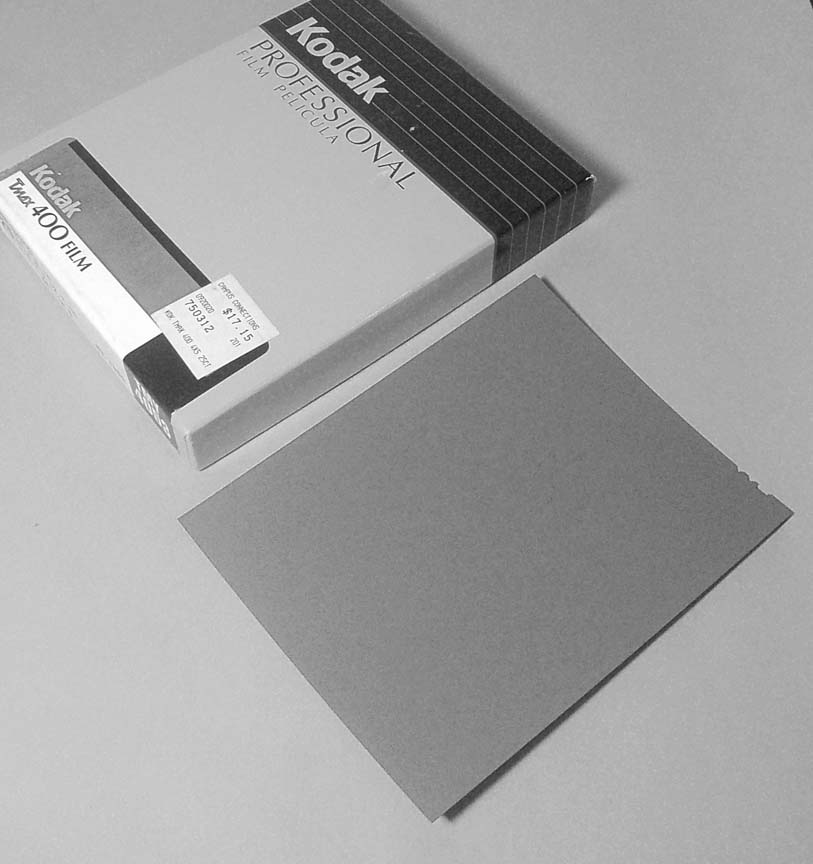
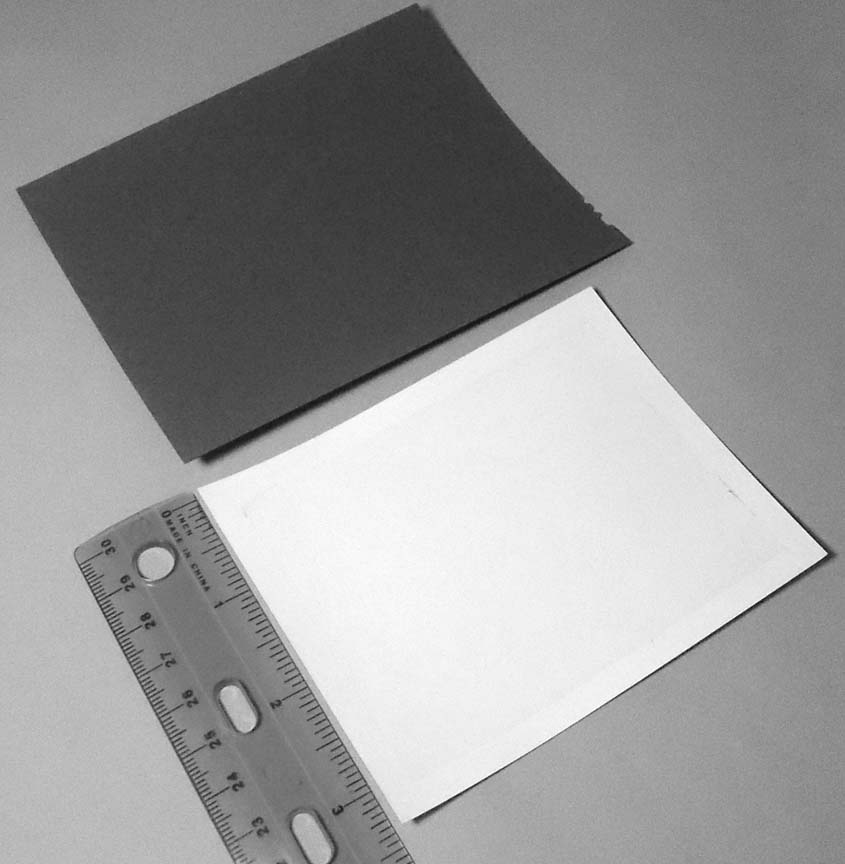
beginning. Find a sheet of suitable 4x5 film and cut the 4 inch
dimension so that it is close to 3 3/8 inches wide. A little less is OK
but more is not. Make sure you don't cut off the notches on the film as
these will help you determine the emulsion side later on should you
need to know this. And you will!. When they are in the upper right you
are looking (if not in the dark) at the emulsion. In the dark you would
not see anything! Anyway, this is as wide as the channel within
which the Polaroid materials would fit in the pack and is as wide as
the
opaque cover sheet.
Disassemble
everything and go back to the
beginning. Find a sheet of suitable 4x5 film and cut the 4 inch
dimension so that it is close to 3 3/8 inches wide. A little less is OK
but more is not. Make sure you don't cut off the notches on the film as
these will help you determine the emulsion side later on should you
need to know this. And you will!. When they are in the upper right you
are looking (if not in the dark) at the emulsion. In the dark you would
not see anything! Anyway, this is as wide as the channel within
which the Polaroid materials would fit in the pack and is as wide as
the
opaque cover sheet.
Still in practice mode replace the cover sheet so it fits snugly towards the end of the pack where the staples were or are. As you did before. Then on top of this place your sheet of sheet film with the emulsion side down, touching the cover sheet. and notice it will pretty much extend the full length of the pack. Now place a bit of double sided sticky tape on the pressure plate and install it into the pack as you did before. You may want to press the front and back of the assembly together at this time. This will affix the film to the pressure plate. Now bend the opaque leader back on itself as you did before and reassemble the pack replacing its back cover. The sticky tape may not be necessary but it ensures that the film will remain where it is supposed to. Just so you know I do not use sticky tape!
Now you don''t even need to try loading the camera as you probably sense that this will work. The pack with your silver halide film is fairly light tight but I would recommend only relying on its light-tightness while the pack is loaded in the camera. My experience is that handling in moderate light levels has produced a small amount of edge fog which in general has not been a problem at least for me.
Once the pack is prepared it loads into the camera as any "old" Polaroid film pack would. You just have it loaded with a single exposure. Notice that you can pull on the black leader paper and it should smoothly glide out of the pack and if you are looking at the front of the pack you will see the trailing end of the leader gradually uncover the film behind it. If the pack is loaded into the camera, the camera would now be ready to make an exposure.
OK ... now read what you have read so far and do the loading process using raw silver halide film. Of course you will have to cut the film and place it into the pack and into the camera in the dark. After a few trials this should not be too difficult to do. Establish a routine and a procedure that you can follow even with your eyes closed. Just make sure you don't just close your eyes and forget to turn the lights out while you are loading your film into the Polaroid pack!!
After exposure you disassemble the pack and remove the film stuck to the pressure plate and process it as you would any normal piece of sheet film. You could prepare several such "cassettes" each loaded with a single sheet of film and then you'd have the opportunity to make several exposures instead of just one. Store each exposed pack in a light tight container. Read below as to how you transfer the film from camera to such a container and how you reload the camera.
Sure. So now what you ask? How do I make another exposure??? Since the raw film is inside the camera and there is no way to replace the black leader you must resort to a drastic measure. A changing bag!!! In fact, the changing bag gives you a way to store and transport several pre-loaded packs as well as a place to unload and load your camera without having it exposed to high light levels during the process. However, as I mentioned above reasonable light levels while handling the pack should not cause much of a problem.
So who said life would be easy? Remember that to make single Wet Collodion plate took a lot of effort. A Daguerreotype even more. But many dedicated and enterprising photographers took on the challenge making one image at time. So what is holding you up?? Give it a shot!!
In my opinion this is a great way to make single shot exposures ... for example a pinhole photograph. Generally we don't make many of these as the fascination with making them tends to ebb and flow. Besides working to make a single negative will possibly improve your previsualization process and the ratio of your number of good photographs vs. the number of almost good ones will improve since you will be forced to think more before pressing the shutter release button. Also, think of the savings that will result form not using so much in terms of photosensitive materials. Your whole life will be simplified by working on one photograph at a time. Maybe one a week! Make them good ones!!
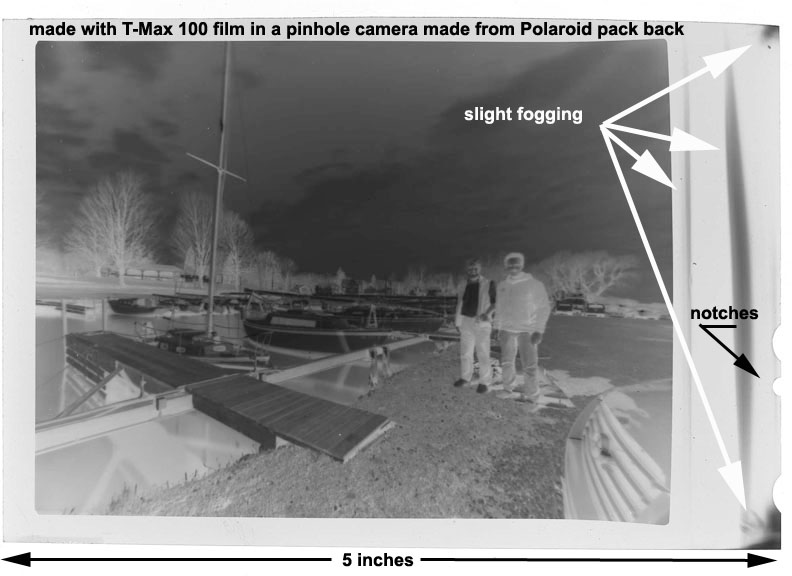
Just to show how well this system worked I actually did make a photograph with my Polaroid pack back adapted to be a pinhole camera. Here it is below. The pack was not exposed to diect sunlight but it was handled in average room light before and after exposure for about 30 minutes. And, of course, it was exposed to dayight such as seen in the photograph, for another 15 minutes or so. Evidence of fogging is quite minimal. The film was Ilford FP4 Plus 125 ISO speed and the pinhole photograph was exposed for about 15 seconds. I don't know what the operating aperture of the pinhole is. Film was tray processed with continuous agitation in D-76, 1:1 dilution, at 70 degrees for 8 minutes. The negative is excellent.
Item 1. I found that the original instant film pack protective sheet now is used and reused and will probably wear out pretty soon so I decided to reinforce at least one end ot it with a layer of clear strong packaging tape. I did not do that to the actual protective end that is in contact with the sheet of film as that part of the sheet has to bend around the "redirect", curled, metal end of the pressure plate and so flexibility is a plus.
 Item 3. I realized that now that I
would
not be using real Polaroid or Fuji film in the camera I actually did
not need
the developing roller assembly. It perfoms no useful function anymore
and I removed it. I think you would also do
well to do likewise. You can always reinstall it if is needed. Its
removal
will make withdrawing the light shield tab that covers your "real" film
easier to accomplish and will save wear and tear on the tab.
Item 3. I realized that now that I
would
not be using real Polaroid or Fuji film in the camera I actually did
not need
the developing roller assembly. It perfoms no useful function anymore
and I removed it. I think you would also do
well to do likewise. You can always reinstall it if is needed. Its
removal
will make withdrawing the light shield tab that covers your "real" film
easier to accomplish and will save wear and tear on the tab.
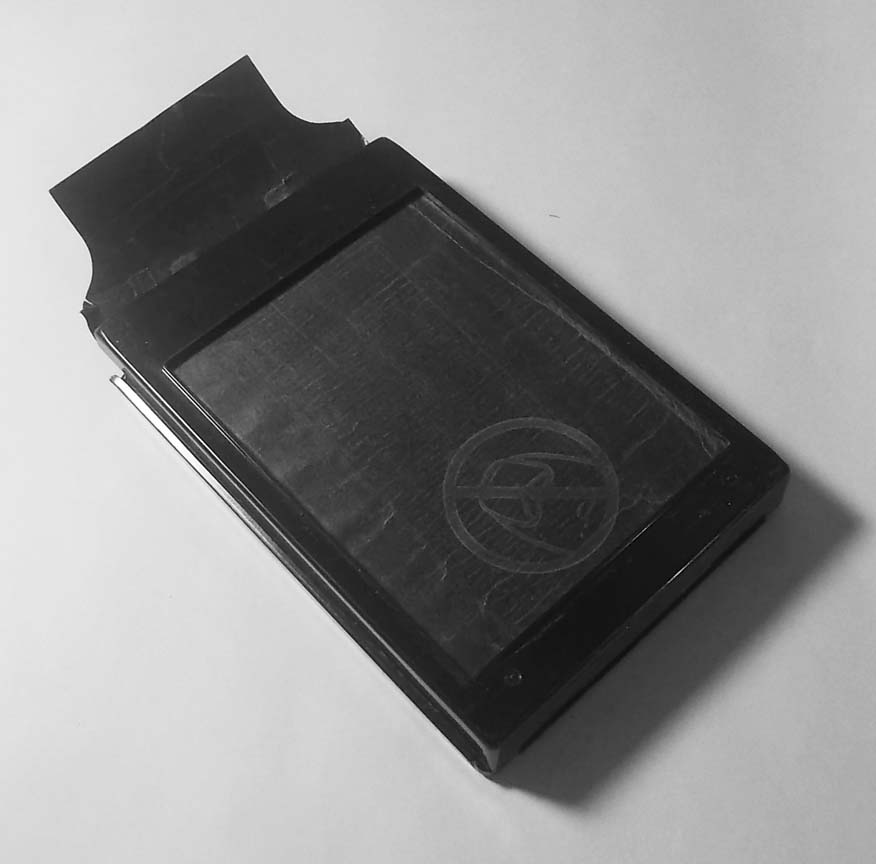
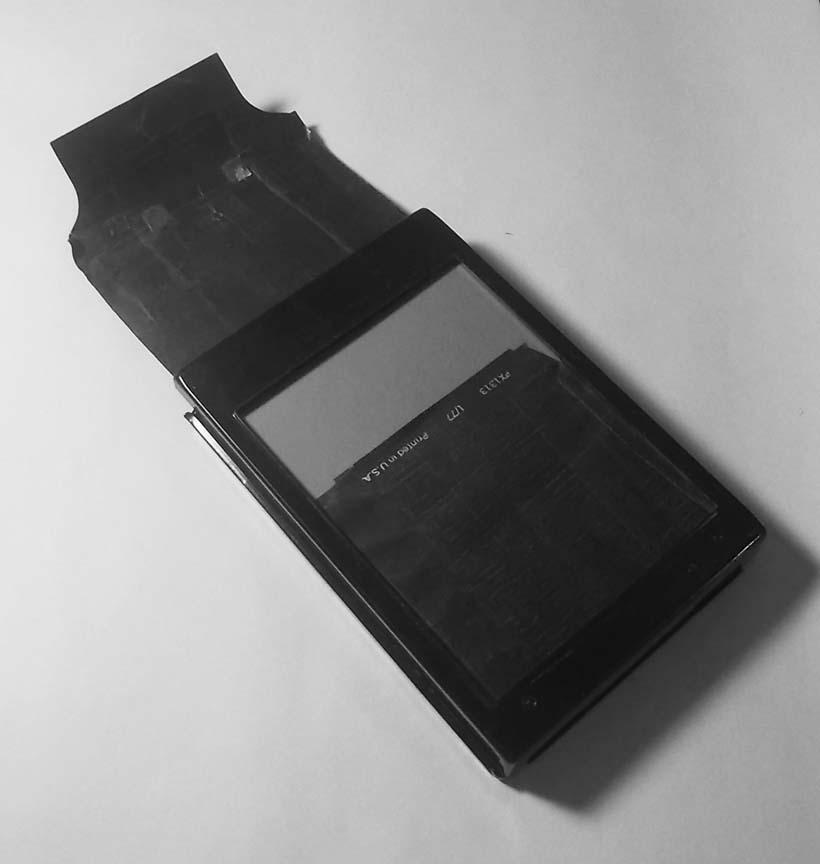
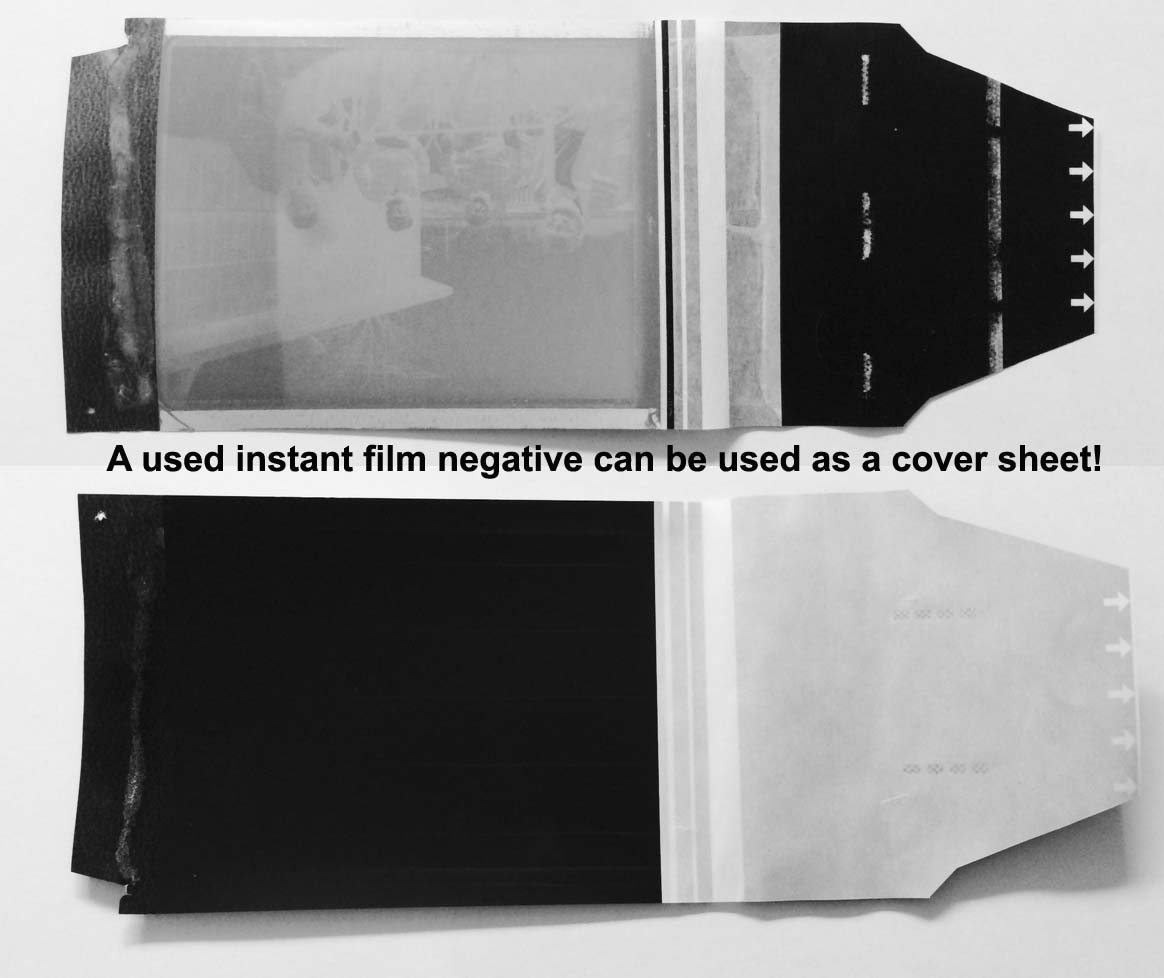
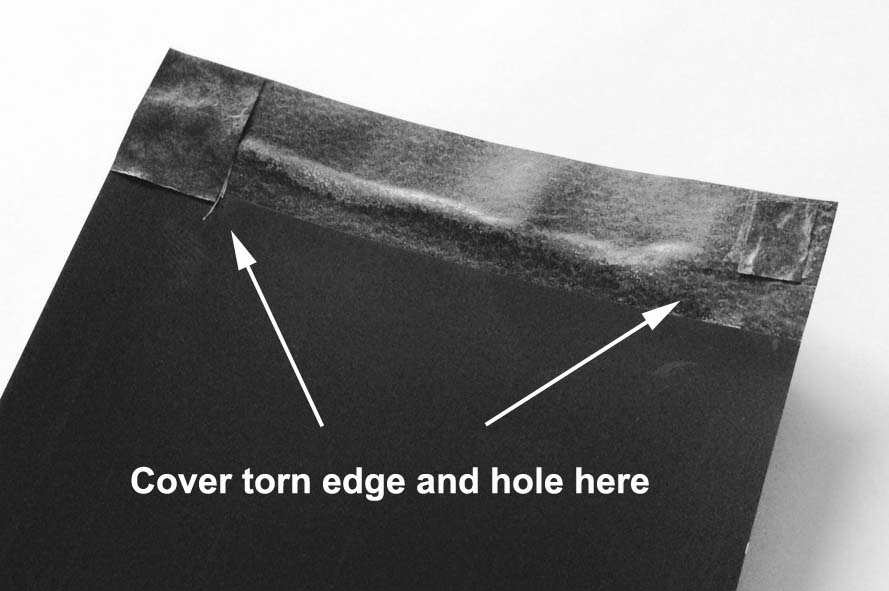
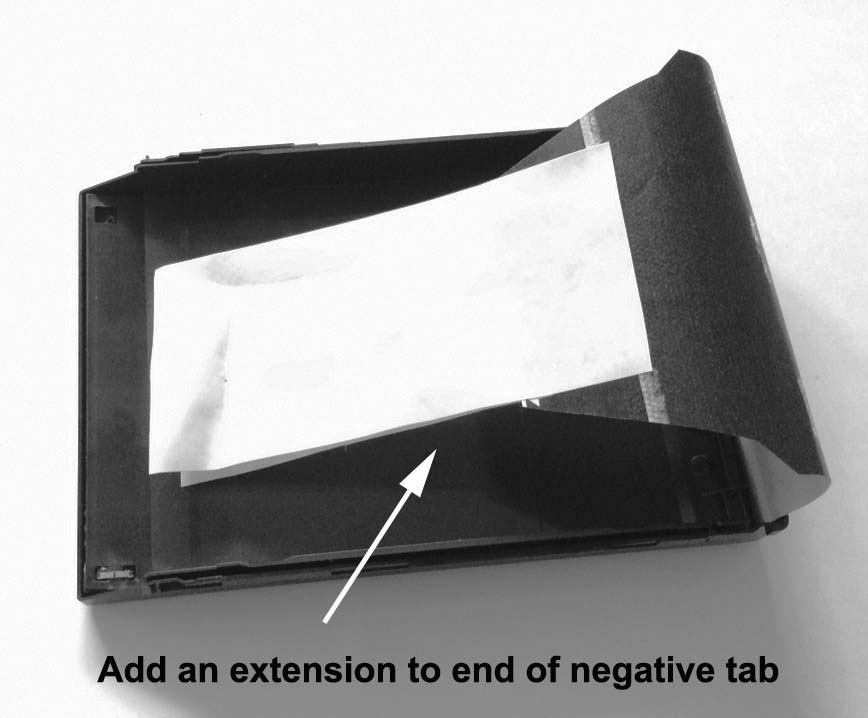
Item 4. While exploring this method further I realized that you can use an old, used, (or new!) instant film negative as a cover sheet. In fact they were designed to block light just as much as the first cover sheet. One advantage is that these appear to be a bit more flexible. If the instant film is used it will look something like the first illustration. One side has the negative image on it and the other side is black. Remove the spent developing pod from the paper backing. Also, note that the end ot the sheet has a torn corner and a hole on the trailing end. It would probably be a good idea to cover these up to prevent light leaks (which would be minor in any case).
The instant film is shorter than the first cover sheet so you will need to add an extension to its leading edge and bring the end of this "tongue" outside the cartridge so that you can withdraw the covering negative and uncover the film in the gate.
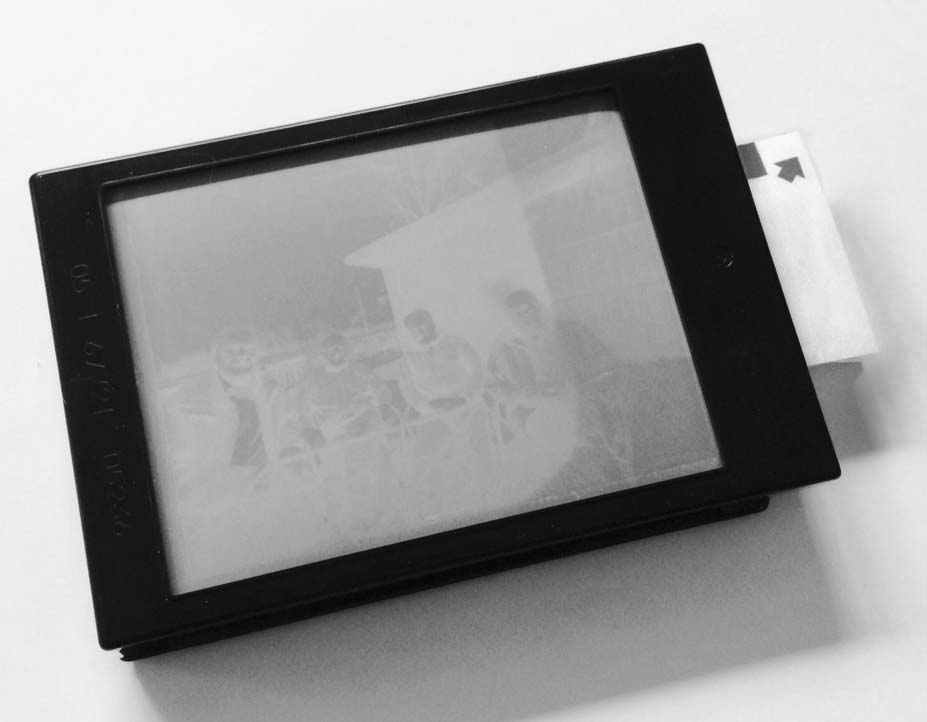
 I
have found that adding a small bit of 2 sided sticky tape at the end
of the cartridge and sticking the new cover sheet to it helps with
making sure the sheet does not move forward befre you pull the cover
sheet to uncover the "live" film behind it when you are about to make a
photograph. The tape should not offer so much resistance that you can't
pull the sheet out and it should remain in place as the paper leaves
it. Practice!
I
have found that adding a small bit of 2 sided sticky tape at the end
of the cartridge and sticking the new cover sheet to it helps with
making sure the sheet does not move forward befre you pull the cover
sheet to uncover the "live" film behind it when you are about to make a
photograph. The tape should not offer so much resistance that you can't
pull the sheet out and it should remain in place as the paper leaves
it. Practice!
I am sure you will find variations to just about every suggestion I made above. I think that is part of the "fun" of making traditional film exposures with vintage Polaroid cameras.
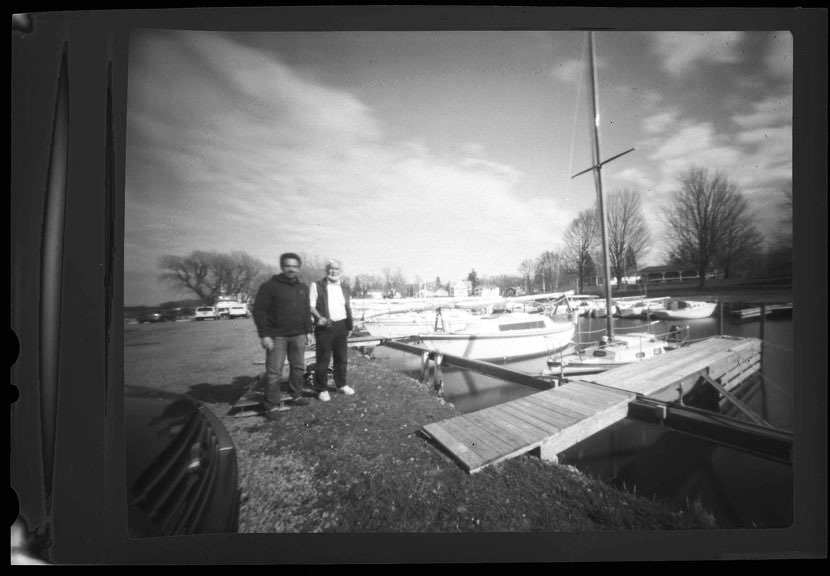
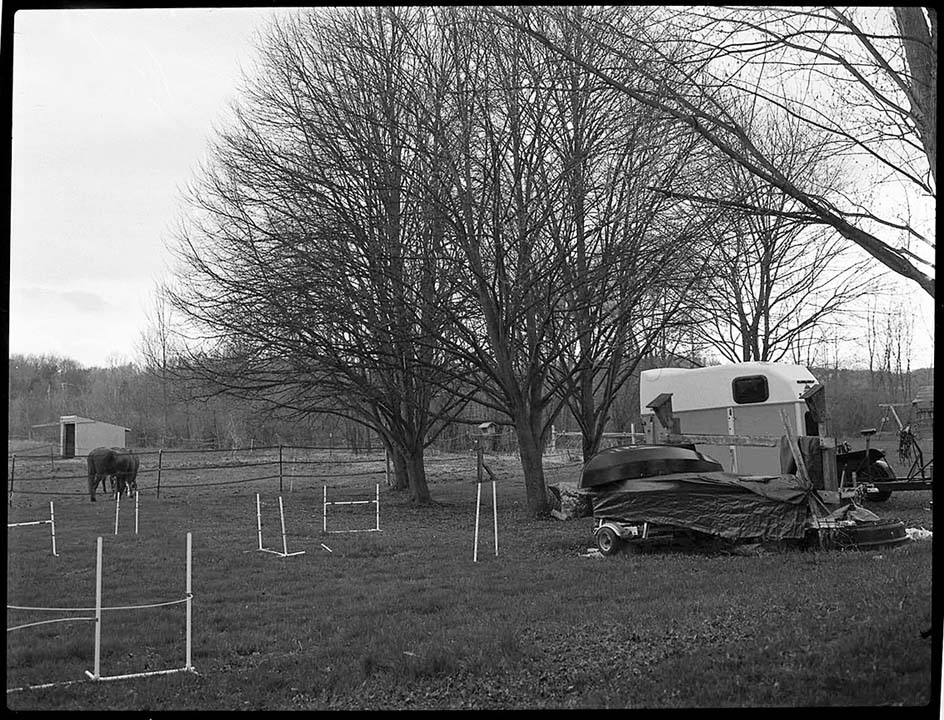
Item 5. Finally, below is an exposure made on Ilford FP4 with the Polaroid 120 Pathfinder camera. It was made essentially just to prove the point. In case you are interested the day was somewhat overcast. The aperture on the 1:4.7 127 mm Rodenstock Ysarex lens was f/8 and the Prontor shutter was set to an exposure time of 1/60 second. Hand held. The film was tray processed for 8 minutes in D-76 1:1 at 68 degrees F.
I hope you found this useful and that it will spur you on to worthwhile experimentation and photographic success. If you want to write me that you found this article of interest I would be glad to hear from you. Also, if you have suggestions for improving this text feel free to contact me at
Andrew Davidhazy, andpph@gmail.com
One can easily take a pack apart whether the ones made by Polaroid or Fuji. They are held together with snap connectors along the top edge of the pack. Just pry the top away from the bottom and out will pop the parts I mentioned although if it is an empty pack then it will not contain the opaque leader sheet or any film stock anymore. Look at the three remaining parts closely to get an idea of what happens within that pack container.
In brief, the pack system works as follows: The opaque leader is withdrawn and this brings a white tab (connected to the first negative/positive combo) to the exit slot and exposes the emulsion of the first exposure to light from the lens when the exposure is made. Once ready for processing the white tab is pulled out and this brings the second white tab out and places the first exposed sheet into the correct position for breaking the developer pod and then processing and transferring image information onto the receiver or print sheet. This is accomplished by pulling out the tab that appeared when the first white tab was pulled out. This breaks the developer pod and spreads the liquid between the paper negative and the receiver sheet. Once processing is competed one separates the donor negative from the receiver, print, sheet and one has a finished product. One generally discards the paper negative and keeps the print. With type 665 materials a very good negative is produced but this material has not been manufactured in years. And this is repeated for every exposure until you are out of film. The pack is now empty.
One word of caution: Resist the temptation to discard the opaque cover sheet. You will need it.
Notice that along one or maybe two edges of the middle septum sheet that has a curved end at one end there are the remnants of paper attached to a small staple at one side of the other end of that sheet of metal or plastic. Clean up that area so it is clean and smooth. By the way, you will need a roll of double sided sticky tape along with the remnants of the empty Polaroid or Fuji film pack.
Now notice that you can place the opaque sheet back in its place, cover it with the redirect septum placing the curved end away from the film exit end of the pack and the smooth side down. You can now bend the opaque sheet back on itself and it will extend beyond the exit lip of the empty pack. Replace the back cover snapping it smartly into place. The completed assembly should look pretty much like an original Polaroid pack.
You can now place that pack in your Polaroid camera and you should be able to pull the opaque paper out without any trouble. If all this happens you good to go!!
Disassemble
everything and go back to the
beginning. Find a sheet of suitable 4x5 film and cut the 4 inch
dimension so that it is close to 3 3/8 inches wide. A little less is OK
but more is not. Make sure you don't cut off the notches on the film as
these will help you determine the emulsion side later on should you
need to know this. And you will!. When they are in the upper right you
are looking (if not in the dark) at the emulsion. In the dark you would
not see anything! Anyway, this is as wide as the channel within
which the Polaroid materials would fit in the pack and is as wide as
the
opaque cover sheet.Still in practice mode replace the cover sheet so it fits snugly towards the end of the pack where the staples were or are. As you did before. Then on top of this place your sheet of sheet film with the emulsion side down, touching the cover sheet. and notice it will pretty much extend the full length of the pack. Now place a bit of double sided sticky tape on the pressure plate and install it into the pack as you did before. You may want to press the front and back of the assembly together at this time. This will affix the film to the pressure plate. Now bend the opaque leader back on itself as you did before and reassemble the pack replacing its back cover. The sticky tape may not be necessary but it ensures that the film will remain where it is supposed to. Just so you know I do not use sticky tape!
Now you don''t even need to try loading the camera as you probably sense that this will work. The pack with your silver halide film is fairly light tight but I would recommend only relying on its light-tightness while the pack is loaded in the camera. My experience is that handling in moderate light levels has produced a small amount of edge fog which in general has not been a problem at least for me.
Once the pack is prepared it loads into the camera as any "old" Polaroid film pack would. You just have it loaded with a single exposure. Notice that you can pull on the black leader paper and it should smoothly glide out of the pack and if you are looking at the front of the pack you will see the trailing end of the leader gradually uncover the film behind it. If the pack is loaded into the camera, the camera would now be ready to make an exposure.
OK ... now read what you have read so far and do the loading process using raw silver halide film. Of course you will have to cut the film and place it into the pack and into the camera in the dark. After a few trials this should not be too difficult to do. Establish a routine and a procedure that you can follow even with your eyes closed. Just make sure you don't just close your eyes and forget to turn the lights out while you are loading your film into the Polaroid pack!!
After exposure you disassemble the pack and remove the film stuck to the pressure plate and process it as you would any normal piece of sheet film. You could prepare several such "cassettes" each loaded with a single sheet of film and then you'd have the opportunity to make several exposures instead of just one. Store each exposed pack in a light tight container. Read below as to how you transfer the film from camera to such a container and how you reload the camera.
Sure. So now what you ask? How do I make another exposure??? Since the raw film is inside the camera and there is no way to replace the black leader you must resort to a drastic measure. A changing bag!!! In fact, the changing bag gives you a way to store and transport several pre-loaded packs as well as a place to unload and load your camera without having it exposed to high light levels during the process. However, as I mentioned above reasonable light levels while handling the pack should not cause much of a problem.
So who said life would be easy? Remember that to make single Wet Collodion plate took a lot of effort. A Daguerreotype even more. But many dedicated and enterprising photographers took on the challenge making one image at time. So what is holding you up?? Give it a shot!!
In my opinion this is a great way to make single shot exposures ... for example a pinhole photograph. Generally we don't make many of these as the fascination with making them tends to ebb and flow. Besides working to make a single negative will possibly improve your previsualization process and the ratio of your number of good photographs vs. the number of almost good ones will improve since you will be forced to think more before pressing the shutter release button. Also, think of the savings that will result form not using so much in terms of photosensitive materials. Your whole life will be simplified by working on one photograph at a time. Maybe one a week! Make them good ones!!
Just to show how well this system worked I actually did make a photograph with my Polaroid pack back adapted to be a pinhole camera. Here it is below. The pack was not exposed to diect sunlight but it was handled in average room light before and after exposure for about 30 minutes. And, of course, it was exposed to dayight such as seen in the photograph, for another 15 minutes or so. Evidence of fogging is quite minimal. The film was Ilford FP4 Plus 125 ISO speed and the pinhole photograph was exposed for about 15 seconds. I don't know what the operating aperture of the pinhole is. Film was tray processed with continuous agitation in D-76, 1:1 dilution, at 70 degrees for 8 minutes. The negative is excellent.
Well,
there are things that one
learns along the way and the next couple of paragraphs are all about
that.
Item 1. I found that the original instant film pack protective sheet now is used and reused and will probably wear out pretty soon so I decided to reinforce at least one end ot it with a layer of clear strong packaging tape. I did not do that to the actual protective end that is in contact with the sheet of film as that part of the sheet has to bend around the "redirect", curled, metal end of the pressure plate and so flexibility is a plus.
However the very end of that
protective sheet is ripped out of staples
the first time it is used and may have tears that may allow some light
to leak in. Nothing major as I have found out in my experience so far
but it you want to deal with placing a nice opaque "end" on that long
protective sheet
that would be something to think about. Don't go overboard in terms of
making that end thick as that may offer unwanted resistance as it has
to curls around the curved end of the pressure plate.
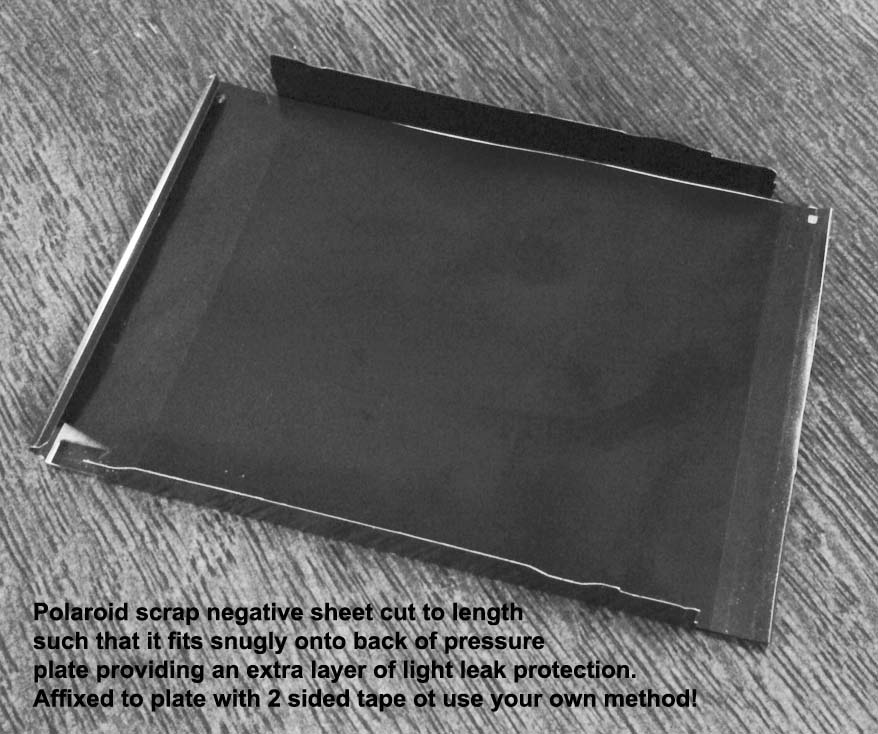
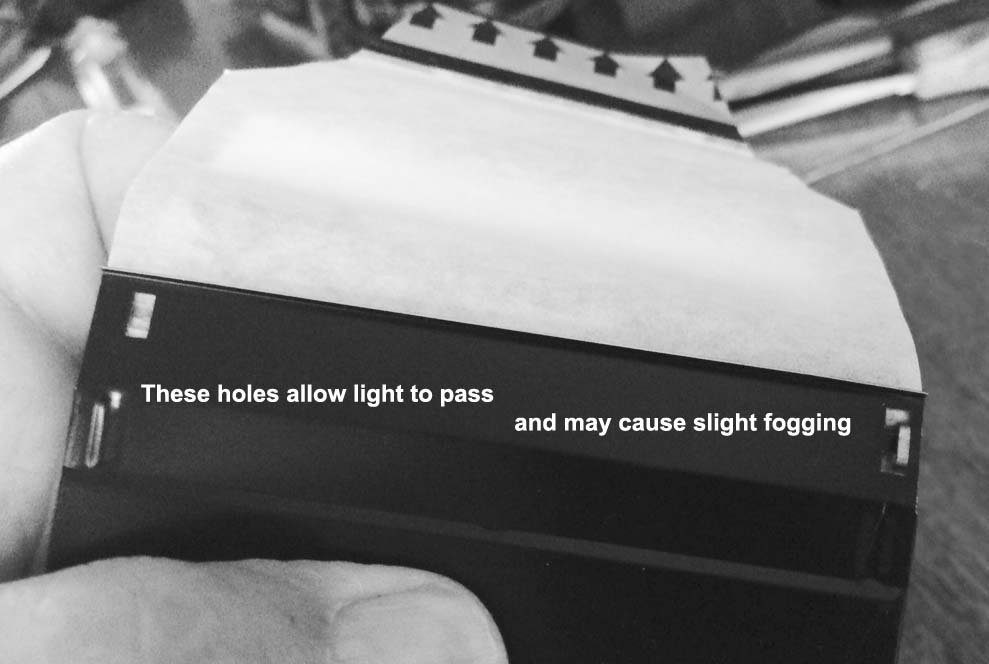
Item 2. Going further, you
will have noticed that the two holes where the staples that held the
Polaroid film back now may be open (since you cleaned them possibly)
and you might want to cover them. Many ways to do this. I opted to do
it by installing a sheet of original Polaroid negative film ... the
opaqie NEGATIVE sheet ... which is very opaque and very black on the
back side since it serves the purpose of protecting the unexposed next
exposure when in the original pack. It is the exact width of the film
channel and I cut the length of it to fit snugly from one end of the
film "tray" to the other. This neatly covered the holes and even
provided a little extra light protection at the other end as
well.

Item 3. I realized that now that I
would
not be using real Polaroid or Fuji film in the camera I actually did
not need
the developing roller assembly. It perfoms no useful function anymore
and I removed it. I think you would also do
well to do likewise. You can always reinstall it if is needed. Its
removal
will make withdrawing the light shield tab that covers your "real" film
easier to accomplish and will save wear and tear on the tab. Item 4. While exploring this method further I realized that you can use an old, used, (or new!) instant film negative as a cover sheet. In fact they were designed to block light just as much as the first cover sheet. One advantage is that these appear to be a bit more flexible. If the instant film is used it will look something like the first illustration. One side has the negative image on it and the other side is black. Remove the spent developing pod from the paper backing. Also, note that the end ot the sheet has a torn corner and a hole on the trailing end. It would probably be a good idea to cover these up to prevent light leaks (which would be minor in any case).
The instant film is shorter than the first cover sheet so you will need to add an extension to its leading edge and bring the end of this "tongue" outside the cartridge so that you can withdraw the covering negative and uncover the film in the gate.
I
have found that adding a small bit of 2 sided sticky tape at the end
of the cartridge and sticking the new cover sheet to it helps with
making sure the sheet does not move forward befre you pull the cover
sheet to uncover the "live" film behind it when you are about to make a
photograph. The tape should not offer so much resistance that you can't
pull the sheet out and it should remain in place as the paper leaves
it. Practice!I am sure you will find variations to just about every suggestion I made above. I think that is part of the "fun" of making traditional film exposures with vintage Polaroid cameras.
Item 5. Finally, below is an exposure made on Ilford FP4 with the Polaroid 120 Pathfinder camera. It was made essentially just to prove the point. In case you are interested the day was somewhat overcast. The aperture on the 1:4.7 127 mm Rodenstock Ysarex lens was f/8 and the Prontor shutter was set to an exposure time of 1/60 second. Hand held. The film was tray processed for 8 minutes in D-76 1:1 at 68 degrees F.
I hope you found this useful and that it will spur you on to worthwhile experimentation and photographic success. If you want to write me that you found this article of interest I would be glad to hear from you. Also, if you have suggestions for improving this text feel free to contact me at
Andrew Davidhazy, andpph@gmail.com