|
Cheap
Polarizer
Based Photographs
Andrew Davidhazy Imaging and Photographic Technology School of Photo Arts and Sciences Rochester Institute of Technology Photographers in general have or should have a good appreciation for the application of polarizing filters among their arsenal of tools to help improve or manage the final look of their images. In this era of digital manipulation or Òimage managementÓ the need for colored filters to adjust the tones or colors in a photograph is no longer absolutely necessary. This is because such adjustments can be done after a photograph has been made. However, a polarizing filter is still the one filter whose effects can not be duplicated with image management tools or programs. The reason for this is that the polarizing filter interacts with light reflected from the subject and alters the outcome based on the interaction between the polarizing filter and the polarized light reflected from a subject. If this interaction is not captured at the time the photograph is made no amount of modification of a digital file can make up for this. In photography, one of the most prevalent or obvious applications of a polarizing filter is that of darkening the sky in those places where the sky sends back polarized light. This s located in the sky at an angle of 90 degrees from the position of the sun at any given time. Another is that of removing glare from storefronts, rocks in mountain scenes, paint on canvases and water covered subjects or watery surfaces themselves in other situations. Polarized light is also the basis on which something called "stress analysis by polarization" works and is used in this application to visualize stress patterns that build up in plastic models of bridges, buildings and similar subjects at the design stage. For the polarizer to work its "magic" however, certain conditions must exist or be arranged. The light that makes up the glare light must be reflected from the subject a a particular angle. This angle is about 35 to 40 degrees. Polarizing filters have no, or very little, effect on light that is reflected straight back to the camera. One area where polarizers also are used is in the study or simple visualization of internal stresses built into plastic or sometimes glass subjects such as plastic drawing aids like french curves and triangles, plastic silverware and cups as well as eyeglasses and similar subjects. What all of these subjects have in common is that they are electrically non-conducting. Meaning that electricity does not travel through the material that these objects are made from. 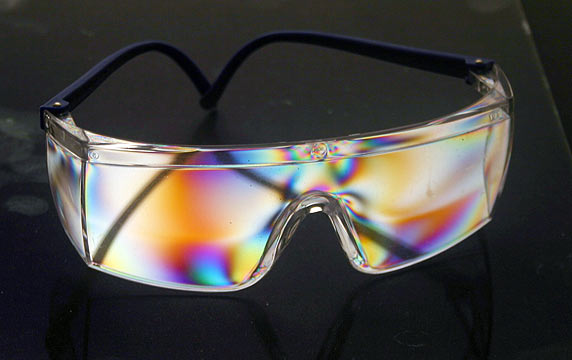 If subjects are conducting, such as metal objects, then the polarizing filters have little or no effect on the capability of a polarizing filter to remove the polarized, glare, light. But all of the above is simply background information to the purpose of this article. The assumption here is that we wish to create unusual, vivid, colored, images of plastic subjects placed in a polarized beam of light. This is generally accomplished by placing a large sheet polarizer over a light table and installing a polarizing filter over the camera lens. When one rotates the filter its polarization direction can be made to match that of the sheet filter in which case that filter appears to have a very light tone. When the filter on the camera is turned 90 degrees to that position it is noted that the sheet filter darkens considerably. In fact it may appear to be quite dark. This is because the "plane" of polarization introduced into the light that passes the sheet polarizer is at right angels to that which the filter on the camera allows to pass. Now placing certain crystalline plastic objects between the sheet polarizer and the polarizing filter on the camera lens causes some of the colors making up the light that travels through the sheet filter to turn slightly or a lot. If the amount by which they are turned matches the orientation of the polarizing filter on the camera lens those colors are able to pass through the filter and make a colored area in the image. Those colors that are turned so they are at right angles to the filter on the camera lens are blocked from passing through and we see that area made up of the combination of those colors that are able to make it through. It is in this fashion that a color like magenta is produced in an image even though magenta is not a color that exists in the spectrum. It is made up by a combination of red and blue light mixing together in an image. When the polarization angle of green light is turned so that it is at right angles to that of the filter on the camera lens, green light is absorbed and that area is seen by the combination of red and blue and appears magenta. In order to make such photographs a large sheet of polarizing material is required. This is available from various sources but it tends to be quite expensive and often beyond the budget of most amateurs or experimenters. 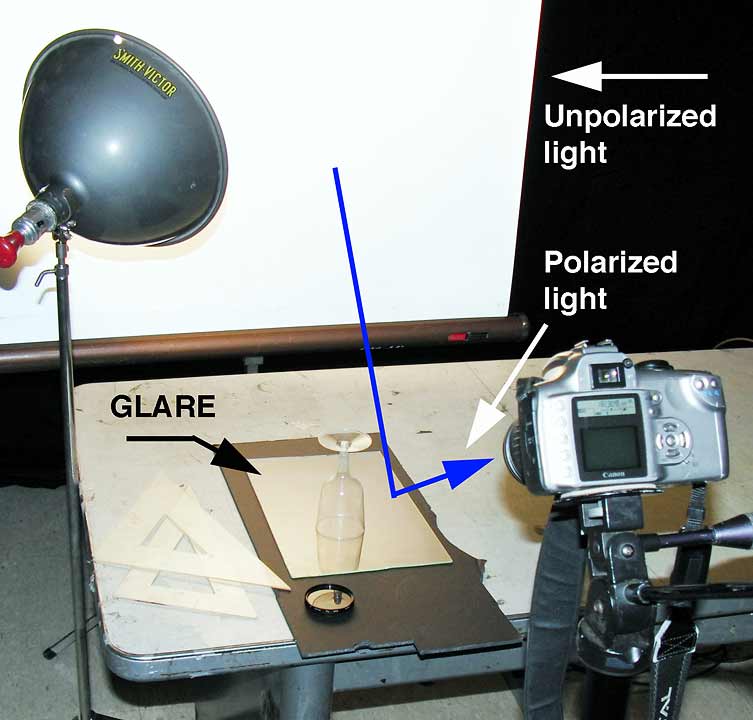 However, no all is lost. The suggestion here is to make use of the property of glare light as a source of polarized light. Which it indeed is but we seldom stop to realize this and less seldom still do we have any positive thoughts about glare light! Well, think again. If you need a large area or source of polarized light you can relatively easily secure such a source for yourself by the simple expedient of reflecting a broad area source, such as a soft box or the light reflected from a projection screen, from the surface of a flat sheet of glass such as window glass. Or, if safety is a concern then you could also use a sheet of plexiglass or plastic. Even a pool of water will do! Just set the reflection up so that it hits the glass at about a 35-40 degree angle and then look at the reflection from the opposite side of the sheet of glass and looking directly into the reflection from about the same angle as the light hits the glass on the other side. You should see a relatively evenly illuminated, white, reflection from the glass. If now you look at the glass through a polarizing filter you will notice that as you turn the filter the sheen on the surface of the glass will change in brightness depending on the rotation position of the filter. You can make the "glare" appear or disappear at will. This indicates that the light reflected from the glass is indeed polarized. It helps if you place the glass or plastic on a black, light absorbing, surface such a black construction paper or, better yet, black velvet. If you don't then obviously, through the glare, you will see whatever happens to be below the reflecting surface. This is much as you would be able to see into a store-front window by eliminating reflections from the steet environment. 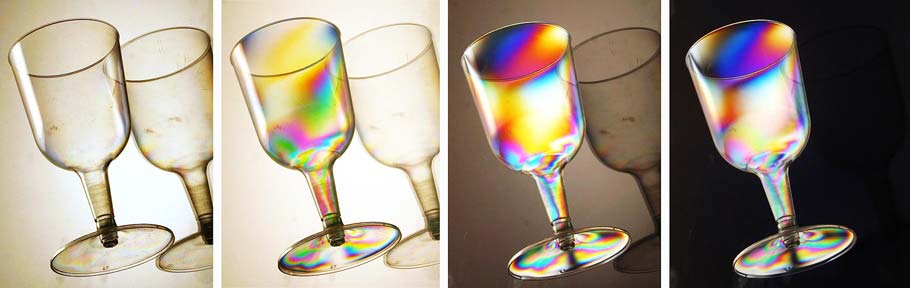 Now if you place a crystalline plastic object on the glass surface or anywhere in between that surface and the polarizing filter on the camera lens the object will probably appear to be made of colored areas whose position on the subject will, to some extent, depend on the rotation angle of the camera polarizing filter. Of course, its position will also affect the brightness of the background. In the above illustration you can see the progression from no polarizer on the lens to a polarizer adjusted so it slightly interacts with the reflected glare polarized light, the next one shows even greater effect and finally the plane of polarization of the glare light is at right angles to that of the polarizing filter on the camera lens and so the background, is pretty much totally darkened. A source such as this for doing polarized photography is much less extensive than buying a plastic polarizing sheet and, in fact, it is in some respects even better, because this method of creating a polarized source is quite neutral in color while plastic sheet polarizers tend to "leak" certain wavelengths (usually blue) more than others. 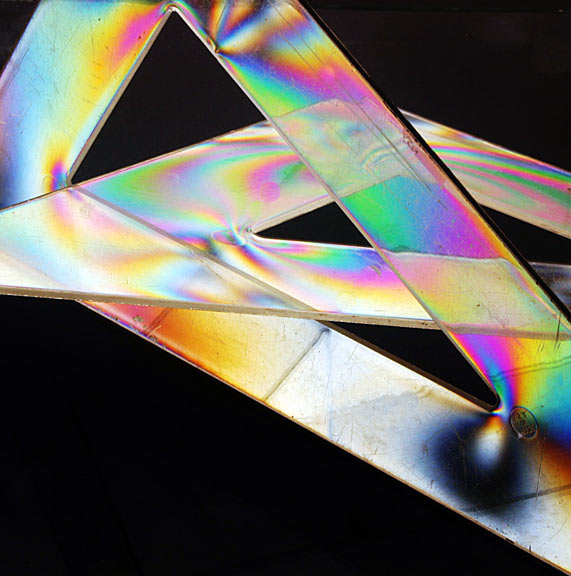 GOING FURTHER ALONG ON THE "CHEAP" ROUTE! So far I have been assuming that a high grade commercial polarizer that you would use in front of your camera lens would be available to you. If this is not the case and you are on a tight budget I have a suggestion to make. Try rummaging through the discarded eyeglasses and sunglasses bin at places like the Salvation Army or the Veterans of America and pick up a pair of hopefully inexpensive clip-on sunglasses or polarizing sunglasses with no "power". Knock out the lenses and use one of them as a cheap substitute for a photographic quality polarizing filter. You can tell if the lenses are polarized by looking at glare reflected from the top layer of a glass of water or most any other liquid. If the surface darkens as you rotate the material in front of your eyes, glare is eliminated, and the glasses or clip-ons are polarized. An alternative source for inexpensive polarizing filters are those made for viewing 3D movies or images. Mounted in cardboard they are set-up for the purpose mentioned but there is nothing stopping you from cutting those cardboard "frames" apart and using a single one over your camera lens. Sure, they are not super quality but then neither is the price. While small the price is also small. Typically less than $1 per pair and available from many sources on the Internet. In fact, the two halves of a polarizing clip-on set can be used by themselves to photograph small objects by placing such objects between them and adjusting the angle between them for the desired effect. Use a large diffuse source to backlight the set-up. Take the illustrations as a guide to what you need to do to create and use a glare-based polarizing source and to make colorful, dynamic and impactful images. If
you have any questions or suggestions about this topic feel free to
write to me, Andrew Davidhazy, at andpph@rit.edu
|