|
Andrew Davidhazy
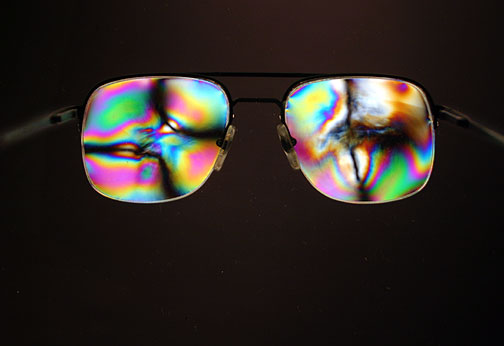
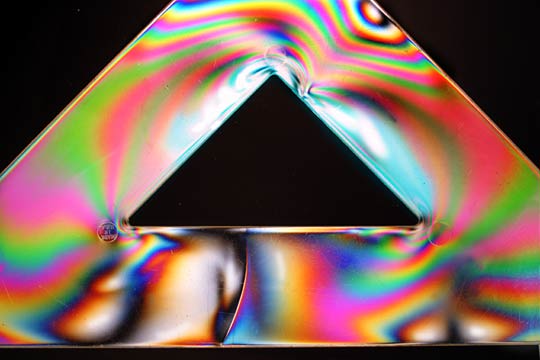
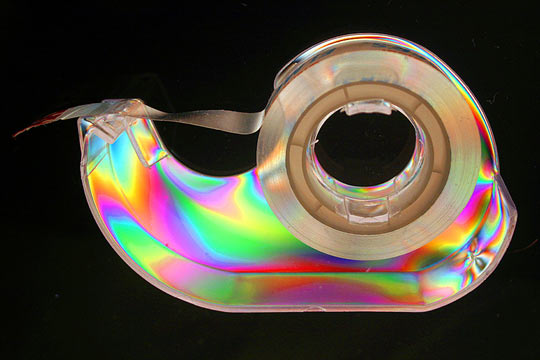
Examination in a polarization system or beam is among the most common visualization tools used by optical engineers and designers to determine the degree to which a particular transparent object has had internal stresses due to a casting or pressing process removed. Many transparent objects made especially of plastic, although other materials behave similarly, change the character of an incident beam of light in a manner that is hardly visible to the naked eye. However, when the object is placed in a beam of polarized light and viewed through another polarizer, internal non-uniformities give rise to a surprising array of previously unseen colors and shades of gray. The effect that makes these colors appear is that the material has the ability to turn the plane of polarization of an incoming beam of light. The degree to which the plane of polarization is turned depends on the color of the light and the stress or characteristic of the material at any given point. This property of materials to affect the characteristics of a beam of light traveling through them can be used for quantitative as well as qualitative (read visually stunning!) applications. The materials required to explore the application of polarization as a creative tool are quite simple and surely within the budget of most photographers. Assuming the subjects that will be photographed are relatively small in size one needs a light table or illuminator that is bigger than the subject that will be photographed by transillumination. The cameraÕs lens needs to be fitted with a polarizer. This may be a linear, or plain polarizer, or a more expensive "circular" polarizer. The surface of the light box itself needs to be covered with a sheet of polarizing material. A neutral colored (gray) sheet polarizer is suggested but in a creative environment you might try other shades as well. Polarizing sheets in suitable sizes may be purchased from a number of suppliers but one that comes readily to mind is Edmund Optics (www.edmundoptics.com/) . Their 8.5x15 inch sheet of gray polarizing material, part number T45-668, currently priced at $35.50 is what I would recommend. For an illuminator you could start with one equipped with fluorescent tubes or you can improvise with a sheet of opalescent glass or plastic that you can illuminate from below with a tungsten lamp. Be careful not to overheat the glass or plastic. You could also use an off camera flash to provide the lighting. It helps if you have a copy stand but if not improvisations are quite possible. The idea is that you will be making a photograph of some plastic object lying on the polarizer placed on the illuminator and you want to set-up a system for doing this that is convenient and easy to work with. Note that some old enlarger baseboards and columns can readily be adapted to becoming a copy stand! Now place the polarizing sheet on top of the illuminator so that it covers the whole top of it. If the illuminator's surface is bigger than your filter then mask off the open areas with tape or black paper. The light box is placed on the baseboard of the copy stand. Attach the camera, whose lens has been fitted with the polarizer, to the copy stand's camera bracket and while viewing through the viewfinder rotate the polarizing filter on the lens. You will notice that the polarizing sheet, which will be the background for your subject, changes in density or darkness, going from a relatively bright condition to one where the camera's screen is quite dark. The polarizing sheet aligns the plane of polarization of the unpolarized light arriving to it from below so that only those components of the light from the illuminator that vibrate in the same direction as that of the orientation of the sheet polarizer are able to pass. When these rays arrive at the second polarizer that is fitted to the camera lens they can either pass, if the filter's plane of polarization is aligned with the of the sheet polarizer, or they are completely blocked if the polarization direction of the light leaving the sheet polarizer and that of the filter on the camera lens are aligned at right angles to each other. The thing to keep in mind is that only those light rays whose plane of polarization matches that of the filter on the camera lens can pass while the others are progressively more blocked.
Now place a transparent object preferably made of plastic (such as a plastic eyeglass lens or a plastic triangle or protractor) on the polarizer on the illuminator. Probably immediately you will notice that the subject as seen through the camera's viewfinder is no longer a uniform color but has acquired a myriad of colors. These can be made to change, while also changing the density of the background, by rotating the polarizer on the camera lens. Subjects that have this property of altering the direction of the plane of polarization of an incident beam of light are called birefringent. Wherever a particular color appears it is due to the fact that the wavelengths that are complementary to that color have been subtracted out from the white light beam that arrived at the subject in the first place. So if you see an area tinted yellow, this is due to the fact that blue wavelengths that passed through the subject had their plane of polarization turned so that they are now perpendicular to that of the filter on the camera lens and thus blue is subtracted from the beam. If blue is removed then what we see is made up primarily of red and green and thus we perceive that area as yellow. If we see a magenta area this means that the polarization direction of green light is now aligned at 90 degrees to the plane of polarization of the filter on the camera. What remains once green has been removed from a white beam is red and blue and this we perceive as magenta. In any case, this is more a this is more a visual exercise than a technical one and while there is no need to know how the color come about at least now you have a general idea of the process. For successful photography there are a couple of suggestions. The first one is related to determining the proper exposure. If you are using a built-in meter manually or relaying on the auto-exposure function of your camera you may want to underexpose a stop or maybe two if the background you chose is dark. Meaning that as far as the background is concerned you have crossed the plane of polarization of the sheet with that of the filter on the camera. Conversely open up a stop or so if you have chosen a white background. With your digital camera it is advisable to check on the histogram associated with any given photograph to make sure you have not inadvertently under or over exposed the shot. Errors in exposure can creep in if your camera meters through a semi-silvered mirror located somewhere in the metering system of the camera. These also have a plane of polarization and will influence the exposure depending on how they line up with the plane of polarization of the light coming through the filter on the camera lens. As for suggested subjects consider any transparent subject. If made of crystalline plastic as many inexpensive drafting tools your chance of success is high. Plastic toys, crystalline candy wrappers or glassine envelopes are additional possibilities. Stacking transparent subjects also may lead to interesting results. Try it! Again, this is mostly about results and the above instructions are provided
merely to serve as a point of departure for creating visually stunning
images whose interesting color are not the result of post-processing and
manipulation but rather that exhibit intrinsic visual qualities in the
objects you photograph.
I hope this material has been or will be of use to you. Feel free to write to me if you have any specific questions about visualizing stress pattersn with a polarization technique. Write to me HERE. |