|
Photogrammetry Project 01 Andrew Davidhazy Imaging and Photographic Technology School of Photographic Arts and Sciences /
RIT This is a project suggested to test whether one can make a good estimate of the size of an object following the principles associated with "radial displacement" as generally associated with aerial photography. The objective here is to replicate the procedure on a terrestrial basis. What is needed for this project:
You will need to identify a location where there is an "inside" corner on a building or room. The diagram below should give you a visual illustration of what the location might look like. Click on the image to see a larger graphic in a new window.
To set up for this project proceed as follows:
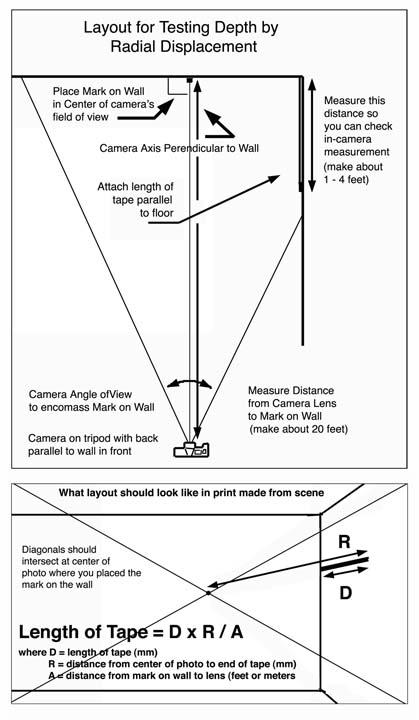
At this point notice that the optical axis of the lens will be at right angles to the wall in front and the piece of black tape will appear somewhere to the right of the viewfinder and you should be able to see the corner of the room as well as the part of the black tape nearest the camera. Make a photograph with the camera lens set to infinity focus and use the smallest aperture you have available. You will be depending on the Depth of Field of the lens to ensure that all objects of interest are reproduced sharply. Before or after making the photograph make a measurement of the distance between the center of the camera's lens and the wall in front of it in any units you wish. Feet or meters. Record this as distance A. While you are at it you should also make a measurement of the length of the tape you attached to the wall. Keep a record of this as this will allow you to check later how close you came to determining the length of the tape photogrammetrically. Make a photograph of the scene. If the tape you placed on the wall was somewhat higher on the wall than your camera then the view in the viewfinder and on a print made from the negative or a digital file would look somewhat like the illustration below (without the diagonal lines). Click on the image to see a larger graphic in a new window.
Now draw the diagonal lines extending from one corner to the other on the print. The print now will start to look like the sample drawing shown above. If you had everything aligned properly before you made the photograph you will notice that the diagonal lines will cross over or very close to where the mark was placed on the wall by your buddy. In aerial photography terms the "nadir", or point on the ground below the airplane and leading to the center of the earth, is located where the optical center or principal point of the photograph is determined to be by the crossing diagonal lines. Now, on the print using any convenient measurement tool, measure the distance in mm, inches or other units, from the black mark on the wall or the intersection of the diagonal lines (they should be close to the same location), to the farthest point of the black tape that you attached to the wall. Make a record of this distance and call it R. Then, using the same units as above, measure the length of the image of the black tape on the print. Make a record of it and call it B. To determine the length of the tape from the measurements you have just made you simply multiply B times A and divide by R. Note that this process is completely independent of how big or small the print that you make is. It is also independent of lens focal length. All that matters is the "radial displacement"! In this example, we will assume the camera was 20 feet from the wall in front or 20 feet from the base of the length of tape attached to the side wall. If you print out the larger version of the illustration above (click on it to get larger version) you will note that on the print, the distance from the center of the photograph to the farthest point of the tape measured away from the center of the photograph is 43 mm. The length of the image of the piece of tape measures about 13 mm. Therefore the length of tape in reality (as measured from this image) is 13 mm x 20 feet / 43 mm or .302 x 20 feet or 6.05 feet which is about 72.6 inches. How long was the piece of tape actually on the wall? Let's say 5 feet 8 inches or 68 inches. The discrepancy therefore is 72.6 - 68 or 4.6 inches out of 68 inches or about 6.7%. If you asked passersby to estimate the length of the tape just by looking at the scene how close can they do this on the average? Points to
ponder: 1. How much of an error in tape length would be introduced by a 1 mm error in measurement? 2. Why is this method independent of lens focal length? 3. Why is this method independent of print magnification? 4. Can the subject be tilted and one still end up with a good measurement? Why or why not? 5. Under what conditions will this method yield the most and least accuracy? 6. How far off the "nadir" point can the camera point and still make reasonably accurate measurements (difficult question! |