Peripheral or rollout
photography for every potter
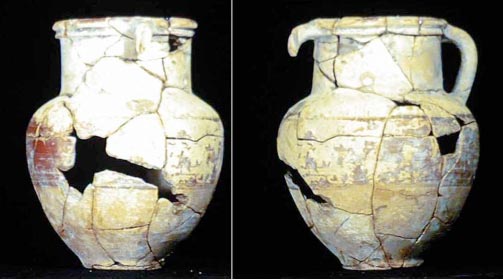
Do you have items with decorations or patterns that are applied around the whole circumference of your pottery? If so how do you communicate by way of photographs what these are to others? It is common practice to simply photograph the object from several points of view so that by looking at the set of photographs a person can appreciate the detailing on the outside surface or periphery of the pot.
The desire to depict on one flat sheet all the information on the surface of cylindrical objects has been of interest to potters and ceramicists over the years. The making and photographic recording of the total surface of pottery is known as peripheral or rollout photography. In its simplest terms this technique can be best explained as non-contact printing where the pot becomes an inked cylinder which when rolled on a sheet of paper transfers the ink to the paper leaving a record of the pattern impressed in the ink. As in a printing press. When the cylinder makes one revolution effectively all the detail on its surface is transferred to the paper and one ends up with a reproduction of the pattern impressed on the cylinder.
The special technique of peripheral photography as applied to pottery was successfully described and practiced at the British Museum as early as the 1890s by Arthur Hamilton Smith, the Keeper of the Greek and Roman Antiquities and later by others. The Shell Periphery camera of the 1960s provided a ready-made solution to museums (and law enforcement agencies) in particular. Unfortunately the process was quite cumbersome and special training was necessary to obtain quality results. I published an article in Ceramics Monthly in the February 1986 issue detailing an improvised process based on the use of film technology. In spite of it being a simplified method it still required quite a bit of motivation and interest to end up with quality results.
Recently, the advent of digital imaging technology has made the process of generating peripheral records much more readily accessible to everyone.
Today, with various phones equipped with built-in cameras, you should be able to produce peripheral or rollout records that match or exceed the quality that was possible with film based methods. In order to make such records you need an application or program that will make your phone camera operate in a modified image capture mode. One that I would recommend is the rather inexpensive Slit-Scan Camera app designed to work with the iPhone.
Slit-Scan is designed to make your camera concentrate on a single line of pixels (or a few), out of all of those making up a complete picture, every 30th of a second. While each frame in regular mode might be made up of 1000 vertical lines, the Slit-Scan app discards 999 and keeps 1 (or a few). Then it does the same when the next frame is recorded and it adds the information recorded by the second line to that of the previously recorded line. This process continues until the camera’s ability to store picture information is exhausted. Then the recording stops and the camera is becomes available for the next “time frame”.
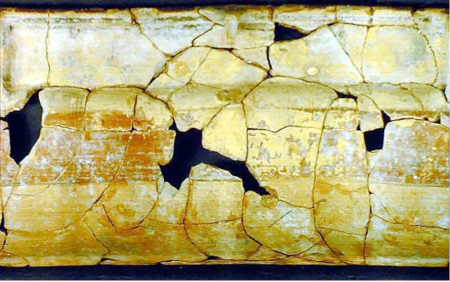
If the subject presented to the line in space that the camera records is of a uniform tone, then, since all the lines recorded by the camera contain the same information the result will be a picture that is uniform in tone from one end of the picture to the other. If the the image is non-uniform then a series of streaks running from one end of the final picture to the other will be recorded. If , on the other hand the subject moves and its appearance on the line of pixels changes with time then these changes will also be reflected in the final image and this makes it possible to make rollout or peripheral records of surface details encompassing the whole circumference of pottery and other subjects.
Making a peripheral photograph with the Slit-Scan app
 First
find the app and install it on your phone. It’s published by
Funner Labs, funnerlabs.com, and it’s cost is at par with many
other apps. It is not the scope of this article to cover every detail
of the workings of the app but you should read the tutorial to
familiarize yourself with it. I use it with my iPhone.
First
find the app and install it on your phone. It’s published by
Funner Labs, funnerlabs.com, and it’s cost is at par with many
other apps. It is not the scope of this article to cover every detail
of the workings of the app but you should read the tutorial to
familiarize yourself with it. I use it with my iPhone.To make your peripheral photograph start by attaching the camera to a steady support or devise some means that will keep the camera stationary while photographs are being made.
Besides your phone and the app you will need a turntable to hold and rotate your pot. A motorized turntable is best but it needs to be able to turn at a very low speed. Lacking a motorized one you can experiment by rotating the turntable by hand … a steady hand!
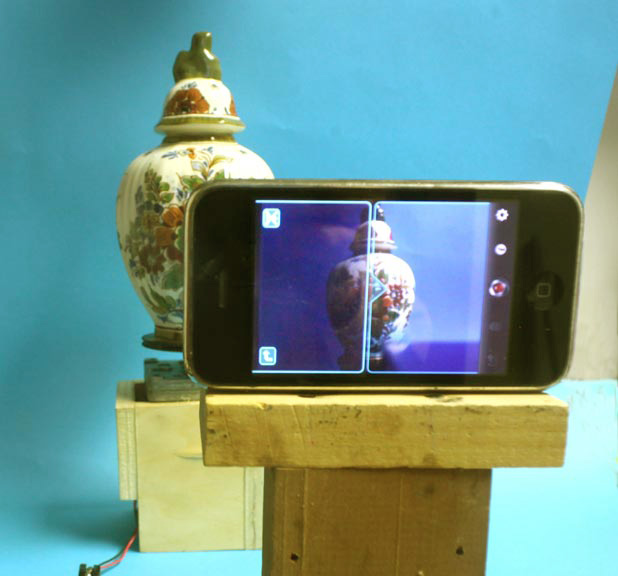
Adjust the distance of the camera in such a manner that with your pot roughly centered on the turntable it’s height extends almost the full height of your camera’s field of view.
Remove your work and place something like clay in the center of the turntable then stick a pencil in the clay so it projects vertically up from center of the turntable and is held up by the clay. When the turntable is rotated the pencil should not move side to side but should remain centered on the turntable.
 You
will notice that the app allows you to chose from several
configurations. Find the one where a vertical line extends across the
short dimension of the screen. That is the line that the camera will
eventually record again and again over time. In the settings panel
select “single pixel” line width and 30 fps. Make sure the sensitive
line on the camera screen is centered within the screen. You can move
it left and right by simply touching it and dragging it one way or
another. Center it.
You
will notice that the app allows you to chose from several
configurations. Find the one where a vertical line extends across the
short dimension of the screen. That is the line that the camera will
eventually record again and again over time. In the settings panel
select “single pixel” line width and 30 fps. Make sure the sensitive
line on the camera screen is centered within the screen. You can move
it left and right by simply touching it and dragging it one way or
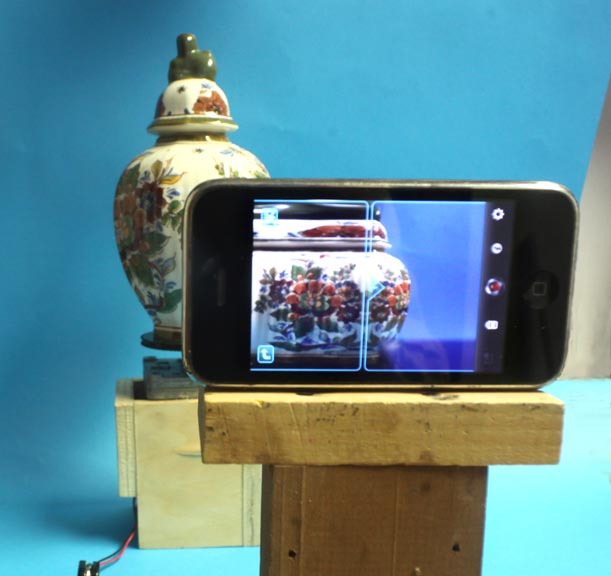
another. Center it.Now aim the camera so that the line is aimed at the pencil. Then remove the pencil and replace your pot on the turntable centering it as best you can. The set-up should look something like the photo shown here
Tap the red capture button on the app and you will notice “bands” or “streaks” increasing in length over time. Now power up the turntable and you should notice the streaks change in character and eventually the changing
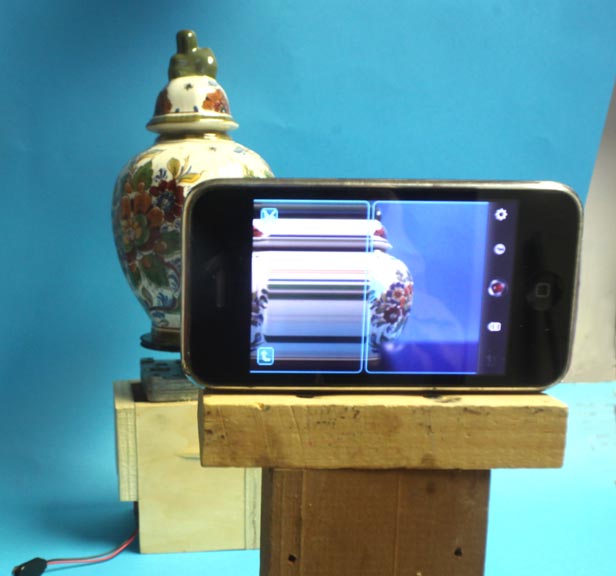
surface detail features of your pot will be “rolling out” on the display screen of the camera and moving towards one side of the frame or the other.
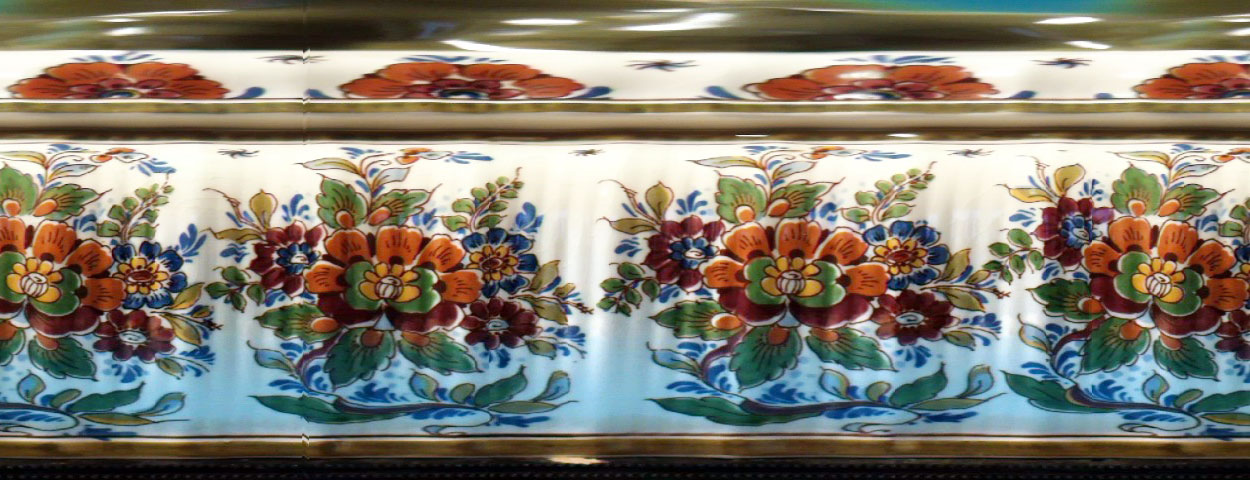
After some time recording will stop and you can save the image in your library or collection.
If as you examine the result of a record you notice that surface details appear to be stretched out or compressed, you simply make another record but this time you adjust the rate at which the turntable turns making it either faster or slower than the previous time. The best speed can only be judged from looking at your results. If the features of interest are compressed the turntable needs slowing down. If stretched out then the speed needs to be increased.
Note that pots that have large differences in circumference along their height will appear stretched out in some places and possibly compressed in others while one region may appear quite normal. This is something inherent in peripheral reproductions and is due to the fact that the circumferences vary in length on the pot and the image lengths of a reproduction are the same for any given amount of recording time.
If the reproduction appears reversed left to right then the turntable needs to rotate in the opposite direction with respect to the first time. Here is another example. Note that it is not possible to satisfactorily record details around small and large circumferences of a given pot. A compromise reproduction is selected. Generally details around the belly of the pot are usually given preference over those there the pot has a smaller diameter.

Please note I do not have any connection with the maker or seller of the app discussed above. If you have any questions or want to discuss this process feel free to write to me,
Andrew Davidhazy, andpph@davidhazy.org