Proving Newton right or wrong
with Blur photography
Andrew Davidhazy
Rochester Institute of Technology
School of Photo Arts and Sciences
Andrew Davidhazy
Rochester Institute of Technology
School of Photo Arts and Sciences
Sir Isaac Newton determined that the acceleration constant for gravity was 32 feet/sec/sec. This is a fact that most students become familiar with over time and through various means. But how can it be demonstrated simply in a classroom situation and using relatively simple equipment?
Traditionally the method that was used was to photograph a falling body with a stroboscope to periodically illuminate the object while a camera recorded the image of the object located at various positions along its descending path. For this a stroboscope is needed and such a device, whether simple or sophisticated, is often not readily available to teachers or students.
However, if a camera with shutter speed that can be manually set is available then there is an alternative way to engage students in a photography-based project to determine the speed of a moving object.
It turns out that unlike older mechanical shutters modern electronic camera shutters are set at the factory to deliver accurate exposure times. Such shutters therefore can be used to provide a reliable and known exposure time or simply measure of elapsed time. And this then can be used to determine the distance that a falling object moves during a chosen time interval.
Further, the amount of motion blur in a photographically recorded image is a direct function of the exposure time used. The longer the exposure time the longer the blur that a moving object leaves on a photograph. That is:
Blur = velocity X delta T or object velocity multiplied by exposure time
Assuming then that exposure times are known the speed of an object can be determined if one can measure the length of a blur caused by a moving object.
To determine the distance that an object moves during the observation period or exposure time of the camera, based on a photograph made of it, one needs to include some scale or scaling reference in the photograph next to the flight path of the dropping subject. Most often a plain yardstick or meter stick will do. This stick should be marked with a reference mark of some kind like an easily visible arrow.
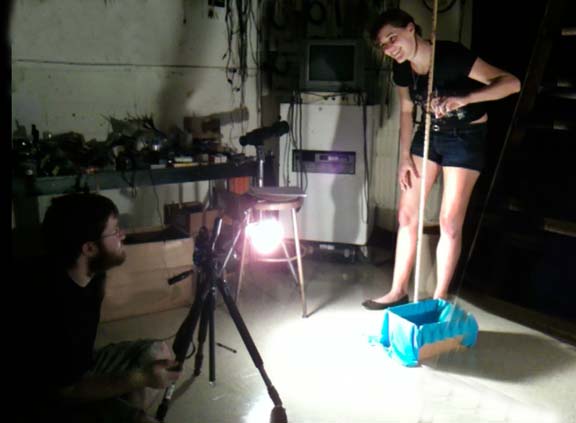
The camera should be set up on a stable support of some kind such as a tripod but other solutions can be improvised. The camera should be prepared so that it is aimed at the reference mark marked on the reference stick. Its distance from the stick should be adjusted so that about two feet above and below the reference mark are included in the view and that the camera is oriented in the "portrait" or vertical position and aimed so that its back is parallel to the flight or drop path of the falling object that will provide the “blur” that will be measured later in the photographs.
So now what should the object be? Preferably it should be something small, round, very shiny and “massive” for its size. A small ball bearing will do nicely.
The procedure now involves dropping the ball bearing from various heights above the mark on the yardstick making sure to annotate the distance from which the ball was dropped for each photograph. In practice this might be from 1 ft to 6 or 7 feet which is about the most one can expect to reach in a room with a normal ceiling height and the camera (and mark) about 1 to 2 feet off the ground.
The next step is to select some shutter speed that will cause blur to appear in the photograph when the ball is dropped from a distance. This maybe 2 feet or 3 feet. By comparing the blur length on the recorded image with that of the distance markers (inches or cm) on the ruler placed next to the blur, the length of the blur can be determined.
An aperture on the camera is selected to produce an image of the falling ball that can be recognized as a blur next to the ruler. It also helps to make the background for the falling ball as dark as possible so that the blur trace can be easily identified. The light that is used to illuminate the ball trajectory could be any bright light with smaller in size the better. This would cause the highlight or reflection of the light by the ball to appear to be small and will make its size negligible in comparison to the size of the blur in the photographs.
The blur should be relatively short; maybe 2 or 3 inches long, as the ball does pick up speed with distance from drop point. If the blur is short then the speed in the middle of the blur will closely match the average speed of the ball from the time it was first seen by the camera until its view was extinguished by the closing shutter.
Based on Newton we can state that at a given distance from drop point or rest the velocity of a falling subject squared is equal to 2 times the acceleration due to gravity times the distance from rest.
So, V squared = 2 as or V = sqrt 2 as
And then also:
a = V squared divided by 2s
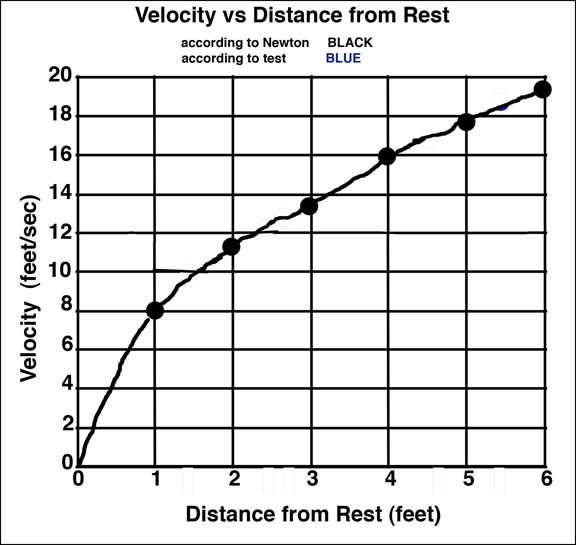
When these equations are plotted as velocity from rest and acceleration of the falling object they lead to graphs such as shown below:
But how do we “prove” for ourselves that Newton’s value for acceleration is true? Or how do we determine the velocity at a given distance from rest or what is the distance that a falling object travels at a given distance from rest?
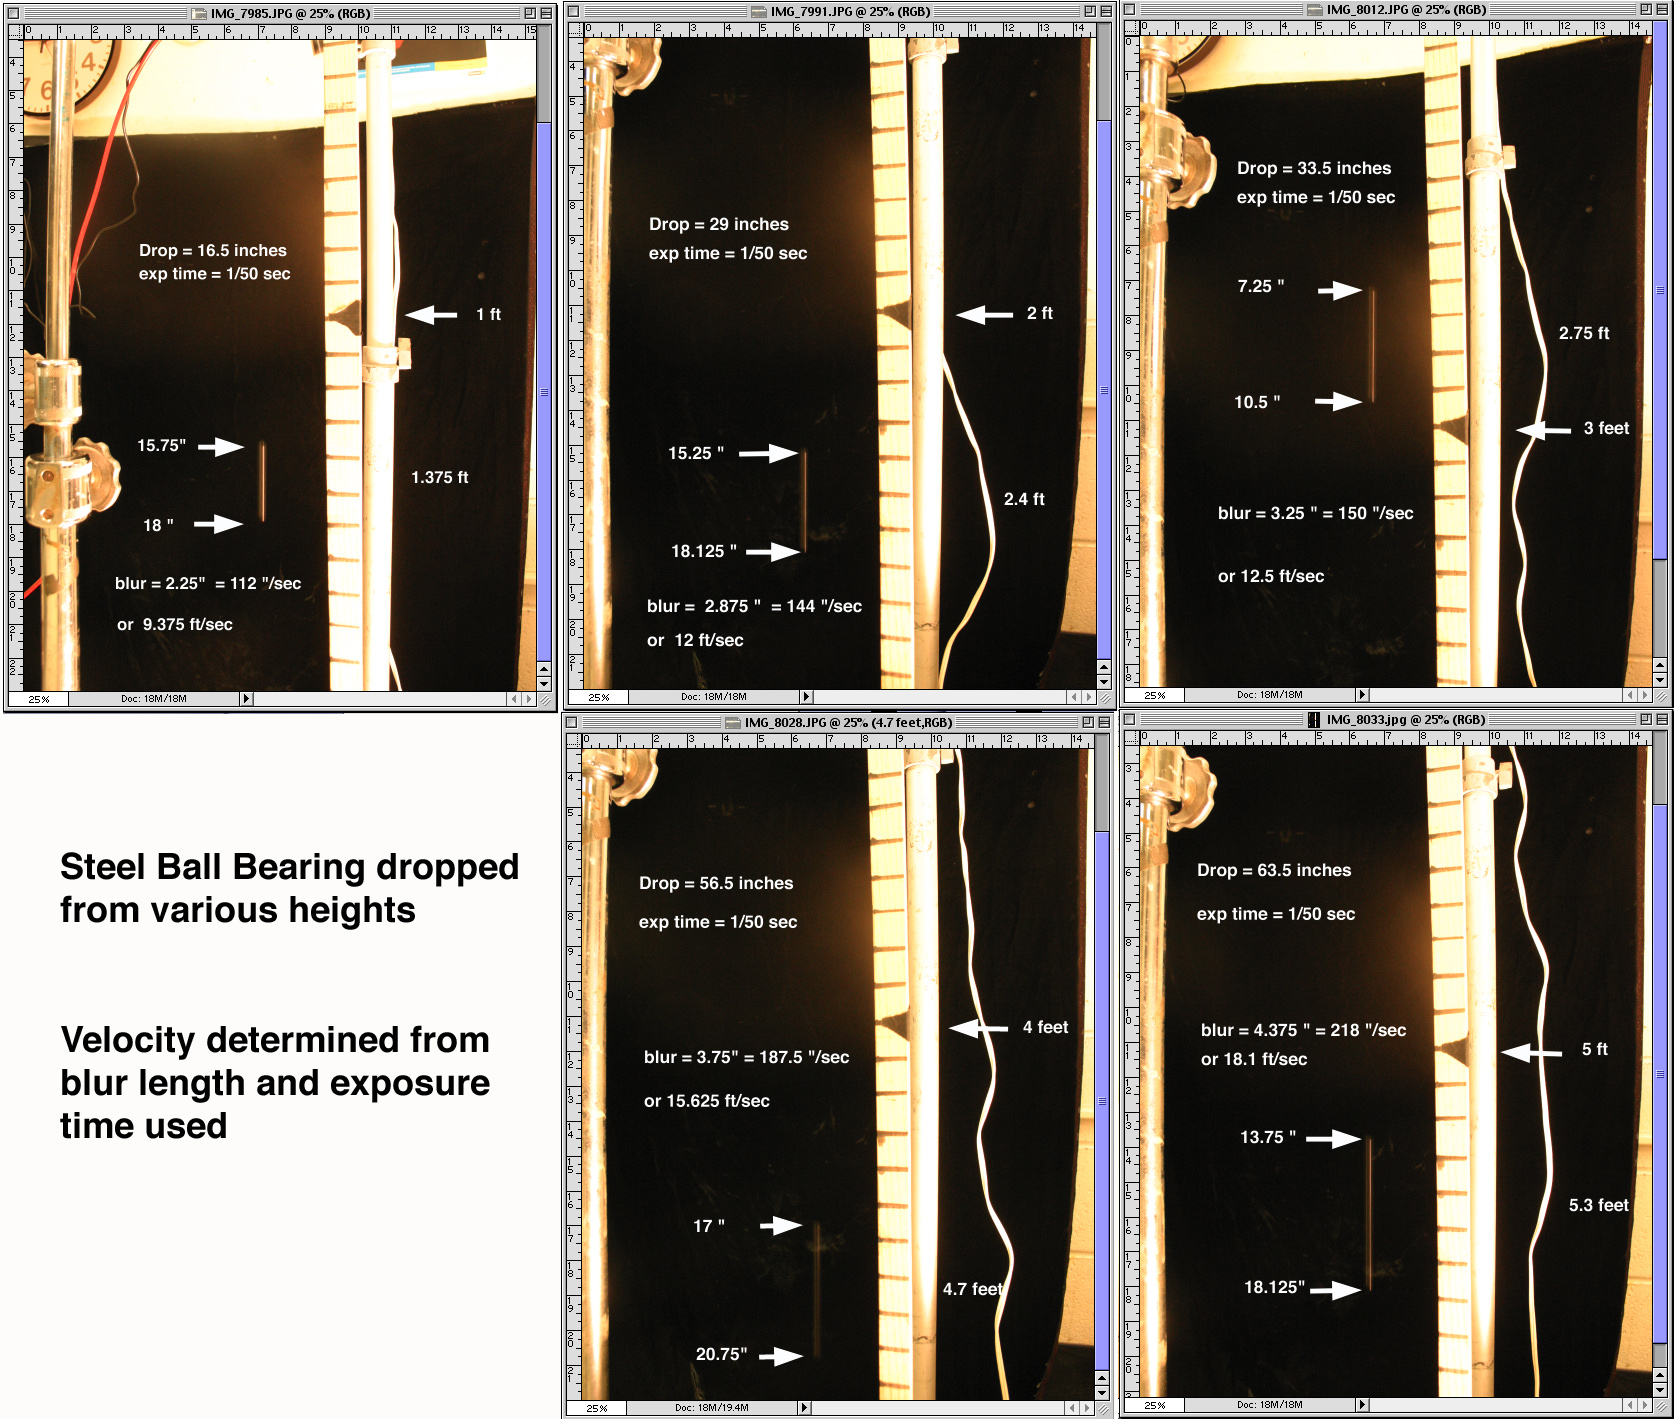
This is accomplished by making a series of photographs with the ball dropped from known distances above a reference mark, determining the length of the recorded blurs (using the yardstick markings) and locating the middle of the recorded blur at a distance from rest where the middle of the blur happens to fall rather than the distance from rest from which the ball was dropped.
The reason for the latter is that it is highly unlikely that the photographs will be made exactly at the time the ball falls leaves its blur where the reference mark is but rather it will be a little higher or lower than the mark. Synchronizing the moment of exposure with the passage of the ball past the mark is very unlikely. But that does not mean that the data derived from the [photograph is useless. It simply needs to be assigned to the real distance at which the ball was rather than the one from which it was dropped above the mark.
This is a set of results from an actual experiment:
When the values determined from the hands-on portion of the project are plotted in the same graphs as were plotted based on Newton’s formulas the graphs look like this:
V = sqrt 2as therefore:
Newton: V at 1 ft 2 ft 3 ft 4 ft 5 ft 6 ft
ft/sec 8 11.36 13.5 16 17.88 19.59
By test: V at 1.375 ft 2.4 2.75 4.7 5.3
ft/sec/sec 9.38 12.39 13.26 17.34 18.41
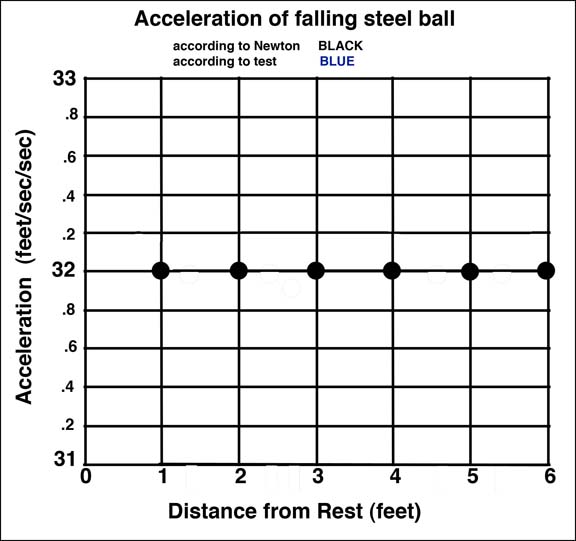
a = V squared divided by 2s therefore
a by Newton: 32 32 32 32 32 32
a by test: 31.99 31.98 31.9 31.98 31.97
And when these values are plotted superimposed on those shown above the result seems to be conclusive!

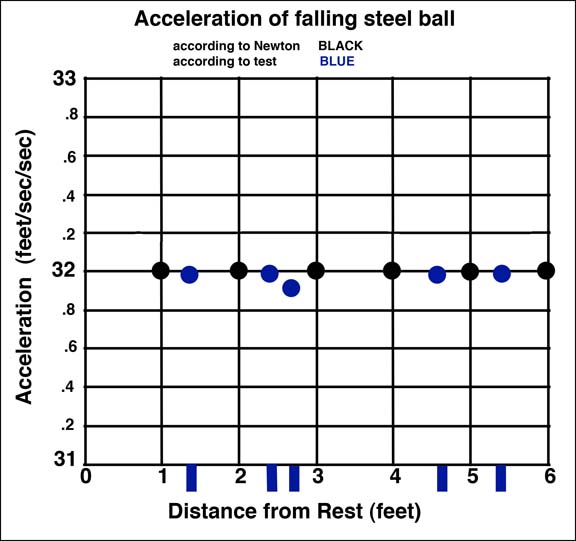
There seems to be pretty good correlation between the measured velocities and the acceleration don’t you think?
And this corroboration was performed with nothing more complicated than a regular digital camera and the realization that blur in a photograph can sometimes be exploited to good use. In short: BLUR IS BEAUTIFUL!
If you have
any questions or comments about this project feel free to
contact me,
Andrew Davidhazy by email at andpph@rit.edu
Andrew Davidhazy by email at andpph@rit.edu