|
Front Projection
a useful compositing special effects technique Andrew Davidhazy Imaging and Photographic Technology School of Photographic Arts and Sciences Rochester Institute of Technology Photographers have devised many different ways to place a subject of choice against some desired and visually interesting and appropriate background without going to the expense of traveling to exotic locations on the world or having at their disposal a large variety of background props. Among the earliest solutions to the problem is the simple expedient of making photographs of various locales of interest. After these are made into prints they are simply placed behind the object of interest and with judicious choice and direction of lighting a photograph of the subject against the print is made. This is often quite possible is the subjects are small or the prints big. Something that is not always the case or possible when the subjects are large. Another approach, in order to work against a larger background is to project the scene of interest onto a translucent rear projection screen. This method was quite widely used in the early motion picture industry especially in situations where the actors were shown driving a vehicle on a street with what appeared to be a great range of driving skills. But the approach works just as well with still photography. Major problems are the requirement for a significant space since the projection apparatus needed space to project and then the subjects (actors maybe) and the camera need space on the opposite side of the screen as well. Further, light from the set can dramatically power the contrast of the scene projected on the screen and the screen itself will generally cause a certain amount of vignetting, or darkening of the image corners, that can be distracting. Yet a more modern innovation is the front projection technique. It is a technique that depends on the availability of screen material that is highly reflective and also directional in its reflectivity. Just such a material was developed (or at least is sold by) the 3M Corporation and it goes by the name of Scotchlite. It is available as paint but also available as a coating on canvas-like material that can be stretched and used as a projection screen. Scotchlite is the same material used in highway signs to make them appear so bright to drivers. The reflection from these signs is several times greater than it would be if the signs were painted simply with white paint. While white paint might reflect back 50 % of the incident rays, Scotchlite reflects back to the source almost 95 % or maybe even more of the incident light. And it does so pretty much back to the source unless the incident angle is great. In the case of a driver the headlamps project out a beam and this beam falls on the sign and the light from there returns back to the car and since the driver is located close to the location of the headlamps sees a very brightly glowing sign. Photographers take advantage of this property of Scotchlite by projecting an image with a desired background onto the screen. If a subject is located between the projector and the screen the subject casts a shadow of itself on the screen. This shadow is, in fact, visible. It is invisible, however, from a particular point of view. This is located on the same exact axis that the projector is sending out the image of the background image. Photographers realized that they could eliminate the presence of the shadow cast by subject onto the screen if they could view along the same axis as the projector was projecting from. This is accomplished by placing a piece of glass (or in the case of commercial front projection units a semi-silvered mirror that lets through 50% of the light and reflects the other 50%). For improvised situations a good piece of thin plate glass works quite well. 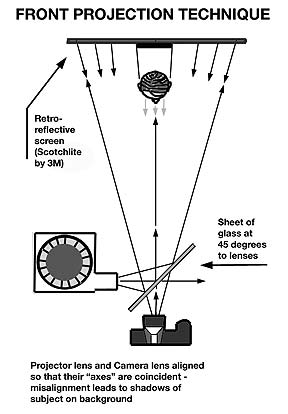 The projector and camera lens are aligned as shown in the illustration. It is important that the camera "shoot" through the beam that the projector makes visible on the angled glass. This is a ready way to align the axes of the two units. The camera lens also, of course, needs to be at the same height as the projector lens. Given that one if careful in lining up everything as shown in the drawing upon viewing through the viewfinder of the camera a brightly lit-up image of the slide inserted in the projector will be visible. A subject placed between the camera lens and screen will appear more-or-less in silhouette. By "throwing" light on the subject one can balance out the brightness of the image on the screen with that of the subject placed in front of the screen. Light that spills on the screen from the lamps illuminating the subject will have generally only a small effect on the contrast of the image on the screen. Avoiding light spilling onto the screen is, however, a good idea. The examples included here were made using a very worn out piece of Scotchlite material and they are intended primarily as a demonstration of what the system is capable rather than being a professional result.
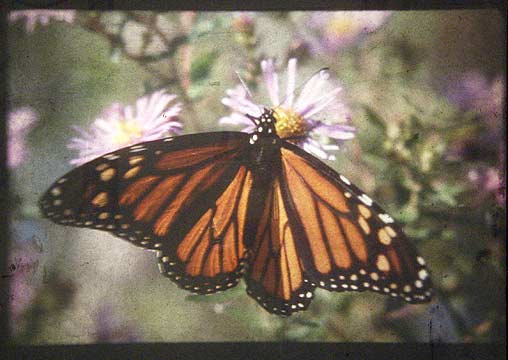
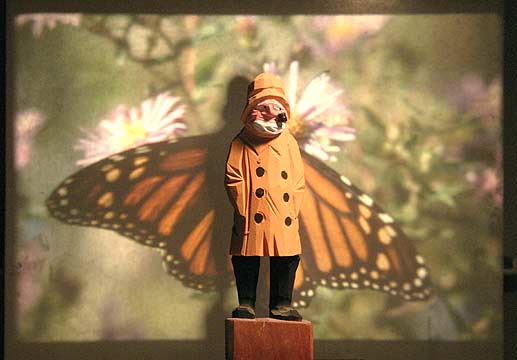
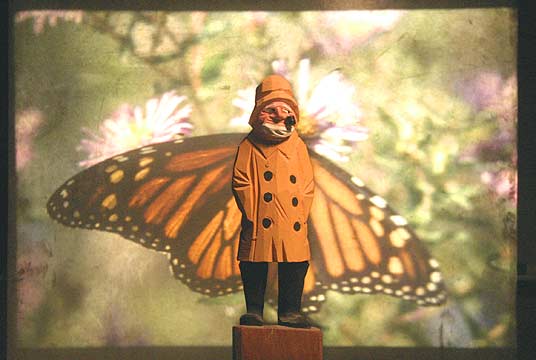
In the first photograph the image for a background is seen as it was projected onto the Scotchlite screen and through the glass angled at about 45 degrees to both the projector's and the camera's lens. It looks pretty much as might be expected! The second photograph indicates that the projector and the camera lens were not "looking" from the same point of view. The camera can "see" around the right side of the subject and it detects the presence of the shadow cast by the figurine. To correct the above "flaw" the camera was moved so that it would be looking through the patch of light that the projector directed at the glass reflector. The glass directs a certain amount of the light from the projector towards the screen and a significant portion it allows to pass through to the right side. A large enough amount is sent on to the screen, however, so that a good, bright, image of the butterfly is visible. Although in addition to making up the background image the light from the projector also, of course, falls on the subject. However, the screen is so much more highly reflective than the subject that it is quite washed out or "drowned" out by the light placed on it directly. The light is reflected back from those areas of the screen not covered up by the subject and they form part of the background image. Because from this particular point of view the shadow is directly behind the figurine the camera cannot detect its presence and the doll appears to be standing in front of the background scene. It might be important to state as this article is wrapped up that effective and believable Special Effects compositing depends on a variety of additional factors. Color quality and direction of the light for example. If the projector uses a tungsten bulb and a flash is used to light the subject then the projector needs to be fitted with a tungsten-to-daylight filter.
And all this without using a computer! Now THAT is something! If you'd like to discuss any part of this technique with me drop me an email to: Andrew Davidhazy, andpph@rit.edu |