|
by Andrew Davidhazy
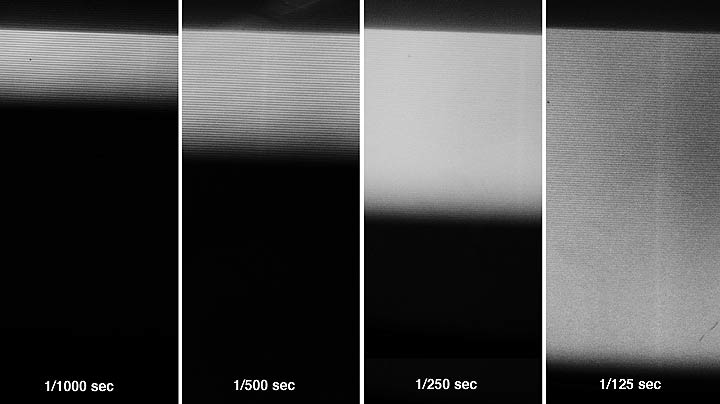
Although the methods for calibrating shutters described by this article have been covered many times in the literature, previous descriptions often stop short of mentioning fine points related to how and why the methods work and that additional information about the behavior of shutters than can be gleaned from these tests. This article deals fundamentally with how shutters can be calibrated by relying on two industries that have established universally accepted standards of timing. These are the audio and the video industries. The tests are based on use of record turntables and television sets as calibration instruments. Calibration of Fast Speeds To test the higher speeds of a camera, from 1/30 to 1/1000 second, a black and white T.V. set, a ruler and a slide projectcr are needed The time base against which the shutter is compared is the industry standard of 15750 horizontal lines scanned on a T.V. picture tube face each second by the cathode ray gun. These 15750 lines make up 30 separate pictures or frames but 60 total scans, called fields, of the tube face. This means that the tube face is made up of 262.5 lines and that each total picture consists of 525 lines, each made up of 2 scans of the tube face each lasting 1/60 second. That is, to present one of the 30 different pictures shown on the T.V. tube each second the gun first scans 262.5 lines on the screen in 1/60 second and then scans another 262.5 lines between the first set of 262.5 lines in another 1/60 second. This is called interlacing. If we take a photograph of a T.V. screen with the set set to a non-picture channel with an exposure time of 1/15750th of a second we would only see one line on the screen. The line could extend from edge to edge on the screen or start halfway along one horizontal line and end halfway along the next lower horizontal line. This depends on the exact time at which the shutter in our camera opened. A consequence of this is that the more lines we see in a picture of the screen the longer the shutter remained open. It is important to remember that the camera should be aligned so that the shutter in the camera moves in a direction perpenticular to the scan direction of the TV set. Generally this will be a horizontal direction and so FP shutters that in the camera move vertically need to be turned 90 degrees from the horizontal. If you use a leaf-shutter or a shutter built into most digital cameras then you don't need to worry about the orientation of the camera. It is interesting to note that you only need to take a reflected exposure reading off the face of the TV set at 1/60 of a second and use the f number required for this speed for all your speeds. Since the lines will probably be very small and undistingushable in a contact print or on the negative you can mount the negatives in a slide mount and use a slide projector to blow up your negatives to a convenient-for counting size!
The exposure time is given by number of lines counted divided by 15750. This test is usable all the way to 1/125 easily. However, it can be extended to longer speeds as well if one is willing to asume that no truly major error in speed is present. At 1/60 second there may be a slight offset or overlap between the first and second interlaced scan patterns. If there is a clearer or less dense space, count the number of lines missing and subtract from 262 to determine total lines; if there is a region of overexposure or a dark band, count the extra lines in the dark area and add to 262. This eliminates concern over lines which may be out of the picture. A similar situation exists at 1/30 of a second. If there is a clear area here youll notice it has the same density as the predominantly grey area of the 1/60 second speed while the overall density will be similar to that of the dark area in the 1/60 second shot if your 1/60 of a second was a bit on the long side. If there is a band of lighter density between the overall density areas subtract the number of lines in this band from 525 and if there is an even darker band apparent, add the number of lines in this band to 525. Thus, the largest number of lines youll need to count will be about 126 for the 1/125 second speed. While this test works best with F.P. shutters, leaf shutters can also be tested but the number of lines will be harder to count because of indistinct areas at top and bottom of the scan pattern. You will note that the FP shutter test will result in a diagonal "band" of lines. This pattern is called a "raster" pattern. If the band of lines does not have a slanting or diagonal shape across the image area then the shutter speed determination you make will be subject to the direction in which the shutter slit and the TV scan direction interrelated to each other. Ifd the slit travels with the scan direction your expsoure time determinations will be a bit too long and the opposite is the case if the slit and scan direction are in opposite directions. Although the error is small it is not unnoticeable! Further, if you are testing a F.P. shutter, you can also determine the exposure time and approximate slit width at various locations across your frame. And if you are really eneterprising you can also determine shutter curtain velocity and acceleration. In any camera equipped with a Focal Plane shutter it is of paramount importance that exposure should be even from one side of the frame to the other. To determine the degree of exposure time unevenness across the frame just count scan lines on the far left and right of your frame by making sure that the T.V. screen completely fills the field of view of your camera at the time you make the photograph of the screen. Also, make sure that a vertical F.P. shutter camera is turned on its side to take the T.V screen pictures with or the test will be slightly off.
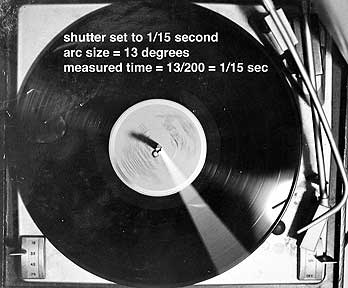
Above you can see the effect of a digital camera operating at a variety of speeds and the results obtained. Calibration of Slow Speeds To test the slower speeds of a camera, from 1 second to about 1/125 second, a turntable running at 33-1/3 RPM or 200 degrees/second, a protractor and a slide projector are needed. If you have a 78 RPM turntable your accuracy will increase by over 100% at the shorter speeds. Place the camera on a tripod and photograph the turntable placed on the floor from a vertical angle. On the edge of the record tape a narrow (about 1/8- to 1/4-inch) piece of white tape. On the edge of a 12-inch disc the 1/8-inch tape moving at 33-1/3 RPM will be giving an exposure time of about 1/100 second while the 1/4-inch tape will be twice that. At 78 RPM these figures will be cut in half. Because the white mark on the record does not remain in the same place for the duration of an exposure some adjustment needs to be made into the choice of aperture when conducting this test. If you assume that the exposure time is equal to the time that the white mark covers a given area on the film, then the exposure time for which you will determine the aperture will be 1/100 second (or 1/125). On the other hand, if you decide that the scene in general must always be correctly exposed then you will adjust the f/number as you change from 1 second to the 1/125 second exposures. At 1 second you will notice that you generally will need a very small aperture to properly expose the scene. This will result in tremendous underexposure of the moving white mark which is exposing any given area for only 1/125 second or so. An appropriate compromise is to choose a middle-ground exposure time. Something between 1/125 and 1 second and leave the aperture fixed in spite of the fact you will be changing the exposure time. It is suggested here that 1/15 second is a suitable compromise exposure time and it is this time for which you should determine the related aperture given the lighting available and with the film youll be using.
To determine exposure times, first blow up and measure the arc covered by the white tape on the stationary mode. Then subtract this number from the number of degrees the white mark covered at the various exposure times and divide the figure by 200 if your turntable was a 33-1/3 or 468 if it was a 78 RPM one. The graphic below present graphical and photographic examples of what these tests look like on film and how the shutter speed or exposure time can be determined. And, with Focal Plane shutters, how evenness of exposure time and slit width as well as velocity can additionally be determined.
Going Further Correlate the 1/30, 1/60 and 1/125 speeds with the tests done with the T.V. set. As stated above, at these speeds in particular some error will be introduced if youre testing a F.P. shutter and the white mark was moving with or against the shutter movement while the exposure was made. For further introductory material on these methods consult the popular literature. The February and March issues of 1988 Popular Photography carried basic articles related to these tests. The description of how to use a F.P. shutter equipped camera as a 1000 picture
per second high speed camera is available online as another article that deals with
focal plane shutters. Find it at:
text-high-speed-slr.html
If you have any questions or comments about this article feel free to write to me at:
andpph@rit.edu
|