Photo flash PC synchronization socket
There comes a time in just about every circuit experimenters life that it becomes desirable to connect some device and cause an electronic flash to fire. Such was my case on several occasions. I solved the problem by buying commercially available PC connector to PC connector (male to female ends) at prices I really did not want to pay and with means for connecting to a device that never looked very professional. Essentially consisting of a black lead sticking out of the circuit box. I decided one day to look into the possibility of making my own PC female connector. The PC socket that is built into most cameras that allow them to fire a non dedicated or non-camera brand off-the-camera hand-held flash , I made some measurements of a PC connector and found that the outside diameter of the female connector was 3 mm and the outer diameter of the male connector was a shade less than 4 mm. Within the diameter of the female connector there is a connector that connects with an inner pin on the male one. I decided it was a matter of finding tubing of appropriate sizes to try make my own PC socket. Visiting a hobby store I bought two lengths of bronze tubing. One was 1/16 inch diameter and the other 1/8 inch outside diameter. The thinner tube easily fitted within the inner diameter of the larger one and the hole in it was large enough to accommodate the pin built into the centers of the male PC connectors. The 1/8 inch tube is, however, too large to accept the PC male connector and it has to be reduced by some means to 3 mm in outside diameter which is what the PC plugs are designed to fit over. After removing a very thin layer of bronze from the larger tube I wrapped the smaller one with some tape (I used clear packaging tape but any flexible tape should work) until it was still able to be press fitted snugly into the opening in the larger tube. During this process of mating the two I periodically checked to make sure that there was no contact made between the walls of the two tubes by checking resistance with an Ohm meter. 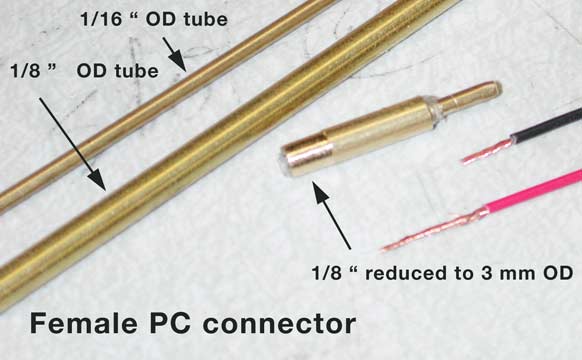
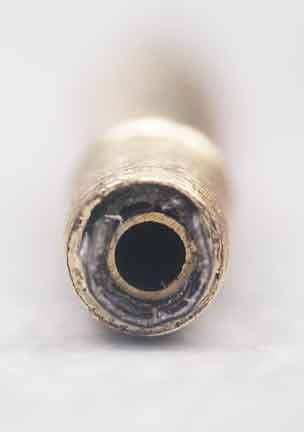 On the left are the parts prepared for final assembly and on the right a frontal view of the manner in which the smaller diameter tube fits into the larger one with insulating material between them. Beyond this step the next one is to make the socket attachable to some project box or container through the wall of the box. Much like if it were attached to a camera's body. For this the device shown above needs to be encased in something that is already designed to be a "through connection" and this was provided by the mini phone connection jack that the 1/8 inch plug fits into. 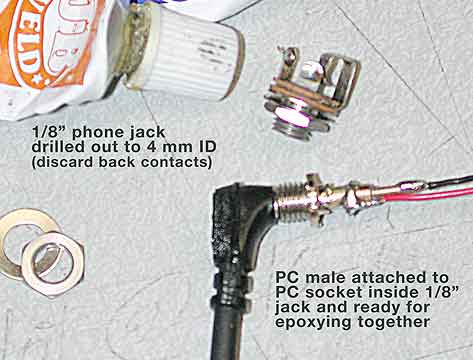 But
the
1/8 inch hole in the jack is too small to accept the outside diameter
of the male PC so an adjustment in the inner diameter of the 1/8 inch
phone plug needs to be made. I used a 4 mm diameter drill bit to
slightly enlarge the hole in the mini phone plug. I also removed all
the unnecessary contacts that are a part of such jacks leaving just the
short, bare, tube and its thread intact. The threaded top could be
attached through a project box hole and fastened with the original nut
that came with the mini phone jack. But
the
1/8 inch hole in the jack is too small to accept the outside diameter
of the male PC so an adjustment in the inner diameter of the 1/8 inch
phone plug needs to be made. I used a 4 mm diameter drill bit to
slightly enlarge the hole in the mini phone plug. I also removed all
the unnecessary contacts that are a part of such jacks leaving just the
short, bare, tube and its thread intact. The threaded top could be
attached through a project box hole and fastened with the original nut
that came with the mini phone jack.At this point the PC connector could be slipped up into the hole within the jack. To ensure that the subsequent fastening of the PC connector to the jack would be completed without problems at PC male connector was attached to the PC socket before final assembly ensuring that it would be possible to do so again later once the all the parts were fixed in place with 2 part epoxy cement. JB Weld epoxy is what I used. 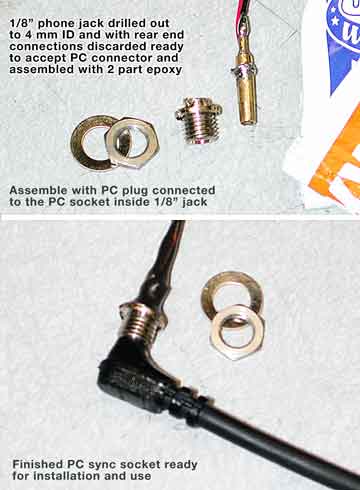 ONE MORE THING: I noticed that the center pin of the PC connector
sometimes did not make good contact with the inner tube of the
PC socket. To alleviate this "problem" I took a few strands of copper
wire from a stranded wirre and inserted into the inner tube of the
improvised PC socket. These were jammed into the tube the first time the
PC connector was
inserted and the connection now reliably fires a flash when required.
ONE MORE THING: I noticed that the center pin of the PC connector
sometimes did not make good contact with the inner tube of the
PC socket. To alleviate this "problem" I took a few strands of copper
wire from a stranded wirre and inserted into the inner tube of the
improvised PC socket. These were jammed into the tube the first time the
PC connector was
inserted and the connection now reliably fires a flash when required.
Finally there is the finished PC connector that can now be securely attached to any project box with the available nut for the 1/8 inch phone mini plug. The total time to build one of these was about an hour and the cost was maybe $1 using a surplus mini phone jack and a small portion of the bronze tubing for its construction. I think I will make a bunch of them next time so that it I ever need one of them again I will have a ready stash available. If not I now know that it is possible to make a connector instead of buying one. If you found any of this of
interest feel free to contact me at my address supplied below.
|