|
Adding multiple exposure capability to
non-capable DSLR
Andrew Davidhazy Imaging and Photo Technology School of Photo Arts and Sciences / RIT One of the "features" of most film-type cameras was their ability to make multiple exposures on a single frame of film. This opened up not only creative possibilities but also technical ones where more than one image of an event needed to be recorded in relationship to a previous image. Photographers deal with this situation in a variety of way. Some of these have their digital equivalents. The making of several photographs and their subsequent assembly by superimposing the negatives and printing the stack resulted in a final product that met the desired criterion albeit introducing artifacts associated with the stacking of densities contributed by each negative of the stack. Another method consisted of sequentially printing a series of negatives onto a single sheet of photographic paper. This also had its drawbacks but under certain conditions yielded useful results. Multiple exposures on a single frame while holding the shutter open and flashing a flash several times with the subject in different locations is yet another approach. There were several other possibilities and many can be essentially duplicated in the digital realm. However, true multiple exposure capability is currently not yet available on many digital single lens reflex cameras and while the above possibilities can be explored with analog as well as digital cameras the suggestion here is that multiple exposures can be relatively easily accomplished by the expedient of adding a surplus or obsolete self-cocking leaf shutter to the front of the DSLR (or film!) camera's lens. 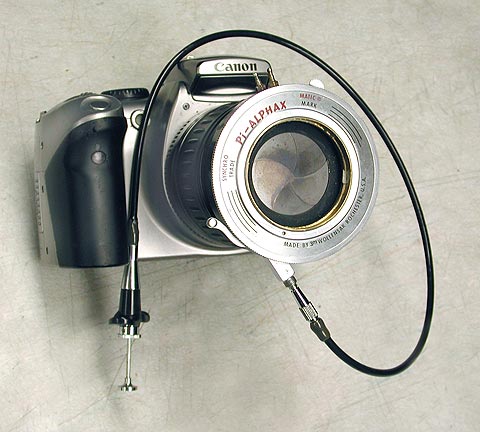 The
major problem is that of finding a
shutter like the one shown in the illustration. It dates back to
probably the 1950s or possibly even earlier although such shutters were
made into the 1980's certainly and may still be made. For the purpose
of
this discussion however it will be assumed that you have located such a
shutter. It should have as large an opening as possible. 25 mm is a
fairly common diameter for these shutters that were at one time
available
on oscilloscope recording cameras and also on some models of Polaroid
MP copy stands. The shutter need no winding-up. It operates each time
the cable release or shutter lever is depressed. The
major problem is that of finding a
shutter like the one shown in the illustration. It dates back to
probably the 1950s or possibly even earlier although such shutters were
made into the 1980's certainly and may still be made. For the purpose
of
this discussion however it will be assumed that you have located such a
shutter. It should have as large an opening as possible. 25 mm is a
fairly common diameter for these shutters that were at one time
available
on oscilloscope recording cameras and also on some models of Polaroid
MP copy stands. The shutter need no winding-up. It operates each time
the cable release or shutter lever is depressed. 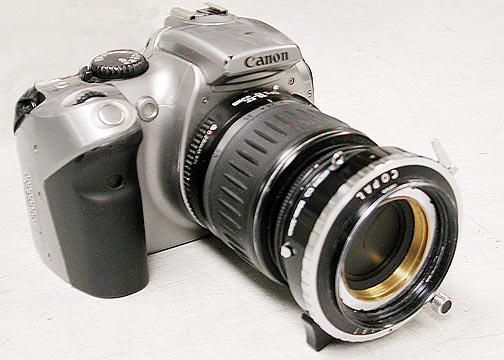 Other leaf shutters, such as more readily available Copal (shown here) or Seikosha or Prontor and Compur shutters will also work but since most of them require re-cocking of the shutter mechanism they are a bit harder to use for multi exposures. On the other hand they usually have PC flash sync connectors buil-in allowing you to use them at the shortest exposure times with full-flash sync capability. They are also more plentiful these days! To start the adaptation process first of all you will remove the optical elements that may be attached to the front and back of the shutter mechanism. Then, to adapt one of these shutters to the lens I simply glued a step-up ring to the back of the shutter using a a 2-part epoxy based adhesive such as JB Weld. 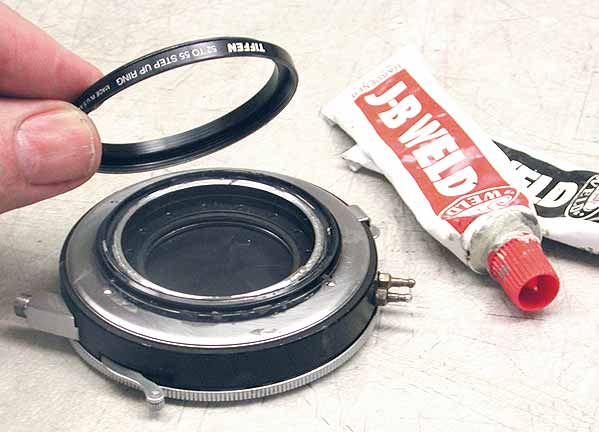 I could also have used a "surplus" filter with the glass removed. The
step up ring allows the attachment of the shutter
by threading directly into the filter threads of the lens I would use
the shutter on. It is best if such a lens is of the non-rotating type
when you are focusing it but even the simpler rotating element to focus
lenses can be used if some care is taken to not disrupt the focus
setting
while using the shutter. This is easiest with the self-cocking shutter
of course.
I could also have used a "surplus" filter with the glass removed. The
step up ring allows the attachment of the shutter
by threading directly into the filter threads of the lens I would use
the shutter on. It is best if such a lens is of the non-rotating type
when you are focusing it but even the simpler rotating element to focus
lenses can be used if some care is taken to not disrupt the focus
setting
while using the shutter. This is easiest with the self-cocking shutter
of course.Once the shutter is attached to the lens it becomes obvious that the view through the camera's viewing system is disabled and to focus, etc. one needs to set the shutter to B or T and then close it again prior to photography. An alternative is to use a separate optical viewfinder that one can improvise and attach to the hot shoe of the camera. Once the scene to be photographer is arranged in front of the camera and multiexposure photography is about to begin, the DSLR's shutter speed is set to about the time it will take the subject to perform its action over the number of multiple exposures one desires to record onto a "frame". This might be 10 seconds or more. With today's DSLRs this is usually not a major problem. On the other hand, the leaf shutter is set to some appropriate time to minimize blur due to subject motion. This might be a 1/25 to 1/100 second. The shutter might even have flash sync capability and flash might be used to capture the image of the subject rather than using tungsten illumination. Now the subject is placed in its initial position and the DSLR shutter is opened. Since the leaf shutter is closed nothing gets recorded bu the sensor in the DSLR. The leaf shutter is "fired" and the first image of the subject recorded. The subject then continues in its motion to a subsequent location and at some point the leaf shutter is fired again. If the subject was in motion then the leaf shutter exposure time must be short enough to minimize blur but it is also possible to stop the subject in its tracks and make an exposure with the subject still. Then the subject moves to another location and the leaf shutter again fired and a third image is superimposed on the previous two. And so on until the DSLR's shutter closes terminating the making of the sequence. 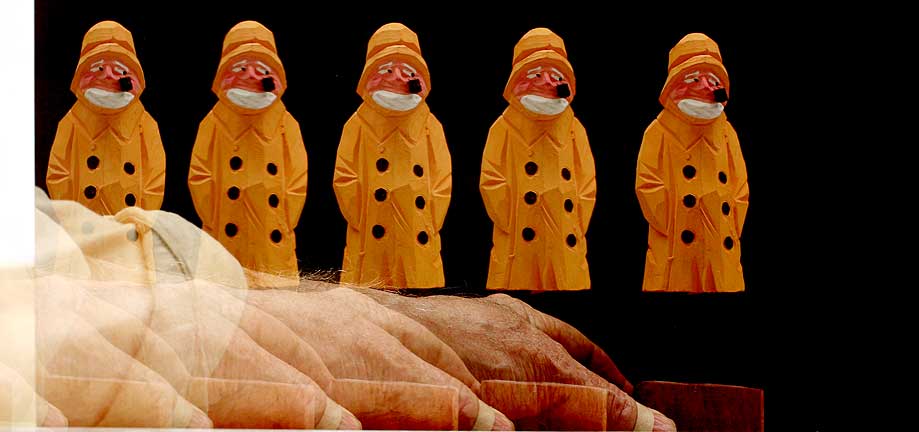 In
this first example a wooden figurine is moved from left to right and
five exposures were made as it was dragged across the filed of view of
the camera. The reason for the slight changes in density or brightness
of the separate images is due to the fact that the background was not
totally black and the cumulative exposures on the left side of the
frame caused the overall exposure there to be a little more than where
the background was darker as on the right. In
this first example a wooden figurine is moved from left to right and
five exposures were made as it was dragged across the filed of view of
the camera. The reason for the slight changes in density or brightness
of the separate images is due to the fact that the background was not
totally black and the cumulative exposures on the left side of the
frame caused the overall exposure there to be a little more than where
the background was darker as on the right.This second example of multi-exposure is of the simple motion of a hand, showing the extension possible by the person lifting their hand from the top of a surface upwards while keeping the wrist planted firmly on the surface. illustration yet to be made! Could some of this be accomplished with digital "manipulation" of a set of separate photogrpahs of the action. The answer is yes. But there is a certain "elegance" in securing the sequence in-camera at the time the action takes place instead of during what might be called "post-production". Are there any "hidden" problems associated with placing one of these shutters in front of you camera's lens? Well, yes. Bleeding" of the background through the individual multiple imags is one of them. This can be controlled by making the background as dark and light absorbing as possible and keeping any light off it. A second problem that may manifest itself is that the leaf shutter opening may cause vignetting of the image and this would manifest itself as a darkening of the corners of the photographs. This will probably only become apparent when you use wide angle lenses or zoom lenses at their shorter focal lengths. So don't use them at those focal lengths! Or exploit visually the resulting effect! Hopefully the examples included in this brief article will give you some ideas for multiple exposure applications that have been difficult to achieve with digital (and maybe even film) cameras. The field of multi-exposure photography is there to be exploited by creative and inventive photographers. If you
found any of this of interest feel free to drop me an email at
Andrew
Davidhazy, andpph@rit.edu
|